Author Topic: Dave's 1971 1302 Not-So-Secret, Secret Project Build  (Read 164313 times)

0 Members and 1 Guest are viewing this topic.

Offline owdlvr

  • Dave Hord
  • *
  • Posts: 1422
  • Karma: 10
    • Classic Car Adventures
Re: Dave's 1971 1302 Not-So-Secret, Secret Project Build
« Reply #360 on: December 13, 2017, 12:17:58 PM »
After a couple of nights away from the car, and a BMW M3 track day, I decided I didn’t like where the pedals were going to be mounted in the Rally Bug. I need to find a way to be push them further forward. Things got technical in the shop tonight. Had to print off a full-scale representation of the Tilton 600-series under-foot pedal set...to see how much more space $800 will buy me.


The underfoot mounting of the master cylinders allows the pedals to be pushed significantly further forward. The trade-off, however, is in width at the firewall. The 600-series underfoot mounting cannot be done in a beetle without significant changes to the heater channel. Since I’m not willing to pull the body off the pan this winter, I decided to save the $800 and make what I have work. The next car I build will get the 600-series set.

I debated cutting away the sheet metal painted in yellow, to gain another 1/4-1/2” of movement…and then figured 'what the heck?’. Removing the yellow got me some additional space, and then I removed quite a bit more. After the cutting I was able to move the pedal set forward almost 1.5" from where it was earlier tonight, giving me enough space to be comfortable. The green tape line shows where the 600-series gas pedal would be, which is about 1" further forward on the car. Pretty much inline with where the stock gas pedal would be.


With the pedal spot basically figured it out, it was time to make a plate for the top side, weld on a steel plate on the bottom side, and drill the mounting holes. With the pedals now sitting at the proper level, I had to figure out how to make the accelerator cable work. The setup of the accelerator cable took three different versions before I came up with something that I’m happy with. Presuming you want to use the stock cable, in the stock tube, you have to find a way to make the system pull relatively horizontally, instead of pivoting and pulling down. Next, you have to sort out the pedal ratio, so it’s pulling enough cable through the travel of the gas pedal. You have to ensure that your setup pulls enough cable that you get full throttle…and finally, the whole setup needs to be adjustable enough that once you setup the brakes and have them bled, you can adjust where the gas pedal sits for best heel-toe use…and then adjust the pull, ratio, etc all over again. It looks a bit hokey, but I think this third edition meets all the requirements.


I moved the brake light switches to the inside of the car, and after this photo tweaked the brackets so that they sit in a cosmetically-acceptable manner.


The project was paused for dinner, while I worked out how I was going to do a grommet to pass the front brake line forward through the firewall. I can’t use the factory grommet spot, due to the pedals interfering, and I forgot to weld up the stock brake master holes. A wiring firewall grommet was my original plan, but it didn’t fit the brake master hole that well. So, off to the milling machine with the factory brake master!


Pedals in, lines plumbed, brake light switches sorted, and the dead pedal has been modified for best fit.


My summit racing order arrived, and I built a bracket to house the brake bias adjustment knob. If I was using the car primarily on the track, I would have mounted the knob in a spot where I could reach it while harnessed into the car. But, with it’s use on multiple surfaces, I’m far more likely to adjust the knob for tarmac, gravel, snow and ice, and leave it after some minor changes. I’ll need to loosen the harness slightly to reach it in this position, but the cockpit of the car is pretty damned busy and this was the best choice.


My steering-wheel spacer also came in, but it had a weird lip on it that interferes with my quick-release. I don’t use my mill that often, but when I do use it…it’s the best thing ever. Something doesn’t fit, and ten minutes later it fits perfectly.


I will still need to move the shifter back by about 2”, and perhaps water jet a new handle for the hydraulic handbrake…but when those are completed, I think I’m done the changes to the cockpit.

-Dave
--
'71 Type 1 - Rally Car Project
'75 Type 1 - Heirloom
'95 F150 - Unfortunate daily driver...

Offline owdlvr

  • Dave Hord
  • *
  • Posts: 1422
  • Karma: 10
    • Classic Car Adventures
Re: Dave's 1971 1302 Not-So-Secret, Secret Project Build
« Reply #361 on: December 13, 2017, 12:18:22 PM »
I will definitely report on them once I've got the car on the ground and running again.

Next up on my agenda is getting the brakes back on, which means first addressing the suspension that's sitting on the floor. It's high time I got around to fitting the Silver Project upper camber plates, as they've been collecting dust on a shelf since before my move. For those of you who aren't aware, these are direct fit for 73+ super beetles, but require some adjustments for 71 and 72 super beetles. The adjustment is to simply open up the large strut tower holes slightly on the body. The strut towers are made from two stamped pieces of metal welded together, and in my case it was just a matter of cleaning out where one layer was slightly skewed from the other. About 2min work with a die grinder on either side, and then some primer and paint for the, now, exposed edge.


Hmmm...it would seem the bump stops in my winter setup are toast :P


The local performance parts shop, Lordco, had some Energy suspension bump stops I figured I could make work. Problem though, they don't fit the upper washers too well...


Nothing a flap disc on an angle grinder can't solve! I forgot to take a photo of all the urethane coating the white wall of the shop...that's going to be fun to clean off.


After reassembling everything I realized that without the factory bump stops and cover, I was leaving the upper strut seal exposed to the elements. On my winter setup, and plans to hit Thunderbird Rally in February, and maybe some ice racing, this isn't an ideal thing to have! Off to Lordco again, to see what else I can find in the performance department...


"But Dave," I can hear you saying, "that is an off-road truck shock boot."  Ah yes, it would appear that way. But funny enough, if you cut the top six ribs off it, it becomes a VW Part!


...alas, we end there as I head off to Big White Rally in Kelwona.

-Dave
--
'71 Type 1 - Rally Car Project
'75 Type 1 - Heirloom
'95 F150 - Unfortunate daily driver...

Offline Parts

  • Full Member
  • Posts: 72
  • Karma: 0
  • AirSpeed Forum Member
Re: Dave's 1971 1302 Not-So-Secret, Secret Project Build
« Reply #362 on: December 15, 2017, 02:56:07 PM »
I was just over on The Samba, and there's a thread about a guy looking for help ordering stuff from Flat4 in Japan. Another dude says he can help 'cause he lives there, and posted pics of the Flat4 magazine.

https://www.thesamba.com/vw/forum/viewtopic.php?p=8638182#8638182

Very cool.

Offline owdlvr

  • Dave Hord
  • *
  • Posts: 1422
  • Karma: 10
    • Classic Car Adventures
Re: Dave's 1971 1302 Not-So-Secret, Secret Project Build
« Reply #363 on: December 15, 2017, 05:17:56 PM »
haha, awesome!
--
'71 Type 1 - Rally Car Project
'75 Type 1 - Heirloom
'95 F150 - Unfortunate daily driver...

Offline s3racing

  • Full Member
  • Posts: 538
  • Karma: 15
    • http://www.walti-sanitaer.ch
Re: Dave's 1971 1302 Not-So-Secret, Secret Project Build
« Reply #364 on: December 17, 2017, 10:32:58 AM »
Your pedal set up looks cool. Dave

FANCY stuff happening on your car!1

Offline owdlvr

  • Dave Hord
  • *
  • Posts: 1422
  • Karma: 10
    • Classic Car Adventures
Re: Dave's 1971 1302 Not-So-Secret, Secret Project Build
« Reply #365 on: March 18, 2018, 11:32:23 PM »
Well, a contract in January turned into another contract in February, and that turned into an event in March...and just like that, I'm almost three months down on car time :P

On the plus side, thanks to these contracts I've driven some absolutely incredible roads and crossed things off my bucket list. I've driven through Pennsylvania, Maryland, Virgina, North Carolina, South Carolina, Georgia, Florida, Alabama, Tennessee, Kentucky, Ohio and Michigan.

I've visited Barber Motorsports Park (including laps of the track, tour of the museum and a special tour of the museum workshop), BMW club of America's museum, The Lane Museum, Rick Hendrick's private collection, The Corvette Museum, The Amelia Island Concours and the Kennedy Space Centre.

I've been lucky to tour some pretty incredible automotive shops as well. The Creative Workshop in Florida was unbelievable. Wood floors, a hidden dyno, and cars you only dream of. Detroit speed builds some incredible muscle cars of the SEMA-type...but the sneak peak at this year's SEMA cars was pretty exciting. White Post Auto Restorations might be the oldest restoration shop in the USA and four generations have owned/worked/run the place. Duncan Imports is a car-guys dream where the warehouses of cars just goes on, and on, and on. How about a beetle with less than 30 miles on it? How about four of them...from three different decades. Unreal.
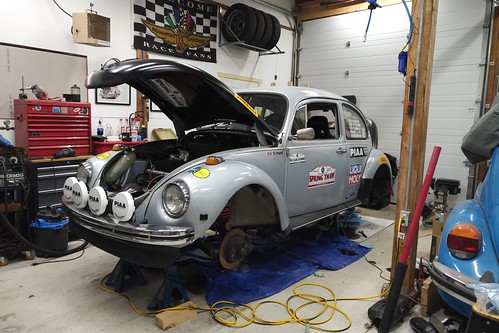

But alas, it means the poor Rally Bug has just sat without me. Having finally returned home, I've been crunching away on it as much as possible. Photos are limited, as I'm trying to get the work done vs. document it.
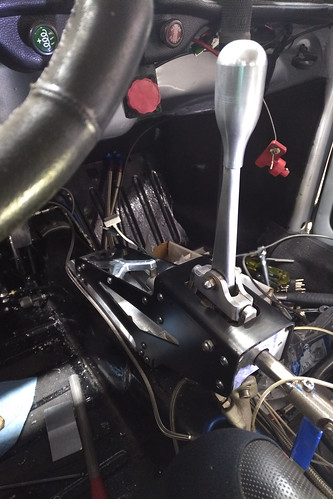

Moving the shifter back 2" resulted in some interesting issues. First off, the mount on the transmission tunnel suddenly had a tonne of flex in it. Previously each of the mounting bolts (three of them) were "boxed in", but the move back results in flex I definitely didn't anticipate. Fortunately the addition of two extra bolts, and a 2" gusset welded between mount and trans tunnel resulted in a flex-free install. The carbon shift rod I built needed to be shortened, which was a bit of a pain since I had to rescue the aluminum end I had bonded in originally. Without my buddies lathe, there was no way to whip up a new one. Managed to shorten the rod without shattering it...and then got to do it all over again as I cut it a 1/4" too long!
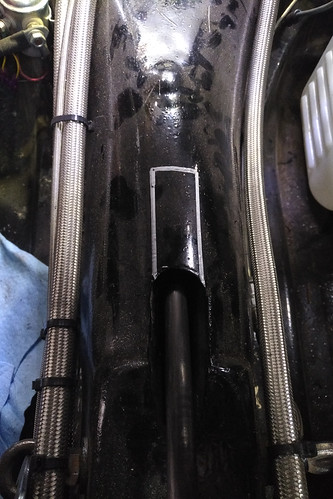

With everything installed in place, I discovered a new problem…the shift rod angle is just steep enough that it was hitting something in the tunnel. I ended up cutting out a little more than I wanted, but worked out it was the throttle cable tube (figures, the only one I CAN’T cut out). Ended up having to cut the tube so I could move it, and then weld in a section to keep it inline so the cable won’t get cut.
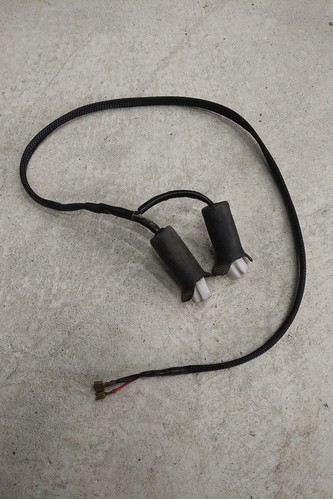

Extended the brake light harness, since the switches are now inside the cabin, in front of the shifter.
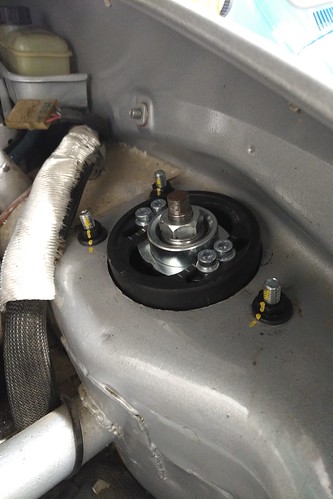

Suspension has been re-installed, with all new bushings…simply because I was in there.


Hmmm…it would seem this box was not the correct set of wheel studs. Where the heck are my 25mm studs!?!
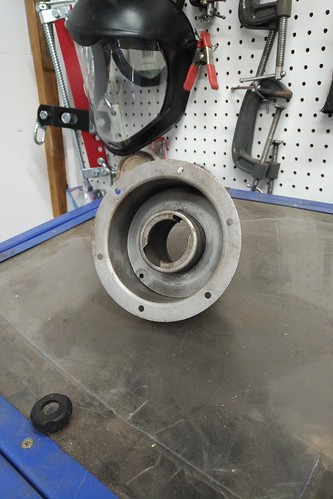
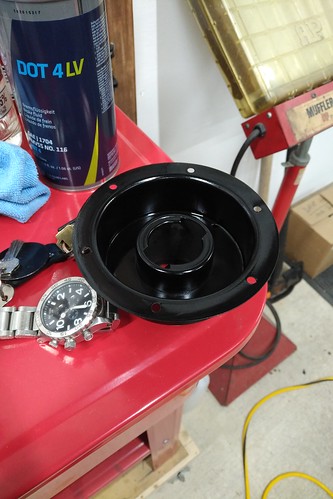
And taking care of some details…trying to freshen it up a little.
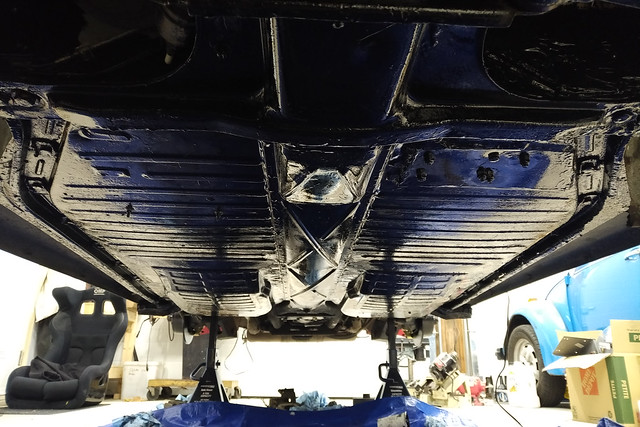

Fresh coat of black on the bottom of the chassis. I hate this job, but rather then patch some sections that needed it, I cleaned the whole chassis and painted it from front to back.
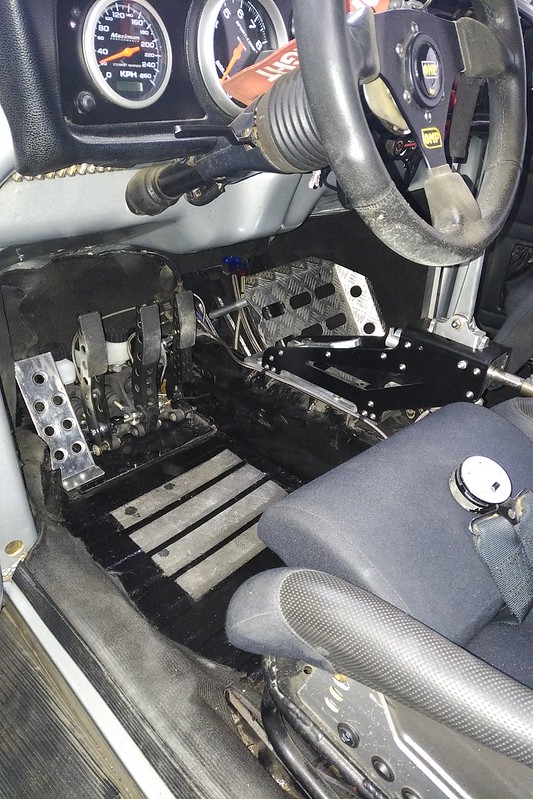

Under-dash area is now ready to go, and looking the business.

No photos, but I fired it up after it's winter break and started tuning the cold-idle a little bit on the fuel injection. There's still no fluid in the brake or clutch system, so I couldn't take it out for a real warm-up.

Found a couple of stripped out bolts in the front transmission mount while doing a nut-and-bolt check on the car. Drilled, helicoiled and new bolts installed. We'll see how that goes. It may explain why I've broken one of the kafer bar mounts twice previously, and again before the winter. Welded and reinforced that bracket, so we'll see what breaks next :P

Dealt with some wiring in the front end, and then looked over at the seat you can see in the floorpan photo above. I had a pair of those OMP seats with the headrest in the car for the Retro-Cars shoot many years ago, and the Cobra Imola 2 seat I'm using is looking quite worn. So, after perfecting the driving position after the pedal install, I of course decided to swap the seat out. Sigh. Fortunately I was able to get the seat in a position that I think will work well. Getting in and out of the car with the headrest is going to be annoying, so I doubt this seat will last long!

Retorqued the heads, and checked the valve train. I have some oil leaks which appear to be coming from the headstuds(?), but didn't show up when I started the car and idled it for 20min (after retorquing the heads). I have a sneaking suspicion the engine is coming out after the road test to find the leak :P

Tomorrow I should get my Motive brake bleeder back, and I can get the car back down on it's wheels. Need to do a front end alignment, and then I should be able to road test it.

-Dave
--
'71 Type 1 - Rally Car Project
'75 Type 1 - Heirloom
'95 F150 - Unfortunate daily driver...

Offline owdlvr

  • Dave Hord
  • *
  • Posts: 1422
  • Karma: 10
    • Classic Car Adventures
Re: Dave's 1971 1302 Not-So-Secret, Secret Project Build
« Reply #366 on: March 26, 2018, 01:06:53 PM »


Top Tip! Before bleeding the clutch and brakes, confirm you actually installed everything tight and correctly...not just for test fitting. If you don't, you'll be figuring out how to pull the clutch pedal with it full of fluid so you can tighten the master cylinder to the mount. Oops.

After bleeding the brakes, I came to the conclusion that I also didn't consider that by doubling the rear brake pistons, I would need a larger handbrake master cylinder. Oops #2.

Having ordered the replacement parts, and them taking a while to get to me on the island...I figured I might as well take it out for a test drive.

First test drive with the car was, to be fair, less than exciting. The clutch is VERY different from my last setup, and I actually think Tilton may have been incorrect with their master sizing suggestion. The pedal travel is very short, so a smaller master cylinder might be needed to get some pedal travel back in the action. The initial brake bleed was pretty terrible as well, but that is somewhat to be expected. I've always found I need to drive the car for a few km and rebleed to get the job done correctly.

After another bleed, the handbrake came back (fancy that), but still has a longer throw than I would like. The foot pedal, however, feels much better!

The first half of the second test drive was better, but honestly not that great. A race car that runs kinda poorly and the controls are all in slightly new places is not the type of experience I was hoping for out of the shop. About a third of the way through the test, however, I remembered that I didn't build this car for puttering around town...so off to some empty highway, where I put my foot down.

OOOOOOOHHHHH, riiiiiight. THIS is when the car is fun! My gosh it's a blast when driven properly. Before destroying the tires I thought I should return home and get my alignment tomorrow.


Motor oil leak is one of two things...I think. It's either leaking from one of the cylinder studs (at the head end), or the oil cooler seals are leaking...or both. I cleaned off all the oil with brake clean, and after my tests one of the studs is wet. I'll pull the stud, reseal the washer inside the head and try again. You know, presuming I don't wake up to a puddle of oil under the car.

-----

Changing the seat has created a new problem. I can no longer reach the switches mounted on the side mount...one of which controls the water sprayer for the oil cooler, so I need to be able to reach them!


Figured I'd make a quick strap so I can close the door and lose the armrest. RS style pulls weren't really possible, since the door panels already have holes...so a simple strap it is.


Ugh. That simply will not do. Can't have the door panels looking like crap...so it's off to the drawing board!


Need to head out of my small town tomorrow to see if I can get the material I want for the new door panels I've got planned. On the plus side, it hasn't been dumping oil anywhere!

----
My solution for ugly door panels involves some ABS plastic sheet, some climbing webbing, and a couple hours of my time to get it all correct. 911RS inspired door panels!


No other work completed...the shop was getting to be a disaster so I spent this afternoon cleaning it up and making sure it's ready for the next project. Whatever the heck that might be.

-Dave


--
'71 Type 1 - Rally Car Project
'75 Type 1 - Heirloom
'95 F150 - Unfortunate daily driver...

Stephan Schmidt

Re: Dave's 1971 1302 Not-So-Secret, Secret Project Build
« Reply #367 on: March 27, 2018, 09:17:48 AM »
Excellent work Dave! Keep it up! The car must be very fun to drive!

Offline owdlvr

  • Dave Hord
  • *
  • Posts: 1422
  • Karma: 10
    • Classic Car Adventures
Re: Dave's 1971 1302 Not-So-Secret, Secret Project Build
« Reply #368 on: March 29, 2018, 09:39:36 AM »
Oh, it's a blast to drive. Can't cruise around in it anymore though, it really needs to be driven hard otherwise it just bucks and coughs and generally runs like a turd. Get on it though, and it comes to life and is an absolute blast. 

Storage in the Rally Bug is a definite problem. There's obviously no back seat, and there is less trunk room than a regular Super Beetle. For the most part, on road trips, I've figured it out...but it's surprising how handy the door panel pockets have become. Even just little things like house keys, wallet, gas receipts, etc. all need a spot. On the co-driver side they've got cell phones, pens, navigator crap I don't really pay attention to. We're gonna need some door pockets.


Cut some ABS to fit inside the door pockets and keep 'em stiff, as well as some strips to support them on the backside of the door panel. The rivets will hold them in, big flange on the one side, two washers on the other to keep them from pulling through the door panel.


Three rivets across the top, one in each lower corner (which was fun to install).


Yup, that will work nicely.


With the door panels done, I tore out the co-driver seat, drained the rear brake circuit and started working on replacing the hand-brake master cylinder.


The old cylinder was 5/8 diameter, and is actually a Honda clutch master cylinder. It was easy to obtain and has metric fittings, so I had all the fittings to swap it over to AN fittings. The new master, as you can see, is quite a bit larger. I had to source the 3/4" master from Willwood, and work out the fittings to get the inlet and outlet down to the -3AN sizing that I'm using. Fitting this bigger cylinder under the shifter, above the valve for the Accusump and without hitting the driver's seat is going to be a challenge and a half...


I had to cut off and grind down the casting corner at the back of the master, taking about 3/8" of material off, but it just fits above the valve for the accusump. Banjo adapters to -3AN look a bit odd with the bends, but I don't have to cut and make new lines, and you'll only ever see it in this photo anyways. Things are TIGHT in here!

 I pressurized the system with a motive power bleeder, and bled the rear circuit without issues. I should have remembered to bleed the circuit before mounting the hand brake master, as you can see from the mounting angle it traps air. A quick manual bleed moves the air from the hand brake into the rear line, and a second power bleed empties the system. At this stage of my evening, things started to go sour. The handbrake feels wonderful. It's got a good short stroke, and while it does require more effort than my pre-winter setup, it's not bad. I hit the foot brake, no air, and then a second pump and the pedal started to sink. What?!  I pumped a couple more times, and that's when I heard it...the tell tale squirt of brake fluid leaking somewhere. Of course, to find the leak required a couple of more pumps...and that's when I realized...I've emptied half a reservoir of brake fluid INSIDE the Rally Bug.

Funny part about having all your brake lines run inside the cabin. You don't have to worry about rocks cutting them, you don't have to worry about them corroding due to road salt. You do, however, have to worry about leaks! The brake fluid was pooling under the driver's seat, which normally wouldn't be an issue except I had been adjusting the seat belts with the new seat. The 6pt belt extras were lying on the floor, instead of wrapped up and ziptied as they usually are. Sigh. Well, didn't need the last 6" of brake-fluid soaked belt tails anyhow, so I cut em off. 

Closer inspection of the leak, however, determined that it was actually a pin-hole, and squirting high pressure brake fluid onto the center tunnel, and was then spraying everywhere like a garden hose. A whole roll of blue towel and a can of brake clean later...and I think the interior is clean :P

Cause? A casting flaw in the 7/16 banjo bolt I bought. The sealing flange, had a nick in it.

-Dave
--
'71 Type 1 - Rally Car Project
'75 Type 1 - Heirloom
'95 F150 - Unfortunate daily driver...

Offline mitchy965

  • Full Member
  • Posts: 133
  • Karma: -7
  • AirSpeed Forum Member
Re: Dave's 1971 1302 Not-So-Secret, Secret Project Build
« Reply #369 on: March 29, 2018, 03:54:42 PM »
thought this kinda shit only happens to me......just had the bail snap off the 5 gallon bucket of anti freeze I was hoisting over full boxes of cleaned and painted engine parts. :1rij: :1rij: :1rij:
1991 964 turbo- 1967 2007cc beetle-01 95" wideglide-2276cc turbo drag bug

Offline owdlvr

  • Dave Hord
  • *
  • Posts: 1422
  • Karma: 10
    • Classic Car Adventures
Re: Dave's 1971 1302 Not-So-Secret, Secret Project Build
« Reply #370 on: April 03, 2018, 10:33:56 PM »


Back together and ready to go? Here's hoping!

----

Well, ran out of fuel in the bug today. Was out doing some tuning and spent 30sec panicking as it was suddenly going lean and nothing was making sense. After a couple of brain cells kicked in, the problem was obvious. I ALMOST made it to the gas station too...but nope, pushed the car the last 100m. At least it's light!

I'm off for three or four days of scouting roads for my Spring Thaw event at the end of April. It could get a little interesting, the weather when I left my house looked good, but now they're calling for rain (which means snow on the mountain passes). Could be a "fun" drive, as I didn't bring my winter tires. :P Tires are technically legal, but not something I would choose to drive in snowy weather on a mountain pass.

Ah well, could be worse. Car is setup like it should be on a race track, not a road (little snappy in the front end). Brake bias is much better, but I haven't romped on it to be sure. Might want to sort that before I hit the mountains! Today I sent my best friend Connor a brilliant Craigslist find. His response was short, and to the point...and quite fitting here:

"It's like you have short term memory for stupid ideas."

heh heh.

----

I've put a 1000km on the Rally Bug, 800 of which was today. Had to stop for a few items...

Got to the ferry terminal, and realized I didn't have any brake lights. Whoops, guess I forgot to check a rather important item before leaving the shop! A quick run through all the terminals and the lights were back in business.

Next 'feature' I discovered, was after a good hour or two of driving, the car developed an issue where it appeared as though the throttle cable was sticking. Instead of going back to idle, it would rev 500rpm too high. After being unable to find the issue in Hope, I chalked it up to something I'd need to look into and continued on to Kamloops. Coming into my exit in Kamloops I realized I didn't have any engine braking, and may even have some maintenance throttle going into the exit ramp. Uh-oh, this could get interesting. YUP, 1/4 throttle stuck on, can't even kick the pedal back to get neutral. And that's when it dawned on me...

The vibrations while the car was running, caused the throttle-stop bolt to back out. There's two bolts, one for full-throttle, and one for neutral. The neutral one backed out, tipping the pedal forward. A quick stop over to a hobby shop in Kamloops, and I had a 5mm nut to lock it down with. While I was down there, I figured I'd red-loctite the full throttle stop as well.

No photos, my phone bit the biscuit about 2hrs after Kamloops. Just the android boot screen over, and over, and over again. Sigh.

-Dave

--
'71 Type 1 - Rally Car Project
'75 Type 1 - Heirloom
'95 F150 - Unfortunate daily driver...

Offline owdlvr

  • Dave Hord
  • *
  • Posts: 1422
  • Karma: 10
    • Classic Car Adventures
Re: Dave's 1971 1302 Not-So-Secret, Secret Project Build
« Reply #371 on: April 09, 2018, 02:37:05 PM »


Almost 3,000km of "shakedown" later, and I have another list of items to do to the car. Some of these are large items, based on the drive, and others are little things that I've been meaning to take care of for a long time, but you never get around to it. Moving my dash cam, for instance, from the centre of the windshield to an area that the wipers actually clear would be a smart idea. So...tear the car down yet again.


One of the big issues identified on the drive is that I'm still too rear-brake biased. I was able to work most of it out, but the balance bar is at the point of binding, so I needed to swap out the master sizing. Front brakes got a larger master, and we'll see how that goes.


Partway through the drive, the tuning on the fuel injection started getting quite challenging, and I suspected an exhaust leak. A few hundred kilometers later, and I knew I had an exhaust leak. Just wish I had stopped to realize it was blowing right onto the rear apron. The paint was already hurting from similar incidents, but I totally demo'd it this time.


Stopped in Squamish to get a buddy of mine to slice off some 6061 for use as wheel spacers...


Started modifying the pallet on my rotary table so that I can finish the wheel spacers. Spent the rest of the evening filtering the aluminum chips out of my bourbon with my teeth...but hey, could be worse. I wasn't cutting/drilling with coolant :P


Hacking away at the list...should be back on the road in another couple of nights for more testing.

-Dave
--
'71 Type 1 - Rally Car Project
'75 Type 1 - Heirloom
'95 F150 - Unfortunate daily driver...

Offline owdlvr

  • Dave Hord
  • *
  • Posts: 1422
  • Karma: 10
    • Classic Car Adventures
Re: Dave's 1971 1302 Not-So-Secret, Secret Project Build
« Reply #372 on: April 16, 2018, 01:06:08 AM »

I've worked through the critical items on the list, and have just a couple of regular maintenance items left on the list. There is, of course, the usual collection of "would be nice" items we always seem to end up with.

One of the critical items super beetle fans are all familiar with is the front end shimmy. The Rally Bug has a few light ones now and then, but usually related to the fact that I use balancing beads instead of traditional stick on weights. Occasionally the beads will "bunch up" if you hit a pothole, or launch off a line, and you simply lift the throttle and roll back on to smooth it out. So when I left home for the 3000km shakedown, the light occasional shimmy didn't bother me. I was running a second set of wheels/tires that may not have the correct amount of beads in them either. Post shakedown I was expecting to have to do the idler bushing (only original part left, and only part that doesn't get swapped on a schedule). But nope...alignment shop didn't tighten the inner tie-rod locking collar enough. :-| Yikes. By the time I got home it was loose enough I'm concerned the threads could be compromised. Almost new tie-rod in the bin, and one of my new ones off the shelf is now in the car.


Oddly enough, it seems I have a problem with one of my brand-new Silver Project upper strut mounts. While working the suspension to pull the tie rod assembly out of the car, and check everything over, I found the passenger spring is binding. Further inspection and it seems the whole pillow bearing binds when a load is applied to the upper strut bushing. If you pop the strut out of the lower ball joint, it all spins smoothly. Pop the lower ball joint in (so the strut is under some load) and it binds. The bearing doesn't want to turn with steering movement. I must have pulled it in and out of the car six times, checking, disassembling, reassembling with different washer combinations and so on. Can't find the actual problem, unless it's the pillow bearing. I milled up a little test adapter and tried to bench-load it a little, and I *think* it gets stiffer, so the bearing needs to be swapped out. These came from Poland, and have the markings on the bearing machined off and replaced with "Silver Project", so I'll have to see if I can get them to tell me what they are.

It would seem under full load (with the weight of the car on the bearing, it works correctly. I’ll need to do some short road tests to figure out if the stock bearings are going back in again until I get this solved. On the plus side, the shock boots I made up at the beginning of the winter tell the full story. As the bearing binds, the boot “twists”, and holds the twist…so diagnosis should be easy.


I definitely should have paid more attention to the exhaust leak. It was expelling hot exhaust gases directly at the rear apron. The photo is what’s left of the fibreglass radiant heat protector…it’s crispy! Unfortunately it has completely trashed the rear apron paint, so I’ll be looking to get that repainted at some point this summer. It was cracked and a little bubbled previously, but now it’s destroyed. The section where it was hitting has some bondo in it, and that’s all cracked and popped off the apron. POR-15 the damaged inside paint (which was completely gone) and two new layers of fibreglass sheet. Replacing the exhaust with one I haven’t beat to a pulp should probably be added to the list!


I need a way to store the laptop I use for fuel injection, and have it easily accessible. Toss in the fact that I’ve got a co-driver at the next event, and well the front seat isn’t going to work. Hmm…need some aluminium C-Channel. But I have this old pocket door channel…and a milling machine…


A quick few minutes, and I’ve got a laptop holding box. Added some high impact foam on the inside of the C-Channels, and some felt to the outside for the “OEM” look. It mounts below the passenger seat, you can just see the laptop (in a neoprene sleeve) sticking out.


Started working on the footplate panel. Ran out of weekend.
--
'71 Type 1 - Rally Car Project
'75 Type 1 - Heirloom
'95 F150 - Unfortunate daily driver...

Offline Piedad

  • Junior Member
  • Posts: 1
  • Karma: 0
  • AirSpeed Forum Member
Re: Dave's 1971 1302 Not-So-Secret, Secret Project Build
« Reply #373 on: April 26, 2018, 06:10:52 AM »
I wasn't blasting it in the same garage as the '66 mini!tonight started out really well. I began by finishing the assembly on the rear suspension (putting my double-shear plates back on) and then while  O2 sensors. The bungs are placed for great readings, but are a little bit exposed. I suspect I might go through a couple of sensors! haha.