Author Topic: Dave's 1971 1302 Not-So-Secret, Secret Project Build  (Read 149226 times)

0 Members and 4 Guests are viewing this topic.

Offline owdlvr

  • Dave Hord
  • *
  • Posts: 1422
  • Karma: 10
    • Classic Car Adventures
Re: Dave's 1971 1302 Not-So-Secret, Secret Project Build
« Reply #150 on: March 13, 2012, 01:44:12 AM »
Alrighty! Back into the garage, though this time I think the post is better if I start with the finished product first, and then show the work behind it:


Some nights I think my roomate and I should open up a rally shop. The PIAA lights mounted to the car? Yeah, those came out of our "spares" collection :P Two of the lights were used on my '69 beetle, one is brand new, and fourth is a light that was on his Subaru but gave up it's lens to the gravel gods. So, if I simply get a replacement lens for the lamp, I have four. Looking at the photos though, they seem small. Don't get me wrong, they "suit" the car, and I'm not going to change out for the larger set. They just don't scream "80's Group-B Rally Lights!!" like my previous Audi did :P

Throughout the mounting process I was continually thankful I decided to run with the smaller 6" lights, vs. the 8.5" Bosch 220's. Fitting these was enough of a pain-in-the-butt that I wouldn't want to try the 225's. The factory cars all seem to be drilled right through the bumper, but I have no idea what they did 'inside' the bumper to take the weight and keep the lights from shaking. Mounting rally lights requires two basic steps: 1) The lights must be 300 times more secure against vibration then you think they should be. And 2) make the lights removable if possible. There is nothing worse, and more tiring, then lights that shake and vibrate while running off road. The strobe effect is distracting and tiring. Removable lights means you don't risk wrecking the lights during the day, and thus blowing any chance you had at night. With that in mind...

Lights follow the curve of the bumper/front of the car...


...but are not actually mounted to the bumper. I used 1" tubing, and some heavy-duty angle mounts to make a vibration-free setup.


Beginning of bar fabrication:


Mounting plates tack-welded on for testing. The two outside lights were relatively easy, but the two inside lights needed to be moved back towards the rear of the car slowly bit-by-bit to clear the front bumper. Eventually I had to notch the bar (pretty heavily) to ensure that I would be able to get a socket in to adjust the lights. I don't anticipate this will add any vibration issues though.


With that done I cut down the plates to the smallest footprint possible, welded them on fully, cleaned up the corners and gave it a coat of POR-15. Based on the photo above I just realized I probably left a weld too close to the bolt hole, so I'll need to clean and dress that tomorrow and repaint. Once it's dry, mount the lights and finish the wiring.

I still had some time before bed, so I took to finishing up some items in the trunk. With the fresh air box mounted, I needed to find a way to join the box to the defrost ducts. Eventually I decided that some aluminized jute padding would probably do the trick nicely...which it does. Problem is it looks like crap! Instead of that space-age look you think it's going to have...it just looks, well, cheap. I know the factory used plastic tubing on the inside, but none of the bits I had fit very well. On the plus side, tonight was the first time I have ever turned on a working Fresh-Air fan that I remember. WHOA!! there actually is some serious defrost air flow! Definitely did not expect that.


-Dave


--
'71 Type 1 - Rally Car Project
'75 Type 1 - Heirloom
'95 F150 - Unfortunate daily driver...

Offline owdlvr

  • Dave Hord
  • *
  • Posts: 1422
  • Karma: 10
    • Classic Car Adventures
Re: Dave's 1971 1302 Not-So-Secret, Secret Project Build
« Reply #151 on: March 13, 2012, 11:27:36 PM »
Alright, I can't find a photo of it but I think we can all agree how your "first car" effects your automotive choices for years to come. The first car that I bought happened to be a 1989 Audi 90 quattro, a car which I still think has the best factory dashboard of any car out there. Even 23 years later the dash is still timeless. One of the best features, for me at least, was the night-time illumination. It was this warm red/orange. To this day I can't buy a car with a dash that lights up green. In my Audi Rally car I used Stewart Warner Gauges and their red LED lighting. It was good, but quite red. When I built the '69 Beetle I needed a way to get the dash to light up my preferred red, but with a mix of bulb types due to the VW speedo and Porsche tach. Anyone who has ever used the rubber "boots" that ship with aftermarket gauges knows they go white within a few weeks of use. Some testing resulted in a simple solution...


Two coats of Tamiya clear acrylic will give you an even light in the color you choose, keep going with the coats to get the color deeper and deeper. The clear Tamiya paints are available in a whole load of colors, so anything is possible. At night, my Bug lights up pretty well even across all the different gauges I have.

Finished up the wiring for the rally lights tonight. Everything was setup waterproof, but a lot of the wires were visible, so I went nuts with the techflex. Chances are it will get all nasty and I'll be cutting it off in a year...but until then it looks fantastic! :P The wiring is virtually invisible, except for the one loop coming from under the apron up to the light bar.


I've got a replacement lens/reflector coming for the broken unit, but looking at this photo it seems I might need to pickup some high wattage bulbs to replace the yellow H4's in the factory lights!


Some buddies dropped by, so we were able to toss the pop-out window into the driver's side. What a pain these stupid things are to install, eh? I do have the hinge cover, I just don't have the correct screws to install it :P


Also this evening, I worked further on the hood lock/latch setup. Last night I had the lock working, made some adjustments and promptly locked the hood shut with no possibility of getting it open. After popping out the spare tire access port, I got the hood open. A few more tries tonight and I ended up with a perfectly working hood latch and lock system. I popped an emergency pull cable in, routed into the front fender. When my buddies showed up I was demonstrating for Scott, who bought my '69, what a factory lock system actually works like (non existent on his '69!). Went to open the hood and the handle in the glovebox broke. ARRRGGG!

That's it. %$#! the factory lock, I'm just going to install a set of these to ensure the hood doesn't fly up.
or

-Dave

« Last Edit: March 13, 2012, 11:52:42 PM by owdlvr »
--
'71 Type 1 - Rally Car Project
'75 Type 1 - Heirloom
'95 F150 - Unfortunate daily driver...

Offline owdlvr

  • Dave Hord
  • *
  • Posts: 1422
  • Karma: 10
    • Classic Car Adventures
Re: Dave's 1971 1302 Not-So-Secret, Secret Project Build
« Reply #152 on: March 14, 2012, 11:37:41 PM »
Tonight was a quick night, I was in Whistler all day for work and then down in Vancouver for a DVKK meeting. Put my minimum hour in on the car, and called it quits. I spent the first bit going around the car and touching up a number of tiny details I have been meaning to get to. Little things, that you'd probably never see, but bother me! I think I'm in danger of becoming a perfectionist.

Example? The razor I used to put the cut-line in on the plasti-dip before lifting off the paint wasn't brand new, so in a few spots it didn't pull on a perfectly straight line. A little plasti-dip brushed on tonight, and I'll cut a new line and pull off the excess tomorrow. Yes, proof I've gone insane.


With various little jobs done, I figured I should tackle the rear bumper and apron. I knew this wasn't going to be a simple bolt on affair, you may remember I dropped the body off a trailer and the rear apron opening is 1+ inches too narrow now! With the right-side bumper bracket bolted on, you can see how far off the left-side holes are:


Using a rather dangerous combination of two pieces of wood and a damaged scissor jack, I managed to spread the bumper apart enough to get both sides bolted together...


...but it's not done yet. For starters, the bumper is slightly shifted to the left and covers more fender on the left side then the right. Normally one would simply loosen the bolts and shimmy the bumper over...but in my case it's currently acting as a stressed member of the rear bodywork. Loosening the bolts without something holding the body spread apart would be a dangerous affair! The second issue is the rear apron opening.

The rear apron WAY closer to fitting now, so much so that I'm confident I'll be able to make things work, but it does need adjustment. I'm about 1/4" off at the bottom now, so I think I need to shim the bumper mounts away from the body. This is going to mean removing the bumper, shimming the mounts, stretching the body, attaching the bumper and then testing the apron. Again and again until it fits! Once that's all done, I have to figure out how to center the bumper!

In the end, I don't know if I'm going to end up with a removable apron or not. Depends on how close I get it, and how easy it will be to remove. At the very least, even if I have a removable apron I'm not going to be able to remove the bumper. At first thought it seems like "well, whats the point"...but I suppose engine pulls will still be much easier.

Let this be a lesson kids: Don't drop the body off the trailer. (but you probably knew that already.)

-Dave
--
'71 Type 1 - Rally Car Project
'75 Type 1 - Heirloom
'95 F150 - Unfortunate daily driver...

Offline owdlvr

  • Dave Hord
  • *
  • Posts: 1422
  • Karma: 10
    • Classic Car Adventures
Re: Dave's 1971 1302 Not-So-Secret, Secret Project Build
« Reply #153 on: March 17, 2012, 12:37:06 AM »
A short time spent in the garage, before F1 qualifying, but a very productive and satisfying one. For starters, I got this to fit:


The rear apron isn't perfect, but its at least in the gap! Started off by notching the left bumper bracket mount a little to try and stretch things over. Managed to cut the distance needed by another 1/8". I was off just a little bit, but far enough that there was no stretching or sneaking it in. Hmmm...what to do? Occasionally, when working on a car, a little bit of violence is allowed. I put the apron on my lap, gave it a good shove in the right direction on the left side, and then a good shove on the right. Oh hey, look at that, fits!

The best part though, is that I'm going to be able to keep the "removable" feature I intended. I've popped two of the riv-nuts / bolts in, but will need to mark (pray) and do the lower two without the bumper on. This means I've got to be quite accurate, as there will be no testing possible between marking and the first test!


Occasionally one should leave the garage on a good note, and thus start the weekend nice and fresh. Lets hope no one needs to "use" these decals during the Spring Thaw next month!


-Dave
--
'71 Type 1 - Rally Car Project
'75 Type 1 - Heirloom
'95 F150 - Unfortunate daily driver...

Offline owdlvr

  • Dave Hord
  • *
  • Posts: 1422
  • Karma: 10
    • Classic Car Adventures
Re: Dave's 1971 1302 Not-So-Secret, Secret Project Build
« Reply #154 on: March 19, 2012, 12:05:44 AM »
Hmmm...this is why I update the thread every night I work on the car. It's Sunday, my last update was Friday before bed, so surely there is a tonne to update! I checked the camera, and I have only two new photographs. Geesh, I was down there for two days...what did I do!?!

I did finish up the rear apron mounts, which required stretching and releasing the rear body structure a few more times. I've got the bumper pretty even left to right, and the apron pops in and out easily (as long as you leave the bumper attached) so I figure that's probably going to give me enough access and clearance to make pulling motors easy enough. Then this morning I tore it all down again so that I could paint anywhere I cut or drilled through to bare metal.

I finally got around to cleaning up all the wiring above the transmission. With the changes to the oil cooler routing, and a change I made to the oil-cooler fan, some of the wires were too long. The rest of them were just popped in temporarily waiting for everything that could end up in the way to be installed. All were hortened where appropriate, and then mounted and cleaned up. Tomorrow I'll pickup the aluminum I need to make the cover for this access hole, install the rear windshield and then the "back seat" area is finished. That will allow me to move onto mounting the belts and seats.


The next major step is the engine. My dry-sump pump still isn't ready, but I have to run the car for The Spring Thaw April 27-29, so I figure I better get something together and give myself time to sort out the car! So, I reassembled my 1776 with the 26mm standard oil pump and some new tin. I'll run the engine with my Kadron carbs until after the Spring Thaw, and when I switch over to the dry-sump oiling I'll switch over to a set of IDF carbs.

You might be wondering about the red fan shroud, and questioning my taste in clown-car engine tin colors...but there is a good and valid reason for it! Once I switch over to the IDF's I'll switch over to the Salzburg style shroud I made and painted. Problem is I only have one set of generator backing tins. My theory was the engine would look worse with a black shroud and red backing plates then it does with an all red shroud combo. But, if I'm honest, I really do hate it! It's everything I can do not to pull out the paint and make it black :P


Hopefully I can find some lower mounting studs in the the length that I need. That's the hold up now for installing the engine and determining the location of the fuel pressure regulator and crankcase breather box. Of course, that does lead me to a new problem...I haven't really determined my crankcase breather setup, or even where I'm going to pull from. Something like this will make the line routing the cleanest with the Kadron carbs:


But these seem to be far easier to obtain on short notice, and while it will be a pain with the Kadrons, it will likely be much neater with the IDFs.


Hmmm...

-Dave
--
'71 Type 1 - Rally Car Project
'75 Type 1 - Heirloom
'95 F150 - Unfortunate daily driver...

Offline owdlvr

  • Dave Hord
  • *
  • Posts: 1422
  • Karma: 10
    • Classic Car Adventures
Re: Dave's 1971 1302 Not-So-Secret, Secret Project Build
« Reply #155 on: March 21, 2012, 12:15:58 AM »
I've got the proper studs coming from Porsche, but its going to be a week or two before they arrive. So, in the meantime, I'm working on other items that are needed to install the engine. Everything at this stage is taking twice as long as it should, because I'm needing to plan ahead. Everything I drill a hole for is permanent...so it needs to not only work with the engine as its but more importantly, it needs to work with the engine I build with IDF's and the Salzburg-style shroud.


After a bunch of testing and measuring I finally determined the positioning for the crankcase breather, fuel pressure regulator and oil pressure sender.

Fuel pressure regulator (still need a fitting and a new gauge), and oil pressure sender. I won't be able to fit the Stewart-Warner sender in the same spot I had the Autometer sender as the body size is larger. I had done a remote sender on Connor's mustang, so I had all the -3AN fittings and lines on the shelf...so tucked this one out of the way with a left-over Coil bracket.


On the crankcase breather side, I decided to reuse the Moroso unit I had, instead of getting one of the rectangular box styles. For now I'll run both the valve covers and crankcase into this one unit, but when I hook up the dry sump system I think I'm going to mount a second one right beside it. I tend to forget about checking them for oil, and would rather not end up with a huge mess. The oil tank will be running a fairly high level of oil, so better to play it safe since I have the real-estate. I did realize that I own a 3/8NPT tap from modifying oil pumps, so made up a crankcase breather that I can use for now. I'm tempted to cut the threads deeper on the part, but the threads were cutting odd and I'm not really sure what type of aluminum it is...played it safe for now.


And lastly, the stud problem. With the proper Porsche studs coming, I figured I could mount the engine using bolts. The only reason I didn't, its the need to guide the engine in using just the input shaft on the transmission. So, some Audi engine bolts sacrificed their lives to become temporary engine studs. Cut threads aren't ideal, and leave a major stress riser right at the base of the last thread...so I'll swap these out as soon as I can. For the moment, however, they should work.


-Dave
--
'71 Type 1 - Rally Car Project
'75 Type 1 - Heirloom
'95 F150 - Unfortunate daily driver...

Offline owdlvr

  • Dave Hord
  • *
  • Posts: 1422
  • Karma: 10
    • Classic Car Adventures
Re: Dave's 1971 1302 Not-So-Secret, Secret Project Build
« Reply #156 on: March 22, 2012, 02:48:29 AM »
A few weeks ago I was doing my usual bi-weekly parts run to AVR, hanging out and chatting with Rob. We were going over the list of items left on the car, and prepping the order schedule based on how quickly I thought I would get there. Rob's often watching out for sales from his suppliers, or trying to stay a step ahead of me on the parts list. Often I'll text him to say "can you add X" to my shelf, only to get "was already there" back. As we went through the list, Rob asked me a question I had been dreading for weeks. "What are you going to run for an exhaust?"

I have a bad habit of always leaving the exhaust system to the end, and usually as an afterthought. I cut my career teeth working for Vibrant Performance, an exhaust manufacturer. It's just ingrained in me to not worry about the exhaust and make something at end of a project. Well, Vibrant was over seven years ago for me...and they don't make any Beetle exhausts! Rob and I started chatting about all the options, and price points, and then he asked me if I had seen the Vintage Speed systems. AVR just started carrying the line, and so far they've been stoked on everything they've brought in. There wasn't an exhaust in stock, but he piqued my interest for sure. Then Rob offered me the contact information for Mr. Lee, and suggested I show him the project. Well...less then 18 hours later I had a reply from Mr. Lee, and in three days I had two boxes arrive on my doorstep.


Now, I could tell you as an enthusiast that in person they are incredible. But as a person who used to evaluate systems for a living, these systems are phenomenal. The workmanship is so far and beyond anything else I've seen for a VW, it's incredible. Hand TIG welded as well. Take a look at the detail photos:


As I'm planning on using heater boxes, the system ships with these flanges, that you can either weld to the heater boxes or use with factory clamps.


Now, you may have missed the fact that I said two boxes arrived to my doorstep. Vintage Speed and I discussed my current engine setup, and the engine setup I plan on running after my dry-sump pump is ready. The Sport Muffler was the obvious choice for the current setup, but would my new build benefit from using the Superflow muffler? Normally it's reserved for larger displacements then mine, but I'll be running high-revs for long sustained periods. "Well," he said, "why don't you try both and decide which works better for your setup." And so, sitting in my living room distracting me from work all day were two incredible exhaust systems! For the moment I've installed the Sport Muffler, and SuperFlow muffler will go to AVR this weekend. No sense in me storing it on a shelf when everyone here can put their fingerprints on it :)

To get the motor in, I've got to take care of some more details. First up was the breather system. I spent a bit of time on the phone with Kroc, and decided that I'm going to try venting the case, cylinder head 1/2 and not cylinder head 3/4. I had 3/4 vented previously, but I'm shortening my lines significantly and worry about filling the breather with oil. Instead of a breather I'm going to go with a drain from the head back down to the sump. Darren was great for sorting out what and how to do it now, so that I wouldn't need to change as much when the dry-sump system arrives. Crankcase breather, now tee'd for 1 valve cover, and the case. I'll redo the fittings with my final engine, this is just what I had lying around. The lower hose is terminated just inside the fender area, all it does is allow me to drain the tank if needed.


Fuel regulator is in with more Russell fittings and hose. I'm going to leave the outlet hose as factory cloth until the new carbs are installed, at which time I'll move everything over to Russell fittings and lines.


I think I'm getting addicted to them actually ;-)  Here's the -3AN line I'm using for the remote oil pressure sender.


Fast forward a whole bunch of time later, and we have an engine installed with an exhaust system. The engine took a few hours, and the exhaust system took less then 20min. It's such a rare experience with this build to have something that just bolted right up the first time! I am also pleased to report that our home-made clutch cable bits and the shortest factory clutch cable seem to have given me a working clutch. Well, the feel at the pedal is "right", so hopefully that equates to working when I get to drive it.


Its far from being ready to start though. I need to run oil lines, breather lines, make a 3/4 head drain, swap out the oil filter mount and THEN I'll be ready to start it. Closer, but still a long way to go!

I did finally solve a question tonight that I haven't been able to answer since I first discovered it. My e-brake cables were much too long for the car, as are the heater control cables. So much so that I can't hook up either without modifications. When I told Rob, he was surprised as they haven't had any issues on the shop cars...which use the exact same parts! Sitting in the car, as well, there is something "odd" and "wrong" with the way it feels. I thought maybe I was using the passenger seat and it was setup on the mounts differently, but that wasn't it. Then today, it finally dawned on me. I think 1973 is the year they moved the e-brake handle and assorted bits further back in the car? I started with a '73 pan, but as I welded '71 style pans into it I always just tell Rob the car is 100% '71. Whoops.

I have to say, the two best modifications I've done to the car so far is the removable rear apron, and the "weber doors". The combination of both made the engine install so easy. You can reach everything!! I will never take a bug to paint without doing both of these...well, unless it's a factory resto. Then, and only then, will I drop the weber doors. The removable apron though, that is going to stay!

-Dave
--
'71 Type 1 - Rally Car Project
'75 Type 1 - Heirloom
'95 F150 - Unfortunate daily driver...

Offline 70's Looker

  • More than a 70's Hooker!
  • *
  • Posts: 1253
  • Karma: 2
  • what's this for?
Re: Dave's 1971 1302 Not-So-Secret, Secret Project Build
« Reply #157 on: March 22, 2012, 10:34:19 PM »
im confused on the exhaust, how are the paper pipes going to hook up to the heater boxes now dave?
Zündfolge Car Club

Offline owdlvr

  • Dave Hord
  • *
  • Posts: 1422
  • Karma: 10
    • Classic Car Adventures
Re: Dave's 1971 1302 Not-So-Secret, Secret Project Build
« Reply #158 on: March 23, 2012, 12:04:00 AM »
Pretty simple actually. You use one long piece per side, and go direct from the fan shroud, through the breastplate and onto the heater box. The photos make it look like there is no clearance, but there is tonnes to do it. The Vintagespeed exhaust system comes with the fiberglass wrap already installed, which keeps the paper tubes from scorching.

You can't burn them though. Vic, Rob and I were trying to light them on fire last summer at AVR and the black paper ones don't burn.

-Dave
--
'71 Type 1 - Rally Car Project
'75 Type 1 - Heirloom
'95 F150 - Unfortunate daily driver...

Offline owdlvr

  • Dave Hord
  • *
  • Posts: 1422
  • Karma: 10
    • Classic Car Adventures
Re: Dave's 1971 1302 Not-So-Secret, Secret Project Build
« Reply #159 on: March 23, 2012, 12:27:35 AM »
Well, that didn't last long.

The motor is coming out!!


Back last year when I was researching dry sump systems and options for the Type 1 beetle, I evaluated as many different options of Dry Sump pump as possible. Most people using a dry sump setup in a bug are Drag Racing, so there was very little information out there regarding daily-driver and race style setups. When I could find information, all of it was clear...the Bugpack pump was reliable and long lasting. Issues were non-existent (as far as the internet was concerned), which these days is a pretty positive indicator! What sealed the deal, however, was the Huebbe brothers in St. Louis. Here are two guys who have been rallying a Beetle for years in the US. Mark and John's dry sump system uses the Bugpack pump, which was what sealed the deal for me. The fact that they just won their class at the WRC Mexico event using the pump is icing on the cake!

Rick at Bugpack was pretty excited about my car when I showed him the photos, he was clear it would be a while before the next run of Dry Sump pumps were ready, but he wanted to help me out and ship one up to Canada as soon as they were. With the Spring Thaw coming in less then 40 days, I figured I would dry sump the car after the event...not wanting to setup a new system so close to an event. So, as we all know, I installed the motor last night...the whole top half was ready to go. Today, however, John my friendly UPS driver showed up claiming "gee, more car parts! What a surprise."

You wouldn't actually expect me to sit around for a month knowing the dry sump pump was in house!?!

So, first it was off with the exhaust...then the crank pulley, then the tin and finally the oil pump.


The Bugpack pump has two stages, one scavenge and one pressure stage. The gears are huge on both, and the scavenge stage allows you to choose from two setups. You can either use the factory pickup (in which case you plug one port as I have) or use an external pickup such as Autocraft unit. In this case you would plug the internal pickup hole in the pump, and attach your external feed to the port I've plugged. Just in case, for archival purposes, you can't use both the internal pickup and the external port at the same time (for example scavenging crankcase via factory pickup and a valve cover via external port). If you do, as soon as one of them sucks air the other pickup won't pull anything.

So moving from left to right we have Inlet from the tank in furthest from the case, blocked port not used near the case. On the Left side there is pressure side out furthest from the case, scavenge back to the tank next to the case. The Russell fitting is my pressure return back into the case (after passing through a filter and the oil cooler).

I've sized up all the oil lines needed for the pump install, and will make those tomorrow. Technically that would be it, I could put the exhaust back on get ready for the next part of the project. But halfway through the day, after he saw the photo of the pump I sent him, Rob was calling me with some crazy ideas. Looks like the motor is coming right out of the car! :D

...anyone want to buy a Powdercoated Red shroud? Used for 24 hours, never run :P

-Dave
--
'71 Type 1 - Rally Car Project
'75 Type 1 - Heirloom
'95 F150 - Unfortunate daily driver...

Offline beetlemandan

  • Full Member
  • Posts: 594
  • Karma: 3
Re: Dave's 1971 1302 Not-So-Secret, Secret Project Build
« Reply #160 on: March 24, 2012, 10:44:55 AM »
so how does the crank pulley clear that oil pump?
the customer is always wrong

Offline owdlvr

  • Dave Hord
  • *
  • Posts: 1422
  • Karma: 10
    • Classic Car Adventures
Re: Dave's 1971 1302 Not-So-Secret, Secret Project Build
« Reply #161 on: March 26, 2012, 12:01:25 AM »
so how does the crank pulley clear that oil pump?

That problem is solved like many others...throw money at it! hahaha. A 5.25" or smaller pulley is required to clear the pump. In order to run that size pulley and still maintain some fan speed for cooling you either need to run a Porsche 356 generator pulley, or better a BMD dry-sump serpentine belt system. They've sized the upper pulley to match the factory ratios.

---------

Well, it's been a long weekend of ups and downs...but progress is certainly happening. Friday I finally cleaned out the car and the garage enough to get it on it's wheels for the first time. It was a good moment, quickly followed by the realization that it was going to be a bad moment. The 300lb springs that I selected are _waaaay_ soft. The car was lowered dry with no engine, no seats, no doors and only one piece of glass. The rear suspension still sags through half of it's travel. Bumping the preload up gains a bit, but they're very clearly too soft. Initially this wouldn't seem like a big issue, I mean they're coilovers...buy another set and swap them in! That's the whole idea. Problem, though, is that I'm already tight for clearance. Each heavier spring will be thicker, and thus cut down on my clearance. Will see what the rally shop has for springs that can be borrowed for static rate testing. I'm going to lower the front a few inches and see if I can find a happy summer setup for testing and actually dialing in the suspension on the car. Too early to panic, but late enough to realize I have a bunch of work ahead of me!


With car on the ground, and tonne of sunny weather for the weekend, I realized it would be the perfect day for a drive. Hmmm, can't drive the car. So, trailer it!


Okay, well, that isn't the full story. I actually the car back down to Chilliwack to GLI Autoworks. Lorne and Gerry have been storing the doors for me while I work on the car, and I've been waiting for the rain to stop long enough to get the car down there. While they mounted the doors, Art from AVR brought out "the magic rope" and helped Rob and I to install the rear window. The front windshield was popped in almost before I noticed, and things were just trucking along. It was team affair as we installed seals, chrome trim and the vent windows...mostly done by Lorne and Rob if I'm honest...but I did a good job of stealing spare parts from their personal garages and the shop to replace stuff that I've lost in the shuffle :D Rob and I finished the door latches by heading to their family farm to 'borrow' more parts from the company parts cars. With it getting dark I hit the road for the 2.5 hour drive home.


Today I started by finishing off the doors. I can officially state that I hate U-Channel felt. I've hated it for some time, if I'm honest, but always thought it was because the '69 one-piece windows used iffy aftermarket felt. Nope. I think U-Channel felt just sucks in general. I'm sure there is a trick to getting it all nice and even, without looking like a wavy boat, but after longer then I care to admit I decided to accept it for now. You can only remove and reinstall it so many times before you wish for a convertible! I finally remembered how to get the glass back in, and the regulators are...um...acceptable. I'll be scouring swap meets this year for a good pair of used regulators. To his credit, Rob told me to wait until I had a good pair of used ones! Door panels come in this week, and when they do I will do the plastic on the doors and finish them up.


With the doors as finished as I can make them, and my fingers raw from all those stupid clips and stuff, I figured I would go back to prepping the engine and car for some power. Oil filter adapter has been replaced, which seems like nothing mentionable...except all the interior oil lines are finally 100% finished.


Russell fittings had a fuel bulkhead fitting (670860) that ships with two teflon washers and a lock nut. On the '69 I used barbed fittings and standard rubber hose for the valve cover vents, and it was always a pain. Fitting the valve cover for AN fittings, though, was definitely an afterthought on my part. Found this fitting at my local auto parts store, and sure enough it works no problem. I'll need to run the engine around the clock once I have a crank pulley back on, but with #1 at TDC the fitting is clearing the valve springs/rocker/etc. And hey, if it ends up interfering...I'll just cut it down :P


Before I went down for the doors, Rob and I were talking about the list of things I needed to get the car running and how that differed from the list of things I needed to finish the car. After counting the number of engine pulls I was planning Rob put together a bit of a surprise pack when I arrived at the shop. That plan about pulling the motor later for carbs? Yeah, lets just do that now.


So my late afternoon / evening was spent pulling the carbs down and blasting out the passages...then reassembling. The engine was stripped, and my "Salzburg" style shroud installed. I keep looking at it knowing it's just such a quick hack job, but everything I've seen/read about the factory cars was the same. I'm torn on it for now, but could re-do it down the road. Warwick was working on his mini and just laughed at me. "When the engine is the in the car, you're never going to notice" Hmmmmm....


Having never done a hex-linkage before, man is there a tonne of little parts eh?! I did have to shorten the hex bar a little, which I knew was a possibility. A quick zip over to my buddies lathe and I was back on track...I thought. As soon as I had the length right I discovered it interferes with the Alternator strap. Had I left the strap stock, no problem, but the powder coating added *just* enough to the piece that the hex shaft was hitting it. A quick trip back to the lathe and I've got it clearing.


Still have some work to do before it's ready to pop back into the car...but I'm starting to feel like I can see a finish line ahead.


-Dave
--
'71 Type 1 - Rally Car Project
'75 Type 1 - Heirloom
'95 F150 - Unfortunate daily driver...

Offline Geoff

  • *
  • Posts: 8394
  • Karma: 441
    • http://airspeedparts.com
Re: Dave's 1971 1302 Not-So-Secret, Secret Project Build
« Reply #162 on: March 26, 2012, 08:18:10 AM »
Bitchen!!

Offline number3

  • Rob Frose
  • *
  • Posts: 395
  • Karma: 2
    • http://www.avrparts.com
Re: Dave's 1971 1302 Not-So-Secret, Secret Project Build
« Reply #163 on: March 26, 2012, 09:24:29 AM »
 Woot_Emoticon

Offline silas

  • *
  • Posts: 6822
  • Karma: 20
    • Some cool videos...Check them out!!
Re: Dave's 1971 1302 Not-So-Secret, Secret Project Build
« Reply #164 on: March 26, 2012, 02:39:31 PM »
good work dave (and the frose boys)!!

keep banging that s#!t out...you're getting close now!!

Offline owdlvr

  • Dave Hord
  • *
  • Posts: 1422
  • Karma: 10
    • Classic Car Adventures
Re: Dave's 1971 1302 Not-So-Secret, Secret Project Build
« Reply #165 on: March 27, 2012, 01:33:03 AM »
So when I went to the shop tonight I thought to myself "I'm going to get the engine back in"...heh heh, yeah right. I started off by taking care a couple of details, and they snowballed and snowballed until all I had done was deal with details. The problem with details, is they take so freaking LONG!!!

First up, was mounting the coil. Should be simple, but the fuel-pump block off plate I'm using isn't flat. That left an angled gap right around the center of the photo below. Technically the hole doesn't matter, as the case is sealed by the gasket and plate...but should it fill with dirt and crap it could get into the case if I ever remove the plate:


Eventually I determined a grommet would take up the space and ensure that a good seal was made. With that, the coil project was done.


So up next, I trimmed engine tin to fit around the pump. Just a 'slight' bit of trimming required :P


With that, I moved onto oil-tank cut-off valve. For whatever reason I had always planned on mounting this below the car, even though it would be incredibly annoying. I was having difficulty deciding where exactly to put it, so I asked Mark Huebbe to send me a photo of his. He's got a Beetle that he rallies in the Rally America series. As soon as I saw his placement it was like a bell went off. Why didn't I think of putting it in the engine bay!?!


The valve, fittings and line are all very close or touching the tin. I am concerned about the potential heat factor and was thinking of possible solutions when it dawned on me. Vibrant Performance recently started carrying a new line of thermal products, so surely they would have something that would work? A quick phone call, even though it was 11:30pm, and I should have the required stuff coming by mail tomorrow. Gotta love good connections! Getting this to fit correctly required pulling off the pulley tin, yet again. I think that was probably the fifth time this evening alone. The worst part is I will still need to take the whole motor down to the point where I can take off the cylinder tins...in order to install a bolt for mounting the valve!  I think I'm going to get lucky on the feed line, though, as I should be able to use the factory hole for the reverse lights to pass the oil line through from the tank to the valve. I'll confirm as soon as the engine gets remounted in the car...if not, another bulkhead will go in near the right-side carb.


I then moved on to the breather system. I mounted up my second breather tank, removed all the lines and fittings from the first tank and then started reworking the whole system. Once I had it about halfway ready, I realized that I really needed to raise the one breather by about a half inch. With it already touching the top of my firewall, that wasn't going to be a simple task! Yet another detail to find a solution to...


With my new resized filter, everything fits exactly how I had imagined it in my head. Full sized filter on the right, shortened filter on the left.


Breather line for the tank was then added through the firewall, and now the system is ready for the engine install. I should be able to disconnect the breathers easily with a stubby wrench, but I'll need to get the engine in to be sure. Add another item to the "check this" list!


Somewhere in the middle of all this I found myself sitting in the back of the car, probably tightening up a fitting or two, and realized that I could pop in a fuel filter and finish the fuel connections by the frame horn while I was there. Fuel system is now connected from the tank all the way to the regulator. No photos, it's just a filter ziptied to the speed sensor bracket!

It was about this point in the late evening that I realized I should begin tearing the motor back down. The garage, however, is a complete disaster with tools everywhere. I took a step back, thought about where to start tidying up, and then realized that would make a far better lunch-break project tomorrow during the work day. Besides, it was midnight and I still hadn't eaten dinner! I'll clean up the shop at lunch, and then be ready to start fresh at the end of the work day. Carbs off, motor in, oil-lines and breather lines completed. That's the goal for tomorrow...bonus points if I get the carbs back on :P

-Dave
--
'71 Type 1 - Rally Car Project
'75 Type 1 - Heirloom
'95 F150 - Unfortunate daily driver...

Offline owdlvr

  • Dave Hord
  • *
  • Posts: 1422
  • Karma: 10
    • Classic Car Adventures
Re: Dave's 1971 1302 Not-So-Secret, Secret Project Build
« Reply #166 on: March 28, 2012, 02:11:15 AM »
Started off this evening by stripping off the bolt-on oil sump (Good Riddance!!) and returning the pickup/cover to factory spec. I was considering tearing the whole motor down to get to the cylinder tins when I realized there wasn't enough room between the tin and the head fins for a bolt head anyhow. I really shouldn't be allowed to powdercoat my tin...I grind, cut and weld on it _after_ powdercoating! :P I'm pretty sure I'll be able to put the heat-shielding in while the motor is in the car, so I'm not going to wait around for it to arrive.


I had to wait around a bit to get a hand lifting the motor off the stand (the one thing I can't do solo). So in the meantime, I prepped the oil lines. Thankfully I was planning ahead when I had the motor in the car the first time, and had pre-measured the lines. I also made notes about where I would need heat shielding or other protection. So basically I just had to follow my own instruction sheet! The heat shielding is relatively obvious, but the other shield is simply left-over Flextech from the wiring harness. These two lines pass really close to a number of electrical connections so my hope is that this will keep them from rubbing through anything.


Once the motor was on the ground, I wasted no time in getting it into the car. I then wasted no time getting the motor OUT of the car, so that I could install the forward tin piece :P  The motor then made its way back into the car. Fortunately I hadn't bolted it in the first time!

The oil lines quickly followed the engine install. I ran the scavenge and pressure-out lines like I had them on my '69, below the exhaust pipe. The feed back into the engine goes between the two exhaust pipes. I did some head measurements on the '69 with the temp gun and this routing should be fine with the heat wrap in place. I'm thinking I may end up cutting the other two lines shorter to run them to though here as well, to keep them from hanging low. Will sleep on it (eventually!) to decide what to do. The photo does make it look far worse then it is, they hang about 1" lower then the heater box.


With the motor in I began making the rest of the crankcase breather lines. My spool of Russell -8AN line was getting to be very short, and I was starting to think I was going to run out of line. The crankcase lines are quite tight in a number of spots...and I won't lie, dropping the engine is going to be a bit annoying with all the oil and breather connections to deal with.


At this stage I was about to call my night a success, finishing all my goals, when I realized I had missed one line. There was still no oil-tank-to-firewall breather line....but there was no oil line material left in the box! All I had was about a 12" section on the floor, the final scrap. Unbelievably, it was 1/2" longer then I needed. One cut and a couple of fittings and the lines are done! Sixty-Five fittings, adapters or hose-ends make up the entire oil and breather system on the car. Popped the right-side carb on the engine to confirm all my lines clear, not quite sure how the ignition wires are going to work, but I'll solve that problem tomorrow.


-Dave
--
'71 Type 1 - Rally Car Project
'75 Type 1 - Heirloom
'95 F150 - Unfortunate daily driver...

Offline Jeremy

  • *
  • Posts: 977
  • Karma: 3
Re: Dave's 1971 1302 Not-So-Secret, Secret Project Build
« Reply #167 on: March 28, 2012, 11:36:06 AM »
Liking your build Dave. Not much of a rally guy but the attention to detail is top notch. Russel fittings isn't going out of business with you around. ;)
'59 Beetle
'59 Single Cab

Offline owdlvr

  • Dave Hord
  • *
  • Posts: 1422
  • Karma: 10
    • Classic Car Adventures
Re: Dave's 1971 1302 Not-So-Secret, Secret Project Build
« Reply #168 on: March 28, 2012, 11:43:39 PM »
I can't wait to see how much I've skewed the Lordco Squamish inventory. They're going to end up with a whole wall of -8 fittings that sit until I build my next project! haha.

Today I zipped down to see one of the guys off the Germanlook Forum to borrow the heavier springs he offered for testing some spring rates. Since I was halfway there, I also zipped out to AVR for a coffee (thanks Vic!) and to pickup some more parts. Outside of a few odds-and-ends, and the final rear spring choice, I think I finally have everything I need to finish the car.


I was absolutely bagged from the past week and hours of driving, but once I woke up from the couch I did my mandatory hour in the garage. Got the carbs on, the linkage in, electrical and fuel lines hooked up before I ran into a problem. CB Performance lists on their website "This pulley will clear all dry-sump oil pumps." What they forgot to mention, however, is that you may not be able to install the fan belt on all oil pumps. Sigh.


Okay, so not a huge deal in the shop. Pop the pulley off, slide the belt on and reinstall. As a roadside repair that means waiting for the pulley to cool, hoping you can wiggle it off and reinstalling...not ideal. Will have to check to see if different belt manufacturers use a thinner belt design. Will definitely be getting a serpentine belt system though!

-Dave
--
'71 Type 1 - Rally Car Project
'75 Type 1 - Heirloom
'95 F150 - Unfortunate daily driver...

Offline buddy boy

  • *
  • Posts: 1303
  • Karma: 5
  • Marked for life
Re: Dave's 1971 1302 Not-So-Secret, Secret Project Build
« Reply #169 on: March 29, 2012, 09:21:49 AM »
if you can manage to squeese it on the pulley it may be fine?.. i think it would be level or even sink in abit once its on.. not to sure.

"only dead fish swim with the stream"

Offline owdlvr

  • Dave Hord
  • *
  • Posts: 1422
  • Karma: 10
    • Classic Car Adventures
Re: Dave's 1971 1302 Not-So-Secret, Secret Project Build
« Reply #170 on: March 30, 2012, 01:50:57 AM »
I started to tackle the last dry-sump issue (I hope). The BugPack pump is long enough that standard exhaust systems won't fit, but a few cuts later...and it fits like a charm.


Hopefully I can get one of the guys at the Rallyshop to TIG weld it back up for me this weekend. Still deciding on whether I'm going to wrap the muffler or not, it's still pretty close to the oil pump heat-wise.


On the fan belt side of things, I opted to just pop the pulley off this time and mount the belt. I've only every had one fail, on a car I bought with a ratty belt, but that doesn't mean I shouldn't plan for the possibility while I wait for a serpentine setup. Not sure what the plan is at the moment, but I'm sure I'll come up with something. Sqeezing the belt on isn't going to happen, I gave it a good shot in ideal conditions! Can't turn the pulley down (belt rides right on it's outside edge) and can't machine the oil pump. The solution might be as simple as trimming a few teeth off a belt and taking it easy until the hotel. Not elegant, but it's such a remote possibility, on a setup that is temporary, I'm not sure another solution is required.

Moving to the interior for a change of pace, I popped on the rear interior panels and started on the cover for my access hole. Really not happy with it at the moment, I wanted to avoid a million bolts holding it down, but the seal I've used is so thick it distorts with the few bolts I've used. Might go back to the drawing board on this one.


And then it was back to the engine...I finally got around to buying high-flow heater boxes, though I will admit to buying the cheaper version. At this point saving dollars wherever possible is a good thing, and Rob and I figured I've fabricated enough at this point that I could fix any issues I encounter. First up was removing the flanges off the one end.


...I think I found the dollar savings :P  A few tweaks and I was able to get the brackets working. One on, one to go!


-Dave
« Last Edit: March 30, 2012, 09:40:57 AM by owdlvr »
--
'71 Type 1 - Rally Car Project
'75 Type 1 - Heirloom
'95 F150 - Unfortunate daily driver...

Offline owdlvr

  • Dave Hord
  • *
  • Posts: 1422
  • Karma: 10
    • Classic Car Adventures
Re: Dave's 1971 1302 Not-So-Secret, Secret Project Build
« Reply #171 on: March 30, 2012, 11:56:42 PM »
Started off by making the pieces to patch up the clearance hole I made in the exhaust. A friend at Rocket Rally is going to TIG weld the pieces in for me, and if I'm lucky he won't need to use any filler rod. Here's hoping my parts are a tight enough fit!


No problems at all with the second heater box...though I did manage to bolt it all up to the car before I realized that I forgot to cut the flange off the rear-end. Oops! Fortunately a sawzall made quick work of the flange and I'm ready for the muffler when it comes back from welding.


While I was under the car, I took the time to swap in the springs that Eric loaned me. They're a 550lb spring, but about 1.5" shorter then the 300lb springs I removed. Lowered to the ground, after a rough pre-load adjustment, the 550's sit about the right height for a "stock setup". The length of Eric's springs do let me max out the suspension height, but I'd be at the absolute limit of of the coil over threads. They have, however, served the exact purpose I needed, which was to figure out a starting point. I'll need to buy a longer length in 550, and I intend to do some crunch math tomorrow to determine the wheel rate on the car and why I was so far off with the 300's.


With the rear sorted, I figured I should adjust the front a little.


Nothing really special here, just a 1" 'lowering spring' which should probably get me to the ride height I wanted to start with. Again, the whole purpose of running standard-type springs up front is to give myself some resemblance of a starting point that I could work from for matching up the rear.


So here is the car sitting on the ground "dry". There's no fuel, oil, belts, seats, apron or decklid. But it does have all the glass, engine, etc. Sitting dry it's a great "rally height", which means wet I should end up a little closer to a street height. That also tells me that wet, I have some latitude for getting it up higher. I mean, it's all speculation at this point but it feels way better seeing it sit in a way I was expecting instead of scratching my head figuring out what the heck I messed up.


I figured I would end on a good note, and called it a night. LOTS of little jobs to accomplish this weekend, as well as that big job of lower shock mounts to be done at some point. I'm using outside help on that one, so I'll just work on knocking down the to-do list over the next two days.

-Dave
--
'71 Type 1 - Rally Car Project
'75 Type 1 - Heirloom
'95 F150 - Unfortunate daily driver...

Offline beetlemandan

  • Full Member
  • Posts: 594
  • Karma: 3
Re: Dave's 1971 1302 Not-So-Secret, Secret Project Build
« Reply #172 on: March 31, 2012, 05:19:33 AM »
i powdercoated my heaterboxes on my baja. 10 years later and they still look the same. there, now you have something to stew on sign0151
the customer is always wrong

Offline number3

  • Rob Frose
  • *
  • Posts: 395
  • Karma: 2
    • http://www.avrparts.com
Re: Dave's 1971 1302 Not-So-Secret, Secret Project Build
« Reply #173 on: March 31, 2012, 02:50:34 PM »
When are you going to mount the polished Fuchs? You_Rock_Emoticon

Offline Bruce

  • Full Member
  • Posts: 2912
  • Karma: -65458
Re: Dave's 1971 1302 Not-So-Secret, Secret Project Build
« Reply #174 on: March 31, 2012, 05:36:47 PM »
I know you're not going to want to hear this, but those manifolds will not survive.


They are the same as what I have on my car, they're junk!  The bottom flange will break off unless you reinforce it.  3 of the 4 ends of the flange have broken on mine at various times.

Find some 3mm Al sheet.  Cut 45º right angle triangles about 1" long on the two short sides.  Then weld one on each side of the nut holding them to the heads. 
Resist the urge to pile up weld, it doesn't work.
Sand the bottoms on a flat plate with a sheet of 120 after welding.
« Last Edit: March 31, 2012, 05:42:03 PM by Bruce »

Offline OUTKAST

  • *
  • Posts: 1908
  • Karma: 3
Re: Dave's 1971 1302 Not-So-Secret, Secret Project Build
« Reply #175 on: March 31, 2012, 06:56:49 PM »
Thread progression awesome : )

Offline owdlvr

  • Dave Hord
  • *
  • Posts: 1422
  • Karma: 10
    • Classic Car Adventures
Re: Dave's 1971 1302 Not-So-Secret, Secret Project Build
« Reply #176 on: April 01, 2012, 01:46:24 AM »
C'mon Bruce! Keep up! You couldn't have told me this three days ago when I was in "assemble motor" mode? Geesh.

;-)

Thanks for the tip. Might pull them off before Spring Thaw to modify, but for the moment going to get things running / tuned / sorted. That sounds like a good weekend project for the near future though.

---------

Today started off as a bit of an odds-and-ends days. I was working on the heater box cable linkage when I got the call that Nick was over at the rally shop. I loaded up the wheels and tires that have been in on the car, and took care of flipping the tires around (so the overspray from previous paint job doesn't show) as well as solve the slow leak in two of them. Rusty rims were attacked by the wire wheel and all seems to be holding air now. Not that I plan to use these wheels and tires, but so far Lorne hasn't had time to dig up the rims I'm getting from him and tire-company-which-will-remain-unnamed hasn't jumped on board with some fresh shoes for the car. So, for the moment, it will have to hang out on these.

I also mounted up one of the spare 15" snow tires I have kicking around. By law where I live you have to be running snows (or carry chains) until April 30th, so when I get the car on the road I'm going to need something for while I'm out doing shakedown runs. A 195/55/15 looks hilarious on a 4" rim...but not exactly safe. Will have to see what else I have hiding in the tire and wheel collection. Might be time to break out the original German Sprintstars!

While I was playing with tires, Nick was welding my exhaust (and swearing my name). I guess the only stainless I could get in town was causing him fits as it was a bit thin. Good thing he's had my sandblasting cabinet for six months...otherwise I might owe him an even bigger favour :P  With the exhaust welded up, tires ready, and the heater box cables hooked up I then moved on to sorting out the other "under car" items I need to deal with. The starter was wired up, one transmission leak was "solved" and another mysterious leak found...but still mysterious. I'm getting a clear-yellow fluid with no smell weeping down the side of the transmission it takes over a week to form any thing even close to a drop-sized amount on the bottom of the transmission. It would seem to be coming from the reverse switch seal, as that portion is wet but not immediately above it. The weird part, though, is the transmission fluid is red...and this doesn't smell at all like trans fluid. My initial thought was brake fluid, but all the fittings and lines on the rear are dry. Very odd.

Leaving that alone, it was time to hook up the heat between the engine and the body. The '71 came to me with these terrible black plastic units which obviously won't fit with all the stuff I've crammed in under the car, so I began stripping it down to it's core to determine what I might be able to build to suit the purpose.


I was thinking of taking the plastic core, and simply wrapping it in heat wrap, when I found stainless steel corrugated pipe in one of my many parts bins. Dad had given these to me years ago when I bought the '69 (and promptly stole as many parts from him as possible). I remember him mentioning that he used to use similar stuff in the engine bay for heater tubes. (Must have been those whacky 80's). For what I needed though, they'd be perfect.


I didn't want to leave them just as the bare metal, as I do know that the airflow right out of the heater boxes can be incredibly hot. No need to risk melting any wiring when I have a spare roll of exhaust wrap kicking around. Finished heater duct, ready for install:


While I had the exhaust wrap out, I took the time to wrap the portion of the muffler that close to the oil-pump. I definitely didn't want to wrap the muffler, as this stuff retains moisture and frays, and looks like crap after a while...but at the same time I'm so close to the oil pump I think anything I can do to help with heat is a good idea. I'll get rid of the hose clamps once I figure out where I put my stainless safety wire.


I figured that mounting up the exhaust was going to be a breeze, but then discovered a problem I hadn't thought of. When I ordered the exhaust with Vintage Speed I was running standard heater boxes, but after seeing the quality knew I just had to uprate them to high-flow boxes. The problem was that Vintage Speed had sent me the flanges I originally requested, which were for stock sized pipes. A few cuts with the angle grinder, about 6 on-and-off fittings of the muffler, a little welding...a bunch of grinding...and I had flanges mounted to my heater boxes.


Muffler and rear tin installed:


...and with the rear apron and heater hoses:


I have to say, I am soooo stoked on the body modifications I did. Between the firewall move, the Weber doors, access panel and the removable apron I can't pick my favourite...they are all so awesome. I can't believe I worked on the '69 for so long without any of these mods. I don't think I could own a modified Beetle without them now. That month of cutting, welding and grinding was 100% worth it! Case in point, I pulled the plugs to prep the car for building oil pressure. Took me 30 seconds, and one long spark plug extension. True, I have the wheels off so it's easier, but that would have been a bear of a job without the weber doors.

Where were we? Oh right, oil pressure. Well, for whatever reason I decided to prime the fuel pumps first. 10L of fuel went into the car (no leaks!), but my fuel pump wiring isn't working as planned. Pump one is working fine, but doesn't shut down without a tach signal as it should. Pump two has an issue at the switch, which is new as I know I had the pump working when I was testing the dash. Regardless, #1 was pumping away and I was working on solving number two when I realized it was getting really smelly in the garage. "Hmmm, has the fuel gotten to the back already?"  I could hear air bubbles working their way out of the system as I walked back, only to realize that no...those are airbubbles being worked out of the #4 intake runner as the left-side carb pukes fuel everywhere.

Yeah, float level? Not so correct.

With that fixed, I have a surprisingly well-sealed fuel system! The fuel tank breather still needs finishing (just an 8" hose at the moment) but otherwise it's leak free.

I filled up the oil tank, oil filter and tossed a litre in the case-sump to help prime the scavenge stage of the system. I started priming the oil system and realized a few things. First off, this was going to take a while due to all the lines...and secondly, if you're contemplating a 901 swap...do the starter modification now before you install it. My starter doesn't engage the teeth properly every time, so until I mill .100" off the front face of the starter I'm going to sound like a jalopy every few startups! 

Priming the oil system sucks. On a stock 1600 build you might have to hold the key for a total of 30 seconds to prime the pump and the engine...but I have like 30ft of oil lines and accessories. This isn't going to go quickly! The whole time that poor motor and its bearings are riding on assembly lube and/or oil-film. I usually begin by undoing the outlet on the oil pump so that I can go in 10sec bursts until oil is being pushed out the pump. Then I attach the pressure line, and disconnect it at the next fitting. Again running the engine in short bursts until I can see oil. I do this at every fitting, every stage, for the whole oil system. Things like the accusump and oil cooler are disconnected (and their fittings capped) until I can reliably build oil pressure. It takes forever, but at least I can check each fitting for leaks as I go.

About an hour ago I finally built up pressure in the engine with everything but the Accusump lines attached. With it being so late, I figured that my neighbours would probably appreciate me packing up for the night and installing the plugs tomorrow. I have to run down to Vancouver at some point, but hopefully I will still have time to shoot a video of it firing up. Not bad for seven months work!

-Dave
--
'71 Type 1 - Rally Car Project
'75 Type 1 - Heirloom
'95 F150 - Unfortunate daily driver...

Offline owdlvr

  • Dave Hord
  • *
  • Posts: 1422
  • Karma: 10
    • Classic Car Adventures
Re: Dave's 1971 1302 Not-So-Secret, Secret Project Build
« Reply #177 on: April 04, 2012, 11:25:05 AM »
This forum needs more build threads! ;-)

Alright, where was I?  Oh right, Saturday night I went to bed with the oil system primed. I slept in a bit on Sunday, then headed down to the shop to fire things up. I had to button up the top half of the motor, and deal with a few little issues, but soon the time came to turn the key for the first time. I held by breath, pumped the accelerator twice and promptly ground the starter gear into the flywheel.

Crap.

I am fully aware of the issue that the starter only engages about 1/3 of the flywheel teeth width, but other porsche-box swappers seemed to have neglected to report the fact that this means you'll likely be grinding the starter on a number of attempts to start. Okay, mental note...pull starter so that material can be milled off the face. I turned the key a few more times before it finally launched itself into mesh, and the motor fired right up!

There is that moment of elation, where you realize it's finally happening, you're close to driving, you blip the throttle twice (always twice...why is that?), walk to the back of the car and see a nice puddle of synthetic forming on the floor…


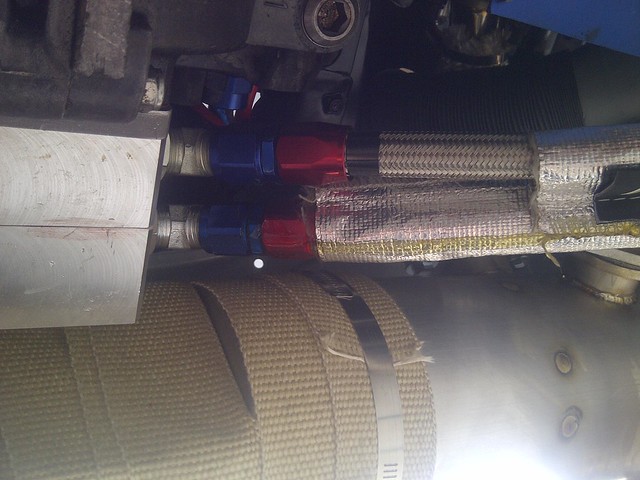
Turns out I forgot to tighten one of the oil lines which is close to the exhaust, almost impossible to get a wrench into...but after a few choice words I managed to get it tightened up.
 

I fired the car back up again, with the intention of letting it warm up enough to start bringing the oil up to temperature, and shoot a video of the car actually running. I couldn't quite place it, but the engine "sounds funny". It's got a strange hollow sound to it, and there was definitely more noise to the engine then I think there should be. Problem is the bottom end hasn't been touched, so it should be fine...unless I managed to flatten the cam while priming the oil system? Either way, I had to leave the car as is and run some company errands for Classic Car Adventures. On the way to Vancouver I called Mark Huebbe in Missouri and talked with him about his dry-sump engine, which is the closest in setup to mine as I can find. No strange noises from his, and certainly no 'hollow" sound. He's run his dry of oil a few times, and the bearings (checked months later) always look perfectly fine...so he did calm me down a little!

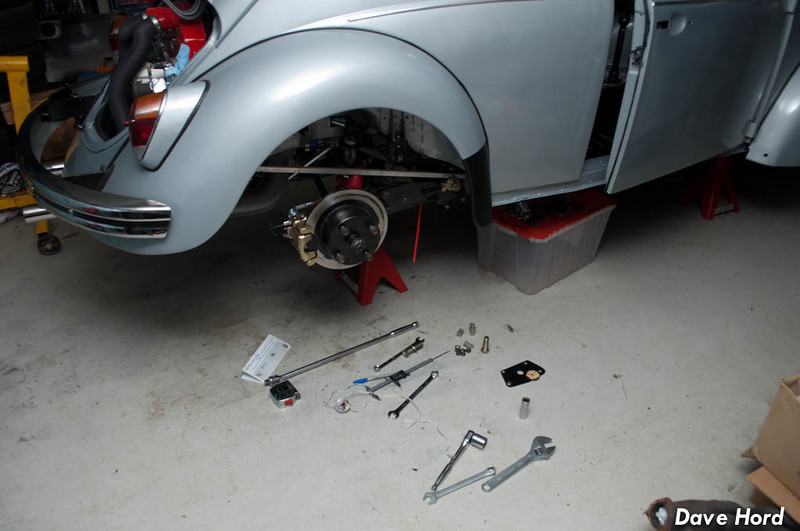
When I returned to the car, I figured I would ignore the engine momentarily and instead work towards getting the rest of it ready. I was planning on an alignment Tuesday, so started working on the rear suspension. Through a series of strings, measurements, 3D modelling and lots of scribbles on cardboard I thought I was getting a good grasp of the rear suspension alignment. Math was never my strong point in school, so sorting this out was one of the more challenging aspects of my build! By Sunday bed time I figured I had the rear end either somewhat close...or so far off it was to be laughable.


Monday started with a 4am run across the border to grab some parts I had shipped to Blake, back in time for work. Warwick had also returned home on Monday, so while he was gearing up for working on the Mini I figured it was a good time to get a second ear listening to the engine. From the very beginning I figured it was my mind playing tricks on me, and that fear of destroying something while priming it. I honestly think I get this every time I setup a new build! I fired it up, grinding the starter a few times in the process, and Warwick confirmed that it "doesn't sound bad at all. A little 'clackety', but not 'gonna blow up tomorrow' bad". Hmmm, clackety is probably the valve adjustment. Duck an ear into the fender and sure enough 1/2 is sounding quite loud. I did a quick valve adjustment,  even though things were a little warm at this point, and as soon as I did all sounded normal. Ah yes, 24 hours of torture because I can't remember what a Volkswagen should sound like!

The odd part is that I was sure I checked the valves on #1 while it was on the stand. If I _did_, then I most likely have an issue where the cam is going flat or similar. But I do know for a fact that I did not do a valve adjustment on all four, and even said to myself "I might as well do that when it's in the car"...so there is a very good chance they were just "in need" and there were no problems. Will have to adjust them cold, and then keep track if they are changing at all.

With that, I moved onto swapping out the springs. I picked up a set of Eibach 550’s in an 8” length, an they’re a perfect fit.


Yesterday was Alignment Day…or so I hoped. I did drive the car out of the garage and onto the trailer, which I have to be honest brought a huge smile to my face. It came off the trailer and onto the rack with no drama. OK Tire in Squamish was pretty incredible about the whole thing. I explained the issues with the rear end, and he agreed to three setup and alignments charged at the end based on the time it took the boys. We would need to measure, then take the car home to change the rear end, measure again (thus giving me a baseline of “two turns equals X degrees) and then go home for a final measurement change.

Off to the gas station for the first time!


Once I got the car on the rack it was apparent that the first thing I would need to do is fix the fuel leak :D  Fortunately it was a quick hose clamp, for the gas heater and NOT the one  found buried under the tank!

Grant at OK Tire called me about 30min after I dropped it off to say “come and get it”. The rear end was so far out it would have to come home. -2.2deg of camber on the left side, -0.8 on the right. 0.18deg positive toe on the left, 0.30deg of negative toe on the right. Well shoot, I didn’t even realize camber was that adjustable on the rear, how would I fix that!?!


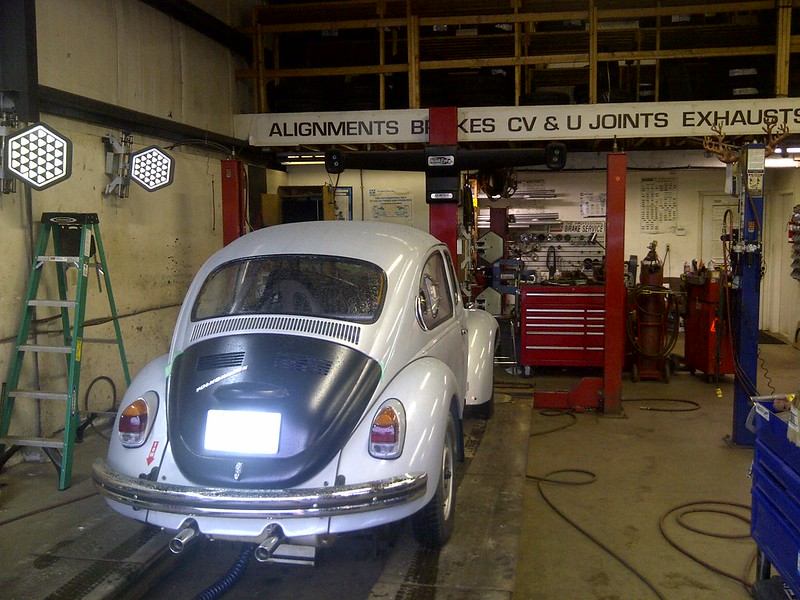
Thankfully Bruce Tweddle’s post on TheSamba was readily available on my iPad, and the camber adjustment was easy enough. I dialed in back end of the car over lunch, and brought it back at the end of the day. We tossed it up on the rack and found that I had fixed the left side, but gone way too far on the right. That’s when Grant came through with the best news ever. “I don’t have another car booked on the rack, if it won’t take too long just fix it here.”

We jacked up the rear, pulled the tires and in less then ten minutes we had adjusted and checked the suspension twice. I’ve got .06deg negative toe on both sides, and -1deg of camber on both sides. I left the guys to dial in the front, but thankfully caught them before they had finished the camber adjustment. The factory spec calls for .2 to .8 positive camber! Uh yeah, sorry guys but I’m not doing that! We dialed in a half degree negative and I’ll see how that works out.

…and that’s where it sits right now. I can’t drive it because I still need to tune the carbs, and fix the lower shock mounts on the rear. The 50ft between the trailer and my driveway were quite exciting though. My shifter setup works perfect for going from dogleg 1st to 2nd without catching reverse, but that’s about all I can report.

-   The starter grinds
-   The clutch feels HORRIBLE (needs additional return springs for sure)
-   The throwout bearing is noisy (oh weee, another engine pull)
-   …and I think I found a few other issues. But hey…

IT DRIVES!!!

Also had to dial in a few things for weatherproofing the car (it was raining yesterday). So Monday night saw the addition of the engine deck lid, some ducting for the oil cooler, door handles and a few other odds-and-ends.

I kinda wish I could run without a license plate! Mounting the decklid did reveal an item I forgot to pre-plan for. The license plate light has no wiring, and no where to connect it! Whoops.


With the plate installed. The plate sits on ¾” spacers to allow for airflow. You can see the green tape in the corners, I can’t find a way to adjust the decklid so it doesn’t hit here. Might just use 3M stoneguard to protect the paint.


The oil lines are actually tucked up quite high, this is temporary with zipties but now I know where to put the proper clamps.


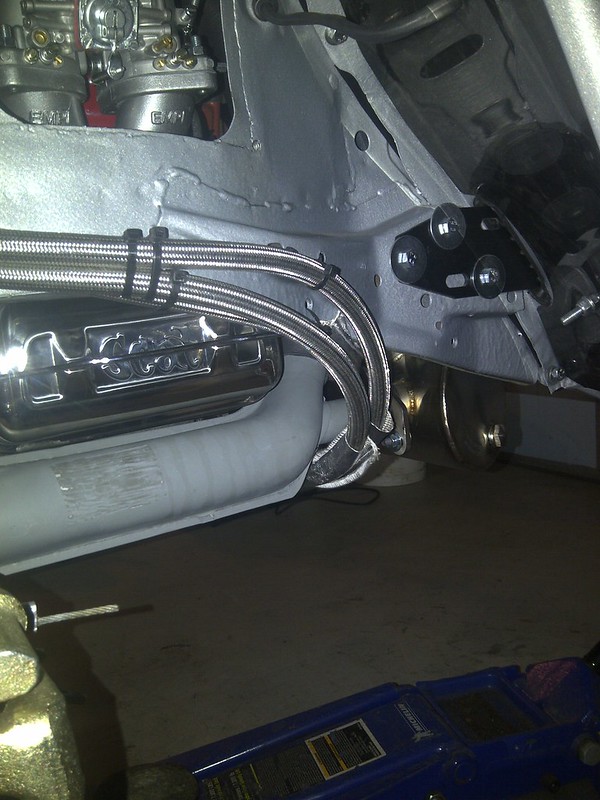
Oil cooler ducting. I have a tube of really nice proper racing duct, but unfortunately it’s just long enough for one side. It’s the high-temp silicone hose type for brake ducting, so I think I’m going to reserve it for front brake ducts should I ever decide to add them.


But really, you all came here for videos. So here’s a couple of startup/idle vids.

#1 is Monday night, you can hear the valves clattering. http://www.youtube.com/watch?v=bH-Q6ZtgXbw
[youtube]http://www.youtube.com/watch?v=bH-Q6ZtgXbw[/youtube]

#2 is today, quick start up…needs some tuning.
http://www.youtube.com/watch?v=iLRz--T2FZo
[youtube]http://www.youtube.com/watch?v=iLRz--T2FZo[/youtube]

Eventually I have to return Geoff’s trailer to Vancouver…so I’m going to see if I can rope either he or Darren into some carb tuning ☺.

-Dave
« Last Edit: April 04, 2012, 12:11:12 PM by owdlvr »
--
'71 Type 1 - Rally Car Project
'75 Type 1 - Heirloom
'95 F150 - Unfortunate daily driver...

Offline buddy boy

  • *
  • Posts: 1303
  • Karma: 5
  • Marked for life
Re: Dave's 1971 1302 Not-So-Secret, Secret Project Build
« Reply #178 on: April 04, 2012, 12:19:48 PM »
insane !!!!

"only dead fish swim with the stream"

Offline OUTKAST

  • *
  • Posts: 1908
  • Karma: 3
Re: Dave's 1971 1302 Not-So-Secret, Secret Project Build
« Reply #179 on: April 04, 2012, 01:07:29 PM »
Awesome sounds good all that hard work and inovation is almost ready for a good test ride, Way to go incredible motivation .Can't wait to see it in person : )