Author Topic: Dave's 1971 1302 Not-So-Secret, Secret Project Build  (Read 148465 times)

0 Members and 2 Guests are viewing this topic.

Offline owdlvr

  • Dave Hord
  • *
  • Posts: 1422
  • Karma: 10
    • Classic Car Adventures
Re: Dave's 1971 1302 Not-So-Secret, Secret Project Build
« Reply #270 on: December 19, 2012, 01:41:04 PM »
The motor has been back together for two weeks, and I've put almost 2,500km on it. So far the engine has been trouble free, and I'm even letting it idle for short periods while I walk away. I guess you could say I'm testing my luck, but so far there hasn't been any problems.

The current oil setup, including the fittings, was modeled after the Huebbe brother's setup. They've been stage rallying their car without oil issues for a few years now, which is why I figured it was the safest way to go. I have been looking into new fittings on the pump, however, as they do look pretty restrictive. Only the fittings on the pump are the steel industrial units, everything else is a proper aluminum -8AN fitting. The steel fittings on the pump are the same fittings the Huebbe's and I have used without problems (until now)...but at this stage I should be tweaking everything I can.

Upon reassembly I obviously measured everything, once again, but this time found one item which I had missed on previous builds. The magnetic drain plug was long enough to be touching the screen. While it *shouldn't* cause a problem, with heat I suppose it's possible that it could have reduced the opening gap for the pickup. Next time I have the engine apart I plan to cut the pickup on an angle to reduce the chances of a occurrence. For now I've tossed a washer in as a spacer. Sometimes the quick fix is just as good.


A new issue, which is probably related, is that the Accusump stopped holding pressure. Now to be fair, I think this was an issue prior to the big failure...but I broke the gauge on the Accusump months ago and haven't fixed it. In order to swap out the gauge I needed to remove the Accusump, so I was simply waiting until an oil change with some time. Over the previous months I've noticed it was slowly leaking down pressure, like if I left the car for a week or more it wouldn't have the pressure to pre-oil. Without having the gauge on the unit I couldn't tell if it was the ball-valve leaking down, or an issue with the Accusump. Once installed with the new gauge, I quickly determined it was leaking down. Within a couple of days of use, it wasn't holding any pressure (or indeed building pressure when the engine was running). A few emails to Canton Racing and it was agreed the internal seals on the piston were probably in need of replacing. Considering I've been using it daily, not really surprised.


The Accusump isn't designed for user-servicing. Canton requires that all units are sent back to the factory, except for a few teams who do refurbish their own. I was given the go-ahead, and a list of mistakes to avoid. But first, one has to create a key to get into the secret vault...


With that done, I popped open the Accusump and immediately found the problem. The first thing they check when rebuilding these units is scoring on the cylinders. If the cylinder is scored, the unit needs to be replaced...and I won the bad-luck lottery. Obviously the Accusump ate some hard particles at some point, which I suppose isn't surprising considering I've roasted a couple of motors with it. The score marks are also on "the bottom" of the cylinder with respects to how I had it mounted, so the particle(s) were probably settled on the bottom and then caught up in the seals.


A few emails back and forth with Canton, and I'm going to need a new Cylinder. Since they don't sell refurbishment parts, that's going to be a challenge as I missed the production run for the year. Hmmmm. They're looking to see if they can find a cosmetic blemish unit, and in the meantime I've decided to clean up the scoring marks. While waiting for the correct sized O-rings, I figured I would try the closest-fit from the local industrial shop, just to see if I'm wasting my time. In went the O-rings, in went the Accusump and voila! Holding pressure...for a while. Interestingly it's now holding oil pressure, but not holding pressure on the air-side of the chamber. I suspect with the proper sized o-rings it will all work as planned. Might make it without a new cylinder after all!


Also started on a new project for the car, I've been getting tired of 'bouncy tach', and tore apart a spare Stewart-Warner performance Tach to start playing around with sizes. It's going to take a bit of work to get it to fit/work in a 914 Tach housing, but i have some ideas on how to make it work.


I also spent some time tuning the gas heater this week. I was having some issues with it cutting out, or taking a long time to fire up. Through adjustments to the flame switch I think I've finally got it running close to factory spec. It now runs continuously without cutting out, which is great. I should be getting just a bit more heat out of it, but my fuel pump adjustment is maxed out. That's the Achilles heel with using a gas heater these days, the pumps aren't available new and everyone I have is just slightly under the factory spec for output.


-Dave
--
'71 Type 1 - Rally Car Project
'75 Type 1 - Heirloom
'95 F150 - Unfortunate daily driver...

Offline Bruce

  • Full Member
  • Posts: 2912
  • Karma: -65458
Re: Dave's 1971 1302 Not-So-Secret, Secret Project Build
« Reply #271 on: December 21, 2012, 08:50:31 PM »
Does your heater have the remote pump under the car, or mounted right on the heater?
I've got to get my heater's pump working right too.

Offline owdlvr

  • Dave Hord
  • *
  • Posts: 1422
  • Karma: 10
    • Classic Car Adventures
Re: Dave's 1971 1302 Not-So-Secret, Secret Project Build
« Reply #272 on: December 21, 2012, 09:47:15 PM »
Does your heater have the remote pump under the car, or mounted right on the heater?
I've got to get my heater's pump working right too.

I've got the remote (newer) pump under the car. I have at least one or two spare on-heater pumps, but haven't checked their functionality since I prefer the under-car units. I do have a few (6 or 7) spare gas heaters as well.

What's the issue with your heater?

-Dave
--
'71 Type 1 - Rally Car Project
'75 Type 1 - Heirloom
'95 F150 - Unfortunate daily driver...

Offline owdlvr

  • Dave Hord
  • *
  • Posts: 1422
  • Karma: 10
    • Classic Car Adventures
Re: Dave's 1971 1302 Not-So-Secret, Secret Project Build
« Reply #273 on: December 31, 2012, 08:09:20 PM »


We've had a fantastic December in the area as far as snow is concerned, which has been fun for the bug and I. Learning the switch from All-Wheel-Drive to RWD has been, uh, interesting...but I've got the hang of it for the most part. I have stuffed good at least once, but following a few snowstorms I'm feeling pretty comfortable up into mid-fourth gear. Now I need to transfer it to more slippery surfaces, as I've got 20 days to ice racing!


Started playing around with the tachometer project, its going to be a little more involved then I anticipated. I need to work out how to remove 3/4" in depth from the Stewart Warner tach internals before moving forward. I think I've figured out how to attach a face-dial, and the Porsche needle will simply need to be drilled out to fit the SW motor.


On the one hand, my motor will definitely be rust free. On the other hand, an oil leak is never appreciated. Turns out the pressure switch was leaking through and out the electrical connection. Rather annoying, as with the Christmas rush it took a couple of days to figure out that simply tightening things up back there wasn't solving the issue! Finally stopped to run the engine while I watched, and the issue was quickly determined (and solved).

-Dave

--
'71 Type 1 - Rally Car Project
'75 Type 1 - Heirloom
'95 F150 - Unfortunate daily driver...

Offline Hansk

  • Full Member
  • Posts: 1638
  • Karma: 4
Re: Dave's 1971 1302 Not-So-Secret, Secret Project Build
« Reply #274 on: January 04, 2013, 11:26:12 PM »
Ice racing?  "Cars on ice" ? Looks like they have cancelled this season.
Big fat black fastback

Offline owdlvr

  • Dave Hord
  • *
  • Posts: 1422
  • Karma: 10
    • Classic Car Adventures
Re: Dave's 1971 1302 Not-So-Secret, Secret Project Build
« Reply #275 on: January 05, 2013, 01:16:00 AM »
Cars on Ice have indeed cancelled their season. The rally club, however, uses their track on weekends where they aren't running. I'm a little skeptical that the organizers of this years rally club events have sorted plowing, but participants have been told an ice-report and update is coming this week.

-Dave
--
'71 Type 1 - Rally Car Project
'75 Type 1 - Heirloom
'95 F150 - Unfortunate daily driver...

Offline Hansk

  • Full Member
  • Posts: 1638
  • Karma: 4
Re: Dave's 1971 1302 Not-So-Secret, Secret Project Build
« Reply #276 on: January 05, 2013, 08:23:12 PM »
So would it be individually timed laps or door to door racing?
   (was going to warn you about getting door to door with the carsonice bunch)
Big fat black fastback

Offline owdlvr

  • Dave Hord
  • *
  • Posts: 1422
  • Karma: 10
    • Classic Car Adventures
Re: Dave's 1971 1302 Not-So-Secret, Secret Project Build
« Reply #277 on: January 05, 2013, 11:56:40 PM »
The rally club always does timed laps, one car at a time as per our Rallycross regulations. I know the Cars-On-Ice series and action quite well, one of my Squamish buddies is involved in the series. Definitely wouldn't be risking the bodywork with that crowd!

-D
--
'71 Type 1 - Rally Car Project
'75 Type 1 - Heirloom
'95 F150 - Unfortunate daily driver...

Offline Hansk

  • Full Member
  • Posts: 1638
  • Karma: 4
Re: Dave's 1971 1302 Not-So-Secret, Secret Project Build
« Reply #278 on: January 06, 2013, 12:11:08 PM »
Ahhh. Very cool! Did some ice racing in the 90's in a 71 super. Always wished they would set up some timed lap events instead. That car is no longer with us.
Would street cars be able to run on the ice with the rally club?
Big fat black fastback

Offline owdlvr

  • Dave Hord
  • *
  • Posts: 1422
  • Karma: 10
    • Classic Car Adventures
Re: Dave's 1971 1302 Not-So-Secret, Secret Project Build
« Reply #279 on: January 06, 2013, 01:12:41 PM »
Ahhh. Very cool! Did some ice racing in the 90's in a 71 super. Always wished they would set up some timed lap events instead. That car is no longer with us.
Would street cars be able to run on the ice with the rally club?

Yessir, 95% of the entries are street cars.

www.rallybc.com

The Jan 20th date is sold out with a waiting list, but there will be a March date as well. Best bet is to join the "wrca rallyX" page on Facebook (if you're a FB user) as they do post information about registration there.

-Dave
--
'71 Type 1 - Rally Car Project
'75 Type 1 - Heirloom
'95 F150 - Unfortunate daily driver...

Offline pittwagen

  • Full Member
  • Posts: 589
  • Karma: 2
Re: Dave's 1971 1302 Not-So-Secret, Secret Project Build
« Reply #280 on: January 06, 2013, 02:39:57 PM »
Dave, what tires and sizes are you running for your around town snow driving?  Thanks.

Offline owdlvr

  • Dave Hord
  • *
  • Posts: 1422
  • Karma: 10
    • Classic Car Adventures
Re: Dave's 1971 1302 Not-So-Secret, Secret Project Build
« Reply #281 on: January 06, 2013, 06:44:14 PM »
In previous years I've run the Toyo G02+ in the city/around town, a Yokohama IG20 for ice and the Kumho KW-22 for snow. This year I thought I would change my strategy a little, and go with a single tire for winter. I'm running 185/65/15's, and chose the Kumho KW22 as I expect to race in a good amount of deep snow. If I was anticipating driving on mostly plowed conditions with a little deep snow, I'd run the Toyo G02+ as my winter tire.

If I was back living somewhere that's cold all the time and mostly plowed (like Toronto), ice would be the number one condition and thus I'd have the Yokohamas as my single tire.


I've been really happy with the Kumho's through the Sea-to-Sky.

-Dave
--
'71 Type 1 - Rally Car Project
'75 Type 1 - Heirloom
'95 F150 - Unfortunate daily driver...

Offline pittwagen

  • Full Member
  • Posts: 589
  • Karma: 2
Re: Dave's 1971 1302 Not-So-Secret, Secret Project Build
« Reply #282 on: January 07, 2013, 01:20:36 PM »
Thanks for the.reply.  I'm currently running Hankook Zovacs -165/R15 and they seem to be a fairly hard compound despite all the siping.  Pretty easy to lock up the front wheels on a slick surface. The tread is very skinny as well.   I do not believe there is a soft compound tire available in the stock size, at least around these parts. Maybe I'll need to switch to some 65 series tires to get a more favourable compound. Not a big fan of too wide a front tire on a beetle.  You probably have quite a bit more weight up front than I do on the 73 standard so front wheel lockup is not as big an issue.

Offline silas

  • *
  • Posts: 6822
  • Karma: 20
    • Some cool videos...Check them out!!
Re: Dave's 1971 1302 Not-So-Secret, Secret Project Build
« Reply #283 on: January 07, 2013, 10:03:32 PM »
really hoping to see some sideways in the snow pics and/or vids soon dave!!  ;) :laugh:

Offline owdlvr

  • Dave Hord
  • *
  • Posts: 1422
  • Karma: 10
    • Classic Car Adventures
Re: Dave's 1971 1302 Not-So-Secret, Secret Project Build
« Reply #284 on: January 08, 2013, 01:17:44 PM »
Will hopefully grab some on Friday...

-Dave
--
'71 Type 1 - Rally Car Project
'75 Type 1 - Heirloom
'95 F150 - Unfortunate daily driver...

Offline owdlvr

  • Dave Hord
  • *
  • Posts: 1422
  • Karma: 10
    • Classic Car Adventures
Re: Dave's 1971 1302 Not-So-Secret, Secret Project Build
« Reply #285 on: January 12, 2013, 12:27:29 PM »
I was invited to check out a driver training center just North of Whistler yesterday, and so popped the car up on axle stands Thursday to give it a "pre-event" check. I was anticipating an issue with the rear wheel bearings on the right-side, and I wasn't "disappointed". The metal washer between the disc and bearing spacer had cut into the seal, destroying the first lip. Dirt then destroyed the second lip and the outer bearing had water/dirt ingested.


Normally the job is annoying, but not too difficult. Public Service Tip: if you weld all new lower shock mounts onto your control arms, confirm that you can still remove the axle stub before assembling the car for the final time. Oops. Once I pulled the shock out I was able to get *just* enough room to cut away the required material. A mere 5mm was all I needed. With the stub axle free, the job was as per any other Volkswagen. Greasy but easy. Alas, we had incredible amounts of snow in the last few days, and the skid pad plowing went much slower then anticipated. Event postponed...but I'll get out there soon enough. This does mean snow photos/video will need to wait as well.

The Pre-event check also determined that the mud simply never stops. Geesh.


Back to the tach project. Started with a lot of measuring, and some basic drawings / concepts to figure out the direction I was going to go.


In order to get the drawings perfect I'm using a combination of Rhino3D, and then exporting it to Adobe Illustrator before finally exporting it to my vinyl cutter. The three steps opens a lot of room for file error, so test cuts are required.


Once the file was sorted out, various stages of 'look' for the tach dial.


The new tach will have the turn signal indicator where I can see it, as well as the high-beam indicator and an oil-cooler fan indicator so I can see when the fan is on (either tripped by the thermostat or by my override switch)


After modifying the internals of the Stewart Warner Tach, and then determining that my original plan of mounting it all inside the Porsche housing wasn't going to work, it was off to the Lathe! Unfortunately, this is where the project sits for the next little while. A slight 'lathe accident' means I'm on the hunt for a new 914 tach housing :P


-Dave
--
'71 Type 1 - Rally Car Project
'75 Type 1 - Heirloom
'95 F150 - Unfortunate daily driver...

Offline owdlvr

  • Dave Hord
  • *
  • Posts: 1422
  • Karma: 10
    • Classic Car Adventures
Re: Dave's 1971 1302 Not-So-Secret, Secret Project Build
« Reply #286 on: February 11, 2013, 05:40:13 PM »
Well, rather long since an update. Whoops. Canton Racing and I had been talking about refurbishing my 1-quart Accusump, and after trying a few of their suggestions we determined the damage was too extensive. Lucky for me, however, as Canon Racing loved the build and sent me a little care package:


Inside was a 2-Quart Accusump, and Canon Racing Products oil filter. Part of the issue with my original Accusump could have been attributed to less-then-ideal filtering, and this new oil filter cuts down to 8-microns. I'm pretty stocked to add this into the oil system.


Installed and working like a charm. I'm back to pre-oiling before each startup, which I feel much better about.

You may have noticed the paper towel stuffed down beside the heating pipe...had a bit of 'fun' while swapping out the Accusumps. I was undoing the AN fitting on the old sump, sure that the line was depressurized since the gauge said zero. But just as I'm doing the last 1/4 turn my brain asks "what if there is no pressure on the air side, and the piston is all the way against the case?" BOOM! The line released and about 1/2 quart of oil went EVERYWHERE. My jeans were ruined, but only because I worked frantically to clean off the headliner, windows, back of the driver's seat, floor, door cards and everything else. Did I mention I was going to a work Christmas Party (we do ours in Jan) and thought "oh I'll just do a quick swap before I leave."?  Oops.

I also got fed up with people who think they're funny at Gas stations, and decided to add a touch of clarity to the roof logo on the car. No more questions or jokes regarding a certain 30's-40's German political party.


…and then I got a few weeks of trouble free driving before the car started spitting a popping a bit on idle during warmup. I figured I had a bit of tuning to do, but had a couple of busy days at work which included trips back and forth to Whistler. This coincided with my wide band 02 sensor taking a dive, so it was hard to say whether or not I was experiencing a major issue. On day two, I noted a bubble in the paint on the apron upon arriving in Whistler. Doh. Limped it home, cleaned the jets in the carb, checked the timing and then fired it up. Within seconds the apron on the left side was noticeably hotter then the right. Pulled the apron off, and there's your problem!! No wonder the wideband was showing impossibly lean settings at idle!


The emergency exhaust gaskets I got on the last engine install were apparently really short-life units!


I knew getting gaskets to fit the Vintage Speed exhaust in my hometown wasn't going to happen. And while AVRparts.com had a set on the shelf, that means they would have a system they couldn't sell until replacements came in. Time to find a better option!


I've read a lot about Remflex gasket material, it's 100% graphite material, and is often used successfully for pitted and warped header flanges. Could be awesome in this application, as the Vintage Speed flanges are pretty long and narrow, making them challenging to seal if you're not careful. The Remflex is 1/8" thick, and crushes down to 1/16" (but seals long before that apparently). I traced out the flange, and cut out gaskets using a hobby knife and punch for the bolt holes. So far, so good! If the gaskets aren't the reason I pull the exhaust next, they'll definitely be a success.

-Dave
--
'71 Type 1 - Rally Car Project
'75 Type 1 - Heirloom
'95 F150 - Unfortunate daily driver...

Offline josh

  • *
  • Posts: 2248
  • Karma: -17
Re: Dave's 1971 1302 Not-So-Secret, Secret Project Build
« Reply #287 on: February 12, 2013, 09:38:45 AM »
I've used that stuff, it's good just don't go torque crazy! Been dressing flanges on the belt sander (crazy how un-true they are after getting welded!!) and just using copper silicone on both sides, let tack up a couple mins, mate parts with only a snug then wait a couple hours if not overnight and torque down rest of way.......sequence is very important, skimp on any of the steps and  "results may very" ;D
55 ragtop T1
56 kombi T2

Offline owdlvr

  • Dave Hord
  • *
  • Posts: 1422
  • Karma: 10
    • Classic Car Adventures
Re: Dave's 1971 1302 Not-So-Secret, Secret Project Build
« Reply #288 on: March 05, 2013, 11:45:25 PM »
Whew, long time no post! Funny how that happens when I'm out enjoying and using the car, vs. building it.

A few days after installing the Remflex gasket material, I was heading over the Duffy Lake road on my way to The Thunderbird Rally. I was almost past the point of no return when I smell alerted me to a problem. Yup, burned out number 4 again...and this time it was the Remflex that was 100% gone. Clearly my issues were bigger then just the gasket material. I checked my watch, and was a little over 40min away from the closest town...and it was 4:40pm on a Friday night. Not good! I hammered down the road, and into a tire shop and general repair shop to peruse their gasket selection. I found a few that were close enough, and then hit the local snowmobile shop for a roll of header wrap. A parking lot backwoods repair was done, and I was on my way.

Since I'll forget to update it later, it turns out the issue was not the gasket materials, but that I had overtightened the flange when I last had the motor out and they were no longer mating flat. With the pressure localized on the ends, the gasket would blow out in the middle every time. I have since repaired it and enjoy leak free driving without issues...

For Thunderbird, I was serving the role of "Chief Steward", which is to say that if there were any protests, or issues with the rally I was the guy who would make the final call one way or the other. This also allowed me to checkpoint the rally, and run the whole route without competing. I figured after the last event having a few more 'shakedown' events on the car wouldn't hurt. And, as it would turn out, I was 100% correct. The next morning I was heading off to my first checkpoint, on regularity (stage) one, without a co-driver. I was probably...okay, I was definitely...going too quick. What can I say, I was having fun in the light dusting of snow and loose gravel. I came around a right-hander and saw three yumps which were definitely far too large for the speed I was going. With little time to react I opted for ensuring I didn't end up in the ditch or a tree, car be damned. Coming down off the first one, I was landing on the second. The rear went clean through to the bump-stops, and then I was hitting the third. Instantly I knew there was an issue, but kept the car pointed in the right direction and slowed down until I could pull off safely.

Crawling under the car I was met with a rather interesting sight, which I'll admit took me a few seconds to figure out:


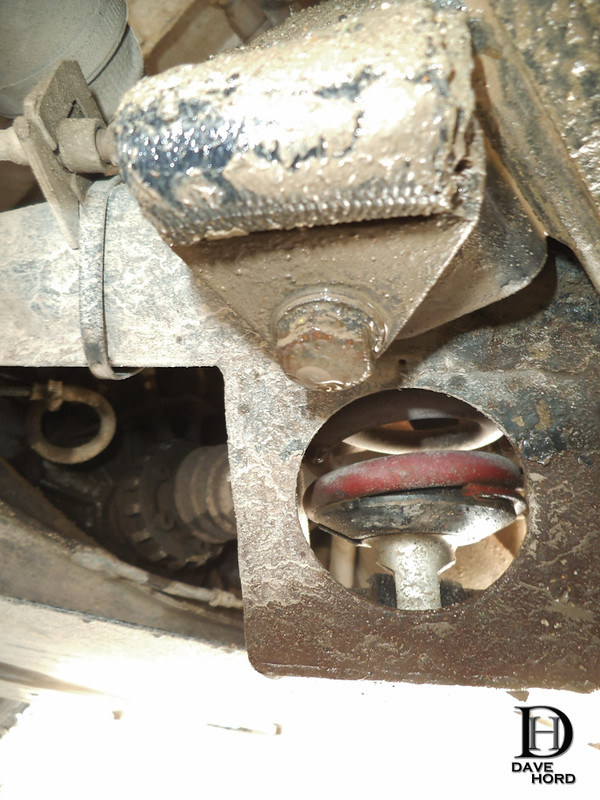
The observant amongst you might notice that something is missing. I could see the shock body, I could see the spring. I could see the lower spring perch but oddly enough there was no shock shaft joining the upper and lower halves of the assembly! Now, a normal person would probably look at this and think "call a trailer", but rally people have never been accused of being normal. I could see from the way the shock body was wedged, and how much movement it has without a spring, that there was very little risk of losing the spring out of the assembly. The embarrassment of not making the finish of another event was too much to consider, so I jumped in and began to figure out the new handling characteristics.

By the end of day one I was getting pretty comfortable with the car, and I had pushed it enough to know that I wasn't going to be at any real risk of losing the spring. I could take it easier on the gravel sections, and go with a much heavier foot in the snowy sections. By the end of the event, I was thoroughly enjoying myself. Sure, I had heavily damaged my car (who knows what else went with the shock), but it held together and I had figured it out enough to have a tonne of fun driving it. I drove home over the Duffy, which was snowy by this point, and I found that special bond you hope to build with a car. That moment where you can't wipe the smile off your face, that point where enjoyment and experience outweighs the build, the cost, the headaches and everything else. That spot where the car I imagined on paper was finally materializing in experience.


Of course, one still has to fix the damage.


Upon teardown of the rear suspension the first thing I noticed was there was no longer any bump stop attached to the trailing arm. My best guess, based on the experience is that I lost the bump stop on the first big hit, which then allowed for the shock to bottom out completely. The shocks haft snapped off right at the lower eyelet, at the beginning of the threads which are a stress-riser. Initially I was concerned that the shock was getting a side-load under full compression, but the missing bump stop (and cycling it through without a spring), points to a simple bottom out failure.


Both the upper and lower hardware had the faintest of bends in the bolts (visible only when rolled on glass), so they were replaced. The load travelled through the Kafer bar to the right-hand side, where the upper bar mount snapped clean off at the weld. Needless to say, it had to be a big hit! While technically the QA1 shocks are rebuildable, and all parts are replaceable, for time sake I picked up another unit and installed it. The Kafer brace was removed, a new stronger mount welded up, and replaced. Sorry, no photos as I was trying to get the car running for work the next day!

The upper shock body received some damage from leaning against the body all weekend.


More updates coming, but I think this one is probably long enough…

-Dave

--
'71 Type 1 - Rally Car Project
'75 Type 1 - Heirloom
'95 F150 - Unfortunate daily driver...

Offline owdlvr

  • Dave Hord
  • *
  • Posts: 1422
  • Karma: 10
    • Classic Car Adventures
Re: Dave's 1971 1302 Not-So-Secret, Secret Project Build
« Reply #289 on: March 11, 2013, 01:07:07 PM »
I call this next shot "why I will never POR15 new metal again"...


It literally just peeled off the bottom of the floorboards, iphone included in the sweeping up for scale:


Interestingly enough, any of the "old metal" (spine, torsion bar housings, etc.) which was prepped the same way is fine...can't take the POR15 off with a chisel. So, I let the bare pans 'season' for a day or two and then repainted them. We'll see how this holds up...


-Dave
--
'71 Type 1 - Rally Car Project
'75 Type 1 - Heirloom
'95 F150 - Unfortunate daily driver...

Offline kirin

  • Full Member
  • Posts: 2957
  • Karma: -2
Re: Dave's 1971 1302 Not-So-Secret, Secret Project Build
« Reply #290 on: March 11, 2013, 02:51:35 PM »
I have had the same experience on "good metal"... Makes me rethink POR15 sometimes.
If more power is better. Then too much is just enough.
Why do it once when you can do it thrice?

Offline scubagord

  • The Cabinet Guy
  • Full Member
  • Posts: 350
  • Karma: 3
  • Another VW fanatic
Re: Dave's 1971 1302 Not-So-Secret, Secret Project Build
« Reply #291 on: March 11, 2013, 04:39:44 PM »
I have had the same thing happen with Por. I will never use it again. I use Endura now. It is the same stuff they use on the Oil rigs. Tough as nails.
65 sunroof beetle
56  Single cab original paint
68 Single Cab
62 Arizona Beetle rust free patina car

Offline bwaz

  • brian waz
  • Full Member
  • Posts: 2640
  • Karma: 16
Re: Dave's 1971 1302 Not-So-Secret, Secret Project Build
« Reply #292 on: March 12, 2013, 07:37:47 AM »
I've used endura before, and though tough, man it's a pain to apply. Great when you've got the car separated from the pan, but not an easy fixup for small areas.
brian waz

Offline owdlvr

  • Dave Hord
  • *
  • Posts: 1422
  • Karma: 10
    • Classic Car Adventures
Re: Dave's 1971 1302 Not-So-Secret, Secret Project Build
« Reply #293 on: April 30, 2013, 01:19:45 PM »
Whew...it's been a while since I've updated, and unfortunately not a lot of photos. I've been distracted, but we'll get to that.

The car was essentially trouble free all of March and April, until two weeks before the Hagerty Spring Thaw. I clogged a jet on the way home from Whistler one day, and despite cleaning it out had some serious tuning issues coming back from a parts run (which is about 2hrs each way for me). The tailpipes were showing lean, the wide-band was showing lean, but the plugs looked good. WTF? I hadn't changed any jets...just cleaned them. I worked on some tuning off and on, but was getting very strange results. I'd change the main jets, but the idle mixture would change. I'd move up three jet sizes (in steps) and the first two would show logical changes while the third would blow the wide-band off the scale in some strange way. This was all happening in the final week before the Spring Thaw. My business partner and I were working long hours to make sure everything goes off perfectly at the event. I'd get an hour or two for tuning, get no results, and have to get back to pre-organizing duties. It was incredibly frustrating.

Finally I decided to go all the way back to the beginning. Well, actually the car decided for me when it blew out an exhaust gasket (again). The car went up on axle stands, and I made plans to adjust the valves, set the timing, start with a set of base jets (by the math), fix the exhaust gaskets and try again. The heads had been fully reworked in November by Darren (K-Roc Heads), so I was really confused why every single valve was tight. I was exhausted, so when I popped on the 3/4 valve cover, removed the paper towel on the heater box and was met with a piece of valve spring…


Really? 


Darren and I chatted, and we both realized that I have almost 80,000 miles on this set of springs. More then double what either of us would have suspected. While they were fine in November, clearly that wasn't the case anymore. Thankfully Darren had put dual-springs into my heads many years ago, so when the outer spring failed, He offered me his on-car replacement tool, and had a full set of dual valve springs ready for me…two hours away. Good thing too:


While driving to get the valve springs, I realized my valve adjustment issue. In my stress of organizing and lack of sleep, I had neglected to consider that I have chromoly pushrods and thus adjust to loose-zero, not .006"! Whoops. With springs and exhaust gaskets installed, valves adjusted and timing reset, I cleaned the carbs…finding mud in the choke area which isn't used by the Empi HPMX version. Mud eh? Hmmm. Don't let anyone tell you I'm easy on equipment.


Well, with that cleaned out I started tuning for lean-best-idle…and still had exhaust popping. Soon a hairline 2" crack was spotted, and off came the apron & exhaust. It would seem that at some point an impact resulted in a crack on the muffler at the #2 inlet (actually on the little pipe sticking out of the muffler to the flange. The resulting movement probably attributed to the gasket failure issues I was having earlier this season. It was 11pm, but my buddy Scott still took it home, welded it up, and brought it back. Killer service, and help from a buddy who leaves for work at 6am. It was too late to tune, but not too late to get a good night sleep.

Amazing how easy the tuning is when there aren't a bazillion other problems causing weird results! Within two hours I had lean-best-idle, idle jets set, mains sorted and the airs figured out. My AFR numbers were spot on everywhere except for a lean condition when cruising at 3000-3200rpm. While I knew Darren and Geoff were going bat-shit crazy with all my calls and texts regarding tuning, I was at a loss. The RPM range said it should be mains, but changing them didn't help and made other things worse. Maybe a combination of Airs and Mains? changing didn't seem to get the results I needed. A final text sent to Darren (with crossed fingers) and a suggestion came back "go one up on the idle jets". I did, and what you know. Running fantastic for the Spring Thaw…with 20 hours to spare!
--
'71 Type 1 - Rally Car Project
'75 Type 1 - Heirloom
'95 F150 - Unfortunate daily driver...

Offline owdlvr

  • Dave Hord
  • *
  • Posts: 1422
  • Karma: 10
    • Classic Car Adventures
Re: Dave's 1971 1302 Not-So-Secret, Secret Project Build
« Reply #294 on: May 02, 2013, 12:24:37 PM »
So final follow-up on the valve springs. Coil bind was checked for when I originally built the motor, and again in November when I had the heads off. The old springs show no marks of coil bind, and the new springs (same brand/model) were checked and cleared without issues. I am attributing the failure to a combination of mileage, abuse, and a WOT over-rev the other night while tuning.

 -----------

I mentioned that I've been distracted, and hence haven't posted much about the work on the car. I actually have some other upgrades and items added to post about, just haven't had the time. I've been playing with a new toy, a 1974 Dodge Colt stage rally car. It's owned by a good friend, and was purchased with a blown motor and tranny. I've been storing the car for a few years (he lives in the states, is a professional rally driver), and he finally said we should get this thing ready to rally. Over the past couple of months we've installed a new motor and trans, I've rebuild the trans, had a dashboard fire, re-wired the whole damned car and finally got it tuned and running. We were out testing at DirtFish Rally School on Monday, and the car is a BLAST. Still need to upgrade the seats, belts, cage and paint...then it's ready for stage rally.


Here's the thing, when the owner isn't using it...he wants me to Rally it. Stage rally, rallyX, etc. if it's just going to be sitting, it might as well be used. Hmmmm. So basically I now have a full stage rally car in my collection of vehicles. Suddenly destroying the beetle further with gravel is a less enticing idea. I mean, why would I shred paint on the beetle when I can just use the Colt?


I'm seriously considering working on the suspension this summer, and setting the beetle up as more of a Tarmac-Rally car. We've got our www.classicccaradventures.com events every year, and I'd probably still pop the suspension back up for winter events. The Colt is too damned loud inside for anything but Stage rally.

Thinking Coil-overs on the front, perhaps wider wings (and rubber), a Kamei front spoiler and it should be good. Tarmac rally and track car...???

-Dave
--
'71 Type 1 - Rally Car Project
'75 Type 1 - Heirloom
'95 F150 - Unfortunate daily driver...

Offline owdlvr

  • Dave Hord
  • *
  • Posts: 1422
  • Karma: 10
    • Classic Car Adventures
Re: Dave's 1971 1302 Not-So-Secret, Secret Project Build
« Reply #295 on: June 09, 2013, 01:15:57 PM »
I've been pretty busy with various jobs and haven't had much time for playing with cars, a problem which is compounded by the fact that I've got the Beetle, the Colt, an Audi Coupe quattro and a new Chevy pickup truck all on the go. The Salzburg Beetle has had some ups and downs over the past while, and I'll try and document what I can.

First up, I finally got around to mounting a co-driver footrest in the car. I had planned on machining up a unit which would have two rails permanently mounted to the floor, and a moveable panel (for different height co-drivers), but the crunch time to get the car ready in time for Spring Thaw meant I went with an OMP pre-formed panel. Of course, I'm not happy with the way it sits...so it will come out of the car soon enough for some changes. Basically, the angle isn't "right", and in order to sit correctly it needs to be trimmed to clear the tunnel and the inner fender.


Next up, and far more of a fun toy, is my Shift-I progressive shift light. You would think, in a car that is so loud you need hearing protection, that paying attention to the revs is easy. The problem, I've found, is that after a certain point its all just noise and volume...and you can't distinguish well enough between various levels of RPM. I saw this unit at my local race supply shop, and took a gamble. Such a good call! It's fully programmable for RPM range, light patterns, brightness and more. One button turns it on or off while driving, so I only use it when I'm 'having fun', thus ensuring my brain doesn't get so used to it that I ignore it. I've found it gives me two main advantages: I'm finding it much easier to keep the engine within the torque curve and I'm not risking an over-rev when playing in the upper rev limits.  The one I bought has four green lights on the left, followed by two yellows and one red. I set mine up so the four greens are progressive, then the greens go out as the two yellows come on, and finally the yellow and red flash as you hit the limit. Incredibly hard to miss...but not distracting either. http://www.ecliptech.com.au/index.php?option=com_content&view=article&id=59&Itemid=109


On the bad news side of things, I'm still struggling with burning out exhaust gaskets. To say I've beaten the pulp out of the exhaust system would be an understatement. I think most users would look at the condition of my muffler and assume it's only good for scrap metal. I have noticed that the last set of gaskets I blew out were about 3 days after I bottomed the muffler out on something...even though it was lightly. I now suspect that physical damage is starting the process, and it takes a few hundred kilometers for blow-by to damage the gaskets to the point I can hear them. Once I hear the change in exhaust note, or notice the wideband reading leaner, I get about 50km before the gasket blows out completely. The answer, unfortunately, is probably a whole new exhaust system and to extend the skid plate (or skid plate system) back to protect the exhaust as well.

The second set of bad news involves the oiling system. Three times in the past month I've experienced a zero-oil pressure situation where the car will lose oil pressure at idle and then I can't prime the system back up. I end up loosening off oil fitting and cranking the starter over while slowly working the oil through the system segment by segment. The first time it repressurized in relatively short order (about 30min of work), but just this week I lost pressure twice on one day and it took 1 hour and 2 hours (respectively) to get the car back up and running. Really quite frustrating...but thanks to some things I noticed on the second time, I think I have a theory. I have the cold-idle set relatively low on the car, its at about 500rpm, sometimes less. This corresponds to a hot idle of about 1000rpm. At low RPM I don't *think* the scavenge pump is moving enough oil back up to the tank. Eventually on Friday, while I was trying to prime the system, I realized that the tank had less then 1/8th of oil, and the motor was over-full. Hmmm.... I put an extra litre into the tank, took a risk and revved the motor to 1500rpm (with no pressure). Instantly I could hear the scavange oil splashing back into the tank and in less then 20seconds the oil light was out. So, I think the issue is two-fold:

• First off, I'm not watching the oil level in the tank often enough.
• Secondly, the scavenge pump isn't pulling enough oil at sub 1,000rpms

The combination of the two means that there isn't enough oil in the system to allow the car to idle cold at low RPM…and I lose oil pressure. Repressurizing the system from full oil loss takes about 2.5 complete minutes of cranking (assuming oil in the tank, coil disconnected), which I can't imagine is too kind to the bearings. I'm going to redo the venting on the tank which will allow me to run a higher oil level (additional one or two Litres) and keep a closer eye on things.

I am worried about the likely damage I've done to the bearings in the current motor. At hot oil pressure I'm down a full 10psi from where I was two months ago. I now see 40psi at 3500rpm instead of the 50psi I was seeing earlier. It's not low enough to pull the motor immediately, but it's something to be concerned about for sure. It could be the electric gauge/sensor, however. The mechanical gauge on the Accusump used to match exactly, but now they are 5psi different (Accusump being 5psi higher). Again, no emergency...but something to watch for sure.

Back to the Good News!  If you haven't already seen the June 2013 Issue of UltraVW, you may want to go pickup a copy. Okay, I'm probably a little biased…but hey, six page feature on my car!


Stoked to finally have a magazine feature I can give to family and friends who don't speak Japanese or French! Makes oil system issues a little easier to deal with.

-Dave
--
'71 Type 1 - Rally Car Project
'75 Type 1 - Heirloom
'95 F150 - Unfortunate daily driver...

Offline buddy boy

  • *
  • Posts: 1303
  • Karma: 5
  • Marked for life
Re: Dave's 1971 1302 Not-So-Secret, Secret Project Build
« Reply #296 on: June 09, 2013, 04:35:50 PM »
Nice man !!!

"only dead fish swim with the stream"

Offline Geoff

  • *
  • Posts: 8394
  • Karma: 441
    • http://airspeedparts.com
Re: Dave's 1971 1302 Not-So-Secret, Secret Project Build
« Reply #297 on: June 09, 2013, 11:27:34 PM »
Checked out the issue while at the classic, very good coverage!
Not so sure about the pic with the Mickey mouse ears....

Offline silas

  • *
  • Posts: 6822
  • Karma: 20
    • Some cool videos...Check them out!!
Re: Dave's 1971 1302 Not-So-Secret, Secret Project Build
« Reply #298 on: June 10, 2013, 08:13:42 PM »

Offline owdlvr

  • Dave Hord
  • *
  • Posts: 1422
  • Karma: 10
    • Classic Car Adventures
Re: Dave's 1971 1302 Not-So-Secret, Secret Project Build
« Reply #299 on: July 28, 2013, 10:32:05 AM »


Geesh, this car was new just months ago! It's amazing how things underneath get dirty and corrode. Adjusted the steering box in anticipation of a road trip a couple of weekends ago, and made a note to get under the car with some cleaning supplies and fresh paint soon. The road trip started off as a blast, headed down to the southern border of Washington state, via Mount Rainer National Park and a bunch of other twisty roads. The car was handling flawlessly, despite the heat, until I hit the desert-like conditions of Yakima. The air temperature was a little over 33 degrees, with zero wind. Driving at around 120kph the oil temp was up to 220, and I had to work to keep it below 230F. In hind sight taking the skid plate off before my trip would have been a wise idea, but I was so close to my destination I figured I wouldn't worry too much. I know from past experience that dropping the skid plate will equal a 20deg oil temp reduction, and should probably resolve to create a summer plate with some of the design features of VW's original ones.


The road trip home, though, was like a story from hell. First bad gas (water), which required overnight carb cleaning in a walmart parking lot. The rear brakes went to metal (seized slider pin) and I roasted the rotor and brake calliper. Then ignition issues, and finally a broken elephant foot adjuster (which I discovered many hours later).


I limped the car to AVR on three cylinders, and spent a bunch of time diagnosing the problem (being awake for 30+ hours doesn't help the brain to function). Thank goodness Art and Vic were there to help me out between calls and customers! Eventually I borrowed a set of Rockers from Art's drag-car parts stash, a few other miscellaneous parts and made my final two hour trip home.


And once home, the poor Beetle sat. First off to wait for parts, then to wait while Audi & truck projects were worked on, and then finally because every damned thing I did wasn't working out. The list of things I meant to take care of was rather long, the car after 42,000km was due for some bumper to bumper checks and maintenance. Some things, like the grinding starter, I was aware of…while others (like apparently I have no brake lights!) were pointed out to me on the drive home. While I waited for new rocker arms to arrive, I started picking away at the list.

The brake switch boots were filled with dried mud, and thus the contacts had corroded. Relatively easy fix that, so there was that positive factor. But the next two photos give a much better description of how my last two weeks went.


Missing from the photos is the brand new brake calliper, that once installed started puking fluid out of the e-brake mechanism…there were other issues too, but I'm afraid I'll end up in a mental hospital if I start listing them off!  After breaking the new chinese-rebuilt starter ($40), the only thing I could get quickly was a Bosch rebuilt, at a price tag of $150. True, not bad for a starter…but when you toss them in a lathe and cut a 1/4" off the front face you think about whether or not you want to spend the money! My gosh, why did I not buy one of these from the get-go?  All my grinding starter issues are gone, even though I haven't replaced my now hurting flywheel. Not to mention it spins so much quicker the bug starts in less then a second.

After getting the whole motor reassembled, the brakes replaced and bled (twice) I loaded in a bunch of tune up parts (points, wires, cap, rotor, plugs) and fired it up. Holy bag of hammers, Batman!  The motor sounded like the crank was split in two, and all the bits were bouncing off each other. Well crap. A few evenings of sleuthing around, and eventually I simply replaced the new rocker-shafts/rockers with the old ones (putting a new adjuster into the one broken one) and everything is silent as a lamb. Same part, same part number, same measurements in every respect. The car likes one set, but not the other. I'm not going to argue, because it's running now!

I figured after a frustrating two weeks, two things where in order. First, movie night:


and second, a little upgrade today:


I need to make some mounts today, but looking forward to the front spoiler. Also, my new shifter assembly has shipped…it will probably arrive just in time for the long weekend, and I'll be away in Edmonton. Argh!!

-Dave

--
'71 Type 1 - Rally Car Project
'75 Type 1 - Heirloom
'95 F150 - Unfortunate daily driver...