Author Topic: Dave's 1971 1302 Not-So-Secret, Secret Project Build  (Read 148596 times)

0 Members and 1 Guest are viewing this topic.

Offline owdlvr

  • Dave Hord
  • *
  • Posts: 1422
  • Karma: 10
    • Classic Car Adventures
Re: Dave's 1971 1302 Not-So-Secret, Secret Project Build
« Reply #240 on: August 16, 2012, 11:15:23 PM »
Welded in proper mounts on the frame horns, and then mounted one of those plates as a temporary solution for the weekend. The plate is much further forward protecting both my trans and engine from stone throws. But, lets be clear...that steel plate is only good for further stone-throw damage. It is not a proper skid plate for impact damage like bottoming out or hitting a big rock.

Once GCVW is over I'll have a 7071 Aluminum plate made which will protect the car from rally-type impacts.

-Dave
--
'71 Type 1 - Rally Car Project
'75 Type 1 - Heirloom
'95 F150 - Unfortunate daily driver...

Offline Geoff

  • *
  • Posts: 8394
  • Karma: 441
    • http://airspeedparts.com
Re: Dave's 1971 1302 Not-So-Secret, Secret Project Build
« Reply #241 on: August 17, 2012, 08:23:46 AM »
It will be too late by then. ...  :72:

Offline owdlvr

  • Dave Hord
  • *
  • Posts: 1422
  • Karma: 10
    • Classic Car Adventures
Re: Dave's 1971 1302 Not-So-Secret, Secret Project Build
« Reply #242 on: August 20, 2012, 12:12:43 AM »
Whew! What a weekend.

The CCA "Rush to Gold Bridge" was our first stab at a mixed gravel and tarmac event for classic cars up here in Canada. The formula works well in California, where the events are well attended and popular. Up here, however, we have some work to do! A total of 6 cars made the start, but that was just fine by us. We modified the route throughout the weekend to suit the guests we had. Saturday was shortened due to heat, and Sunday we split into two groups with some cars going for the smooth gravel route, while others braved goat-path-like sections of road to claim they conquered a famous 4x4 only mountain pass. For this particular event, I left the gravel tires at home so that our guests wouldn't feel like their cars were about to die on the event. I could keep the sliding controlled enough for street tires, right?

We began in Hope BC, and after about an hour of paved twisties and canyon views, turned off to catch a ferry. This ferry, though, wasn't like your normal car ferry. This one is a reaction ferry, it has no motors and uses the current of the river to move back and forth between the two banks. An overhead cable holds the ferry and the two guys working the boat simply tilt it one way or another in the current to push across. At least if it sunk, I would have a chance of floating!


From there it was incredibly twisty gravel all the way to Lillooet. I have never driven a road which required so much steering movement, without a pause in between for straight sections. Toss in a little sliding action, and my hands never stopped moving. Rarely do I find myself happy we're stopping to regroup, but on this road I was thankful for the break and the reminder not to get too carried away!  I was running without a co-driver, and more then a few turns were marked "Triple Caution!!! hairpin, exposure with large drop to the outside". I think one of the instructions for a corner we wrote was "Large drop with certain death straight ahead". Have I mentioned it was a blast!?! One of the straight sections:


It was 40.3 deg Celsius as we were doing this road, and for the time I saw 240F on the oil temperature gauge. It didn't go any further (the whole weekend) and once I determined that my oil cooler fan relay failed, the temps were brought back down to 220F for the rest of the day. Warwick, in the Mini, wasn't so lucky. A couple of overheats had him finishing this leg on the tow strap. Once it was cooled down, refilled with water and an expansion tank jimmy rigged, it ran like a top.


Having spent a lot of time with Warwick, we eventually decided that I should probably head to the rest of the group and tell them to carry on. The throttle pedal was dropped, and I went from casually enjoying a few corners here and there to fully setting up and linking slide after slide to try and make up time. I was in a left hand drift when I felt a wiggle...but was already pitching right. Upon returning back to the left, however, I instantly knew what had happened. 'Tis a wee bit flat back there!


Let that be a lesson to you: 165/R15's of unknown age, showing lots of cracking in the tread, are probably not the best tires for sliding around on gravel :P Normally I'd have had this fixed up quick and been on my way, but it would seem that I have neglected to purchase and install an important road-side repair tool. And, really, sweep and every other car is carry a jack. Why would I want to? I stood sheepishly by the side of the road waiting for Warwick and sweep to arrive so that they could now go and deliver the 'carry on' message.


With the flat fixed, it was off again. I met the group in Lillooet and proceeded to pay $50 for a used tire, of completely useless dimensions, to ease my fear of driving 300km home on a steel wheel. For the afternoon we ventured the 2.5 hours into Gold Bridge, via the Carpenter Lake Road. The road is mix of billiard-table-smooth gravel and paved sections. It winds up and down the side of the mountain sometimes mere inches from the river, while at other times so high you'd have time to count your mistakes before impact.


We arrived at the Chilcotin Holidays Ranch tired, dusty and hungry.


...Tomorrow, I'll recount Sunday. Then the cleanup begins!

-Dave
« Last Edit: August 21, 2012, 12:44:41 AM by owdlvr »
--
'71 Type 1 - Rally Car Project
'75 Type 1 - Heirloom
'95 F150 - Unfortunate daily driver...

Offline owdlvr

  • Dave Hord
  • *
  • Posts: 1422
  • Karma: 10
    • Classic Car Adventures
Re: Dave's 1971 1302 Not-So-Secret, Secret Project Build
« Reply #243 on: August 20, 2012, 01:19:59 PM »
Sunday started with breakfast at the Chilcotin's Ranch. We thought maybe they confused our group of 12 for a group of 30 at dinner the night before, but Breakfast proved that these folks simply like to eat! We were fed as though we were going on a 4 day backpacking trip and this would be the last meal we ate. I'm not complaining, anytime I can eat a whole pig-worth of bacon I'm game! Following breakfast, a quick tune and check over on the cars was completed before we departed.

"yup, looks like the engine is still there"


For the Sunday run, our group split up into two. The Mini and 356, which were sporting rather low clearance levels, chose to head out the way we came in. The rest of us were going to brave the Hurley River Pass road, a 4x4-only, summer access road which is not recommended for classic cars. How bad could it be!?!  Warwick, the other photographer on the event, was in the Mini so that means most of the day's photos are without my bug.

First stop was the bustling gas station in the town of Bralorne...


And then off to check out some of the abandoned Gold Mines in the area.


With the sight-seeing done, we were off! Being the adventurous types, we agreed as a group that we shouldn't take the "main" Hurley River Road, but instead venture down the 20km Bralorne short-cut. It's essentially a Goat-Path through the woods in some sections...but we were all in rally cars. Well, everyone except Bruce and Greg in the lowered Volvo :P.  To say I was driving gingerly on these rocks would be an understatement!


Once on the main Hurley we found the road to be wide, in good shape and relatively quick travel. I was averaging about 60kph, which allowed for dodging the odd hole or sump-tearing section of granite sticking out of the road.


The group made it through to the end, with only a minor exhaust pipe issue hampering the progress. After a couple of hours on the pass, we descended into the town of Pemberton and met up with the rest of the group. 


It was a quick zip down the highway to Squamish, where we finished with the traditional (for me at least) Campfire Grill smoked BBQ.


-----

Upon arriving home, I took quick stock of the Bug. The interior is so dusty and dirty the passenger seat is looking brown. There is dirt and dust caked on the headliner, and the whole underside of the car still looks like I just went racing in the mud at that RallyX. The Great Canadian VW Show is this coming weekend, which means I need to get the car back to looking as close to "new" as possible. After a quick body wash, it was up on stands to clean the wheel wells and suspension.


I guess, like I have many times with this project, I got a little carried away next. Out came the creeper, and I scrubbed all the dirt and such off the bottom of the floor pan. I'm pretty sure my neighbours think I'm insane...washing the underside of my car in the driveway. The worst part is you can see I missed some spots, which means I'll be getting soaked again later today when I roll back underneath. Can't do a half-assed job, right?


While the car was in the air, I thought it was high-time I took care of the rather sad looking state of my rear fenders. The vinyl has been chipped through pretty good by the rocks, but at least it's protected the paint somewhat?


Well, peeling off the vinyl reveals that there is more damage then initially meets the eye. The passenger side was even worse, with large chucks coming out of the paintwork. Oops!


New vinyl covers most of the damage, in photos it looks fine but when the light hits it right you can see the divots underneath. At the end of the day though, one has to accept that fenders are replaceable, and this is a bloody race car not a show queen.


For the front fenders, I've always had a problem with the front right and where it meets the running board. In the following photo you can see the dark patch where I've had to cover the factory running board hole which didn't line up at all.


Both front fenders now sport a black vinyl treatment, which matches the rear and hides the error.


So now I have to deal with the front trunk, the interior, the engine bay and all the body lines and door jams. Oh, and a wax of the silver paint...and matte wax on the black to remove the watermarks which are impossible. yee haw.

-Dave
« Last Edit: August 21, 2012, 12:48:52 AM by owdlvr »
--
'71 Type 1 - Rally Car Project
'75 Type 1 - Heirloom
'95 F150 - Unfortunate daily driver...

Offline Chris W

  • *
  • Posts: 493
  • Karma: 0
  • Portland Oregon
Re: Dave's 1971 1302 Not-So-Secret, Secret Project Build
« Reply #244 on: August 20, 2012, 04:42:47 PM »
Great to see your beating up the car and having fun!

If you ever want to do a sold 3-5 days of off road driving check this out, your car would be almost perfect.

http://www.wabdr.com/Map

Offline owdlvr

  • Dave Hord
  • *
  • Posts: 1422
  • Karma: 10
    • Classic Car Adventures
Re: Dave's 1971 1302 Not-So-Secret, Secret Project Build
« Reply #245 on: August 21, 2012, 12:14:07 AM »
Oooh...that looks like fun. Hmmm, Classic Car Adventures Washington chapter.

----
Got the inside stripped down, cleaned out and a fresh coat of paint laid down on any of the areas which needed it. Man that was dusty/dirty. Might have a problem with my seats for the weekend. I borrowed a friend's seats back in April for the studio shots, and was planning on borrowing them again for the Great Canadian Show. Well, it turns out they might not be available...so I'm off to my backup plan tomorrow. If that doesn't work out, I need a backup to the backup plan, and thus scrubbed my current seats like they've never been scrubbed before. Turns out, they are still black and I got most of the staining out! Now I just need to figure out how to cover/hide/fix the tears, and I have a useable back up plan. Too bad I forgot the "before" photo...


While the seats and battery were out, I started thinking about what I was going to do for a battery. My Optima got moved to the truck, and I've been using a Honduh battery for the last little while. It's small, light and fires the car up every time. Too bad it says Honda all over it. Wait, i own a vinyl machine! Bosch it is, in fact, lets make it a small german racing battery :P


Wheels are still off, night number two on Axle stands in my driveway.

-Dave
--
'71 Type 1 - Rally Car Project
'75 Type 1 - Heirloom
'95 F150 - Unfortunate daily driver...

Offline Geoff

  • *
  • Posts: 8394
  • Karma: 441
    • http://airspeedparts.com
Re: Dave's 1971 1302 Not-So-Secret, Secret Project Build
« Reply #246 on: August 21, 2012, 07:30:08 AM »
While the wheels are off ya may want to use some wax-grease remover to take the glue off that heaterbox where the JP group sticker was  action-smiley-060


Offline owdlvr

  • Dave Hord
  • *
  • Posts: 1422
  • Karma: 10
    • Classic Car Adventures
Re: Dave's 1971 1302 Not-So-Secret, Secret Project Build
« Reply #247 on: August 22, 2012, 08:03:48 AM »
I'm not gonna lie, pulling the motor now is a complete %#!@%!!!. So many lines, extras, etc. and then every nut and bolt is caked with dry dirt so they don't spin by hand, you have to use a tool for the entire length of the threads.


The reason for pulling the motor is to make for easy cleaning, and to accomplish a few upgrades as well. As you can see, cleaning is definitely needed!


There is even dirt/mud inside the bell housing!


I started playing with Vibrant Performance's new heat shielding product...


...and finally protected the feed line to the pump from heat.


Fell asleep posting this at 4am, but engine is almost cleaned and ready to go in.


And the engine bay is looking much cleaner. Trans area is insanely dirty. Might have to accept defeat on that one...just no time left!


-Dave

p.s. heaterboxes are glue free.
--
'71 Type 1 - Rally Car Project
'75 Type 1 - Heirloom
'95 F150 - Unfortunate daily driver...

Offline Jeremy

  • *
  • Posts: 977
  • Karma: 3
Re: Dave's 1971 1302 Not-So-Secret, Secret Project Build
« Reply #248 on: August 22, 2012, 10:51:52 AM »
Great thread Dave. Look forward to checking it out closer at the GCVW when you've got the wheels off and mirrors underneath it.
'59 Beetle
'59 Single Cab

Offline owdlvr

  • Dave Hord
  • *
  • Posts: 1422
  • Karma: 10
    • Classic Car Adventures
Re: Dave's 1971 1302 Not-So-Secret, Secret Project Build
« Reply #249 on: August 22, 2012, 11:18:47 AM »
BYOM.

(bring your own mirror :P)

-Dave
--
'71 Type 1 - Rally Car Project
'75 Type 1 - Heirloom
'95 F150 - Unfortunate daily driver...

Offline owdlvr

  • Dave Hord
  • *
  • Posts: 1422
  • Karma: 10
    • Classic Car Adventures
Re: Dave's 1971 1302 Not-So-Secret, Secret Project Build
« Reply #250 on: August 23, 2012, 09:46:17 AM »
Well, this is what the car looked like at 1am last night, except the rear apron wasn't installed.


At 1:01am this turned into the motor-clean from hell, as I went to go rotate the motor to TDC so I could check the valve adjustments. Motor wouldn't turn, locked solid. WTH? E-brake, off. Trans, neutral. WTF. I was already pretty tired from the previous nights early morning, but with time running out before the show I had no choice. The motor was stripped, dropped and checked again. Once the motor checked out okay, I discovered someone hadn't tightened up the countersunk trans mount bolt enough when he adjusted the transmission mount. Sigh.

Back in when the motor, and the carbs, and the wiring, and the oil lines. Now I just need to adjust the valves, change the filter, prime the oil system, add the spark plug wires, swap the distributor and I'm good to move onto other parts of the three-page list.


Went to bed at 4:45am, considered staying up to watch the sunrise but the 3 hours sleep was probably a good idea.

-Dave
« Last Edit: September 09, 2012, 10:58:22 PM by owdlvr »
--
'71 Type 1 - Rally Car Project
'75 Type 1 - Heirloom
'95 F150 - Unfortunate daily driver...

Offline owdlvr

  • Dave Hord
  • *
  • Posts: 1422
  • Karma: 10
    • Classic Car Adventures
Re: Dave's 1971 1302 Not-So-Secret, Secret Project Build
« Reply #251 on: September 09, 2012, 10:57:22 PM »
Well, the night before the big Great Canadian VW show weekend was spent chasing down all the little details that still hadn't been finished about the car. Some of them were small, like actually installing the antenna plug instead of the spot of silver vinyl which had been covering the hole.


Other items, however, were a little more serious. As you can see, my seats are very tired and worn. I bought them used out of a National rally car, after it had been flipped upside down in a pond. That was 10 years ago...they've lived in my Audi 90 quattro rally car, the '69 beetle and now the Salzburg tribute. They've been my daily driven seats for about 8 of the last 10 years, so they're pretty tired.


The image above is after I used a full can of Upholstery cleaner on each seat, which helped greatly. Gone were the coffee stains, ground in dirt and other issues. But remaining were the tears. I called various rally buddies, but couldn't get a set of seats to borrow on short notice. Hmmmm...would iron-on patches work?


Surprisingly, yes they do. Sure, it's not perfect, but the tears are no longer screaming out to me like a flashing red-light.


The last step was to trade out my worn-out belts for a loaner set from the Rally shop. The flash here is playing with the colours pretty badly, but you'll just have to trust me when I say everything is a nice uniform black now. The astute viewers might be wondering why the FIA tags are missing...lets just say these belts were "well used" in a shell that no longer exists ;)


The show weekend wasn't without it's problems for my car, however. I dropped it off the axle stands on Friday, to drive down to the drag racing night, and discovered I had no clutch. The clutch pedal worked, I had resistance, but it wasn't releasing the transmission from the engine. I couldn't get it into any gear from neutral. But if I shut the car off, put it in gear and started it with my foot on the clutch it would start and idle. With no obvious solution, and no time to fix it, I just drove the car down regardless.

I didn't run the car at the drag racing night, partially due to the clutch issue but more due to the fact that I drove down on my Pirelli gravels and didn't really want to destroy the tires on the strip. Not to mention the wheel/tire combo is pretty damned heavy. After the drags, when I went to leave, my leg was hit with burning metal as I turned on the headlights. WTF?

Three, yes three, fuses blew all at once. I had no tail lights, no brake lights and no dash lights. Sigh. With no light at the track to fix it, and no spare fuses, Geoff followed me to the hotel and made sure I wouldn't get hit on the highway. Once there I pulled the tail lights apart and discovered I had vibrated both bulb holders out of the back of the housings. That explained the lack of lights, but why the blown fuses? Eventually I discovered a fresh-air hose (which was aluminum) had shifted, been crushed by the hood hinge and was resting against the back of the fuse panel!  Yikes.

Other then that, it was trouble free for the rest of the weekend. I never did determine what the problem was with the clutch. As the weekend progressed, the problem started going away and by the time I drove home it was perfectly fine. I've had the car up on stands, checked everything (without pulling the motor) and can't find any reason for the error. It's not good, but it's also not a problem I can diagnose at the moment.


The other day driving to Whistler I noticed the oil temp was running about 20deg higher then normal. Cycling through the various senders I also realized that the oil feeding into the engine was 30deg higher then the oil in the tank. That was definitely a bit odd, so I decided to investigate further.

In my efforts to increase the clearance between the oil lines and the ground, they now run far closer to the exhaust pipes, and my best guess is the feed lines are picking up a significant amount of heat from the exhaust:


Out came the exhaust wrap, and some aluminum shielding...


Today's drive to Vancouver had the oil temperatures back to normal, with all three sensors showing matched readings. Guess I found the problem :P

-Dave
--
'71 Type 1 - Rally Car Project
'75 Type 1 - Heirloom
'95 F150 - Unfortunate daily driver...

Offline Geoff

  • *
  • Posts: 8394
  • Karma: 441
    • http://airspeedparts.com
Re: Dave's 1971 1302 Not-So-Secret, Secret Project Build
« Reply #252 on: September 10, 2012, 07:49:33 AM »
Nice work once again Dave.

Offline buddy boy

  • *
  • Posts: 1303
  • Karma: 5
  • Marked for life
Re: Dave's 1971 1302 Not-So-Secret, Secret Project Build
« Reply #253 on: September 10, 2012, 08:07:36 AM »
great work!

"only dead fish swim with the stream"

Offline owdlvr

  • Dave Hord
  • *
  • Posts: 1422
  • Karma: 10
    • Classic Car Adventures
Re: Dave's 1971 1302 Not-So-Secret, Secret Project Build
« Reply #254 on: October 01, 2012, 11:22:47 PM »
Well, I continue to use the bug as much as possible! Over the past two weekends I've done 3,496km on the bug...plus whatever I drove during the week. Last weekend I did half of that in just 30.5 hours, including sleep, while I setup the route for Classic Car Adventure's "Fall Freeze Adventure".


The event itself was just over 1400km, but with the start 5 hours from my house, and the finish 3 hours away, the kilometers added up pretty quick. Prep for the event was supposed to be pretty simple, but quickly escalated into a long list of to-do items. First up, was tearing out the front suspension to figure out why the front strut was loose. A broken top spacer (likely caused by a loosened strut cap) was swapped out and everything put back into place.


I also decided not to risk another event without a jack, having had to wait for Sweep to arrive with one on the Rush to Gold Bridge. A temporary mount was worked out, and later this week I'll figure out how to make it permanent in the car. It would be easy if I was willing to wreck the paint with welding...


I was doing work on the rear suspension and ended up removing the skid plate. I was curious to know what the relationship between engine/oil heat and the skid plate would be, so I left it off for the first weekend of driving. Interestingly there was a significant difference. With the skid plate the engine reaches operating temperature much quicker, and runs between 200 and 220 deg F depending on how hard you're pushing the engine. I was seeing temps as high as 240 before I moved and insulated the oil lines (as per a previous post). Pulling the skid plate results in oil temps 15-30deg cooler, depending on the ambient air temperature. More testing is required to determine if I will need to change the plate shape, but going into the colder weather I don't think I will worry about it until spring.

I also took care of some more simple items, like grip tape on the floorboards.


The Sparco seat has funny story. The last job on my list of preparation was to swap out one of my Cobra Imola2 seats for a wider seat. My dad was flying in from Toronto to co-drive the event for me, and I knew my seats would be uncomfortable for him. On his 60th birthday I called him up and told him he needed to go "race seat shopping" to find one that fits! A Sparco seat list arrived in my email box, and I went and snagged one out of a buddies rally car. Only after I had it all fitted, did I actually read the list that dad sent me. "Sparco Corsa - too tight (nasty!)"  Well, crap. I ended up doing an emergency run down to Vancouver to borrow a Pro2000 out of another buddies rally car. By the dimension charts they are almost identical...but hey, whatever makes Dad happy. On Thursday I picked him up at the airport and we made our way off to the start location in Kamloops. I was pretty sure dad wasn't going to survive in the car for the whole weekend, it's bloody loud inside and he was commenting before we even left the airport! To make matters worse, the intercom stopped working Thursday night as we neared the hotel. I bought a butane powered soldering iron, foam earplugs and hoped for the best!

The event started with about an hour of 'normal' roads, nothing too twisty, or where it was twisty it was populated so speeds are heavily controlled. Soon we were out into the unpopulated areas, and as the first set of twisty corners were fast approaching, I figured it was a good time to test how well Dad was going to do as co-driver. I lifted, so that we were dropping in at about 60% of what I would have normally done, and without brakes drove into the first corner. "Uh, David, these things do roll." 

First corner, fail.

Second corner, onto the gas and drop it in faster...maybe Dad will be impressed with the cornering ability of the bug build? (Dad has owned over 30 beetles, but all of them bone stock)...."daaaVID!!"

Second corner, fail.

I drove conservatively until our lunch stop, where I proceeded to swap the Driver's seat for the Passenger seat so that dad could take a turn at the wheel. I figured that since I had driven all the roads the weekend before, it was easier to just let Dad drive at a pace that made him comfortable vs. trying to convince him I was being perfectly safe. He drove for some of the afternoon, and when the noise was finally too much he jumped into one of the other entrant's BMW 2002. I took the opportunity to jump into John Hinde's 2010 Intermeccanica Roadster, and instantly realized that my next bug is going to need a 2.3L engine like Johns!


Dad and I finished up day one together in the Bug, and were having a quite a bit of fun by the end of the day. I was text messaging my best friend from the passenger seat, and they're pretty funny:

3:30pm
45km into dad driving and he's starting to get comfortable with the car. "Don't lift! It will corner at that speed" ... "Whoa, it sure does."

3:45pm
60km into his stint and he's finding the light side of the limit. 'Oops, that was a bit too fast.' (as we go wide towards the center line)

4:15pm
"Dad, I think you're one of us now". 'That didn't take long, did it?!'


I left the seats as they were for day two and day three. Dad lives on the other-side of the country and hasn't driven any of these mountain roads before. Day two was full of left foot braking, and discovering just how well a beetle can handle. By day three, dad was dropping into corners and making ME grab for the 'oh s%&# handles'! It was an absolute blast. He was pretty impressed with the build, and the bug held up trouble free. And, really, what better way to spend a weekend with your father???


Checking the oil level in Greenwood BC


About to test the traction circle...


Father and Son driving team


The group lined up on the Kootenay Lake Ferry, morning of Day 2


Group dinner at Tin Horn Creek winery


Dad/John with the bug

-Dave

--
'71 Type 1 - Rally Car Project
'75 Type 1 - Heirloom
'95 F150 - Unfortunate daily driver...

Offline Geoff

  • *
  • Posts: 8394
  • Karma: 441
    • http://airspeedparts.com
Re: Dave's 1971 1302 Not-So-Secret, Secret Project Build
« Reply #255 on: October 02, 2012, 07:50:31 AM »
What a great story and way to spend a weekend with your Dad!


Offline buddy boy

  • *
  • Posts: 1303
  • Karma: 5
  • Marked for life
Re: Dave's 1971 1302 Not-So-Secret, Secret Project Build
« Reply #256 on: October 02, 2012, 05:25:24 PM »
Nice Dave !!

"only dead fish swim with the stream"

Offline rekka

  • *
  • Posts: 286
  • Karma: 6
  • AirSpeed Forum Member
    • Radwerx Creative Inc
Re: Dave's 1971 1302 Not-So-Secret, Secret Project Build
« Reply #257 on: October 03, 2012, 07:15:27 AM »
I think you spend more time on your posts than I do working on my car. Amazing reading. Thanks.
Radwerx. Architectural features in wood, metal and concrete www.radwerx.ca

Offline Hansk

  • Full Member
  • Posts: 1638
  • Karma: 4
Re: Dave's 1971 1302 Not-So-Secret, Secret Project Build
« Reply #258 on: October 03, 2012, 10:33:10 PM »
Great stuff ! thanks for posting it all.
Big fat black fastback

Offline DarrenE

  • Full Member
  • Posts: 682
  • Karma: 10
Re: Dave's 1971 1302 Not-So-Secret, Secret Project Build
« Reply #259 on: October 04, 2012, 08:47:20 AM »
Good times!  Great read Dave!
Kootenay Volkswagen Society

Offline owdlvr

  • Dave Hord
  • *
  • Posts: 1422
  • Karma: 10
    • Classic Car Adventures
Re: Dave's 1971 1302 Not-So-Secret, Secret Project Build
« Reply #260 on: October 11, 2012, 01:38:16 PM »
Last weekend I was digging through Jimz Volkswagen parts collection when he showed me these. Wouldn't take a penny for them, even though I tried. I was (and am) super, super excited about them...they'll display quite well with the car for those times when I'm forced to park somewhere ;-)

Thanks again Jim!


-Dave
--
'71 Type 1 - Rally Car Project
'75 Type 1 - Heirloom
'95 F150 - Unfortunate daily driver...

Offline buddy boy

  • *
  • Posts: 1303
  • Karma: 5
  • Marked for life
Re: Dave's 1971 1302 Not-So-Secret, Secret Project Build
« Reply #261 on: October 11, 2012, 11:40:08 PM »
Rad !!! .., i have i few old oil cans

"only dead fish swim with the stream"

Offline owdlvr

  • Dave Hord
  • *
  • Posts: 1422
  • Karma: 10
    • Classic Car Adventures
Re: Dave's 1971 1302 Not-So-Secret, Secret Project Build
« Reply #262 on: October 18, 2012, 12:50:06 AM »
The operating temperature of my setup is heavily influenced by air temperature, skid plate, traveling speed and/or oil cooler ducting. One downside of my situation is that I haven't built an absolute race car, nor have I built a street car. The setup is initially quite sensitive to air temperature, and flow through the duct over the oil cooler. I'm starting to get a good feeling for the relationship between the two, and thus have different 'block-off-plates' for the duct opening in the side window. Once I mounted the skid plate, however, the block-off plates became unnecessary as the engine runs hotter and thus becomes fully controllable (temperature wise) by the oil cooler and fan combo. The hot summer days we got at the end of August, however, were causing oil temps of 240 when I was really pushing it. I anticipate I'm going to want a couple of skid plate options available to use. A solid plate, whenever possible for maximum protection, and a second plate with more airflow for the hotter days. Going into winter, though, I think I'm going to need to look at installing an oil-tank heater to speed cold weather warmup!

And, speaking of warmup, I started working on dialing in some items for winter today. The stock heater linkages were interfering with the Kafer bar setup, so the first job was under the car to shift things around, bend a bit of the stock heater linkage and confirm it all worked. No photos, as I think I've put enough of that area in this thread already! Following that, it was onto the gas heater where I simply had to adjust the ducting, and add some foam to try and stop the cold air blowing around the ducts into my lap. The air-conditioning was nice in the summer, but it's getting a little chilly in the mornings now!

You might, at this stage, think I've got more then enough heat in the car...and you're probably right. I've had my racing seats in my daily driver for the last 9 years, and ever since I popped them into my Audi I've missed the heated seats. I always thought about putting elements into the racing buckets, but it almost seems like blasphemy. A few weeks ago, when I was on the Fall Freeze, I was thinking about how nice heated seats would be on a sore back, and how much I loved it driving home from skiing. I suppose the 3500km in two weekends helped me remember what a sore back was like! As luck would have it, Geoff was selling some heated seat kits when I returned home...well, why not?

But first, we must do a temporary install on one seat to see if I really want to do this...


The elements were laid into the seat for initial trimming. On this first install, I'm going to install them behind the padding instead of right under the cover like a traditional seat. Traditional seat covers, whether fabric or leather, are usually fairly heavy. The covers on my race seats are almost t-shirt thin. The foam padding, before you sit on it and compress it, is only about 1/4-3/8" thick...so I believe the heat should pass through. If I get a bit of warmth, but not good and hot, I'll try the elements right under the cover. But for now, this temporary fitting requires no holes sewn.


This probably isn't FIA approved...but the switch is convenient to reach, and subtle enough to not be noticed.


I thought this would be funny to post. Not my usual wiring standard! Since this is a temporary test, I left the kit wiring harness intact. If I decide to keep the warmers, I'll trim the harness down to it's bare minimum, mount it to the seat frame properly and put in a nice connector. When finished you won't be able to see any wires except for a short piece going from the floor up to the seat track. At the moment I wired the seat heater into the reverse light circuit, since the relay was right behind the driver's seat and I can go without for a day. Tomorrow morning should give me a good test to see if I'll keep 'em.

-Dave
--
'71 Type 1 - Rally Car Project
'75 Type 1 - Heirloom
'95 F150 - Unfortunate daily driver...

Offline number3

  • Rob Frose
  • *
  • Posts: 395
  • Karma: 2
    • http://www.avrparts.com
Re: Dave's 1971 1302 Not-So-Secret, Secret Project Build
« Reply #263 on: October 19, 2012, 01:38:01 PM »

You might, at this stage, think I've got more then enough heat in the car...and you're probably right. I've had my racing seats in my daily driver for the last 9 years, and ever since I popped them into my Audi I've missed the heated seats. I always thought about putting elements into the racing buckets, but it almost seems like blasphemy. A few weeks ago, when I was on the Fall Freeze, I was thinking about how nice heated seats would be on a sore back, and how much I loved it driving home from skiing. I suppose the 3500km in two weekends helped me remember what a sore back was like! As luck would have it, Geoff was selling some heated seat kits when I returned home...well, why not?

But first, we must do a temporary install on one seat to see if I really want to do this...


The elements were laid into the seat for initial trimming. On this first install, I'm going to install them behind the padding instead of right under the cover like a traditional seat. Traditional seat covers, whether fabric or leather, are usually fairly heavy. The covers on my race seats are almost t-shirt thin. The foam padding, before you sit on it and compress it, is only about 1/4-3/8" thick...so I believe the heat should pass through. If I get a bit of warmth, but not good and hot, I'll try the elements right under the cover. But for now, this temporary fitting requires no holes sewn.


This probably isn't FIA approved...but the switch is convenient to reach, and subtle enough to not be noticed.


I thought this would be funny to post. Not my usual wiring standard! Since this is a temporary test, I left the kit wiring harness intact. If I decide to keep the warmers, I'll trim the harness down to it's bare minimum, mount it to the seat frame properly and put in a nice connector. When finished you won't be able to see any wires except for a short piece going from the floor up to the seat track. At the moment I wired the seat heater into the reverse light circuit, since the relay was right behind the driver's seat and I can go without for a day. Tomorrow morning should give me a good test to see if I'll keep 'em.

-Dave

I run the exact same set up in my 914.  I will install them in every old car I ever own from this day forward.  An added bonus is it keeps the female passenger happy which is great for the Spring Thaw.

Offline owdlvr

  • Dave Hord
  • *
  • Posts: 1422
  • Karma: 10
    • Classic Car Adventures
Re: Dave's 1971 1302 Not-So-Secret, Secret Project Build
« Reply #264 on: October 22, 2012, 12:09:50 AM »
Couple of minor updates...

Forgot to post up the pedal set a while back. I do a tonne of left foot braking, and have always loved a larger middle pedal. I mounted these up a while back, but forgot to post some photos. The angle cut lets my size 12 shoe escape the gas pedal for those times when I need to heel-toe.


I also decided to man-up this week. I have no fear of anything mechanical, but tuning the carbs still makes me lose sleep. I guess its like my last frontier...I can get 'em running, and do some gross adjustments, but I set 'em up rich to avoid melting down the motor. Time to step up my game!


...course, fitting this into the bug is going to be interesting. Innovate's first instruction is "zip tie the LC-1 under the car..." um, no. That's not going to work.


Oh hey, I think I'll install a gauge, shouldn't be too big a deal!


The first 15min...


An hour later (not exaggerating), and the harness is through. Stupid foam.


Tucked up beside the carb, away from the rocks.


And, somehow, it would appear I forgot shots of the dash. Whoops.

-Dave
--
'71 Type 1 - Rally Car Project
'75 Type 1 - Heirloom
'95 F150 - Unfortunate daily driver...

Offline owdlvr

  • Dave Hord
  • *
  • Posts: 1422
  • Karma: 10
    • Classic Car Adventures
Re: Dave's 1971 1302 Not-So-Secret, Secret Project Build
« Reply #265 on: November 14, 2012, 11:58:10 PM »
hahaha. that's awesome.

--------

Well, now that I'm back from SEMA and mostly caught up I figured I would actually tackle the tuning of the bug. With the wideband hooked up I'm far less worried about blowing up the motor, so I poured a glass of wine, hooked up the laptop and pulled out the screwdrivers. I just getting started when something caught my eye, something I would have never caught without the Weber doors. Seems my 3/4 accelerator pump cover lost the pivot pin. Crap! Where am I going to get a replacement for that?

Oh wait...what's that on the Colt?


Spare, genuine, Weber parts! Fortunately Empi's Chinese suppliers are good 3D photocopiers, and the Weber pump cover popped right on without problems.


With that, it was back to tuning. The way the carbs were originally setup up (by ear, and rich). I was running at 11.5:1 at idle, dropping to 10.5 under full load. In other words, very rich! With the Wideband I was able to set up the sitting idle at 13.5:1. The result of which means when I'm driving around town I'm seeing anywhere from 13.5-14.5 under partial throttle/loads, and then going to a 12:1 ratio under full load. WOW what a difference. I seriously should have done this months ago. It's crisp, any of the running issues or quirks are gone, and it's got significantly more power. Took a buddy out in the car (who's been in it lots) and after a single pull on the highway he was asking about what new parts I had put in the engine.

Of course, now that I have a Wideband setup, I need to figure out how to protect it from gravel...


Vibrant Performance & DCI Heat Shielding to the rescue. Technically I'm not using the product as designed, and I will need to build something a little more robust down the road...but Totem rally (snow and ice) is this coming weekend and I needed a quick fix to last a few days. This material is rock solid with the curve, and even my ball peen hammer wasn't making a mark. That pretty much tells me it will be folded around the O2 sensor by the end of the weekend, but probably won't allow the sensor to be damaged :P


I picked up enough of the material to protect the exhaust wrap on the muffler as well, but will wait until after the weekend to re-do the wrap. Snow tires should be here tomorrow, and I can finish packing the car for the event. I won't be racing this one (I'm event steward) but at least I will get out for some fun roads and winter sliding.

-Dave


--
'71 Type 1 - Rally Car Project
'75 Type 1 - Heirloom
'95 F150 - Unfortunate daily driver...

Offline bwaz

  • brian waz
  • Full Member
  • Posts: 2640
  • Karma: 16
Re: Dave's 1971 1302 Not-So-Secret, Secret Project Build
« Reply #266 on: November 19, 2012, 02:19:36 PM »
brian waz

Offline owdlvr

  • Dave Hord
  • *
  • Posts: 1422
  • Karma: 10
    • Classic Car Adventures
Re: Dave's 1971 1302 Not-So-Secret, Secret Project Build
« Reply #267 on: November 29, 2012, 11:46:15 PM »
Well, Totem Rally didn't exactly work out as planned. The event started out well enough...I had great drive up, and Saturday was a tonne of fun. The morning stages were mostly gravel due to warmer temperatures, but as we climbed up in elevation we got to see some colder temps and 'old snow'. The car started to feel 'right', and I was getting used to it on the slippery stuff which was a relief beyond reliefs.

See, I swapped from super-stiff sidewall summer performance tires to snow tires, and then immediately left on a five hour drive over the Duffy Lake road to the rally start. The entire trip the car felt like it was trying to kill me. You'd turn the wheel, the car would turn in...followed by the sidewalls flexing and then it would REALLY turn in. Horribly unpredictable and near deadly before I wisely calmed down.

But yes...by mid-day Saturday, I was back to getting along with the car on all surface types.


Saturday afternoon was a blast. Mud, gravel, a bit of snow and then a "late on transit" night time blast through mud and ice with the odd fallen tree. Fun is seeing a downed tree, hitting the brakes and having to do the split-second determination of whether a) you lost all brakes on the car 'somewhere back there' or b) that's ice, not water and you have no grip. Oh yes! B. Quick, adapt! Alas, a stage later and the fun was over.

The last two stages for the day were cancelled due to multiple road blockages. I came upon the rally group as they gathered at a bridge, and stopped the car. I left it idling as I got out and walked four cars down the row to get the latest update. A brief chat, and walking back to the car I noticed the air had a lot of exhaust vapor. Wait, "is that my car making all that smoke?" OH #$%!!!!!!!!! It is! We're talking blown-motor, can no longer see the cars parked around me smoke-show. I jumped in, oil-pressure light was on, and shut it off just as my brain registered the 0psi on the oil pressure gauge.

Checked the oil tank, it was completely empty. Checked under the car, as best we could with flashlights, no major oil leaks that we could find...though the skid plate was coated oil. I filled the oil tank with the 5L extra I had and started the car. After about 20 seconds, the oil pressure light went out and 20psi popped up on the gauge. (this, for the record, is normal procedure when filling the system from dry). While the procedure determined the oil system was working, there was no diagnosing where all the oil disappeared to. Thus, I had sweep rope-tow me 40km to the highway, where we dumped the car. From there I had a 14 hour towing adventure with borrowed vehicles and dropped the car off at the AVR farm like a surprise present.

I met the guys who owned this Mercedes about 10min before they offered to loan it to me for an overnight towing adventure...a bit nuts on their part, but I wasn't going to complain!


Getting the car on and off the trailer, however, required some creative techniques.


That was two and half weeks ago, and finally last Friday I was able to pickup up the car and bring it home. Driven hard, and put away wet, this cleanup was going to suck. It started with a $10 trip to the car wash, where I thought I had gotten most of the mud off. Once it was on axle stands in my garage, however, I realized how much more mud there was...


So, a second wash in my garage...and then the floor...and then I could start on tear down.

Yeah...that's probably not a good sign:


I'm seriously thinking of switching to track racing. This is just brutal :P


Now, I suppose at this point I should mention the magical beast which is my oil system. See, when the motor blew deep in the woods of Lac La Hache we found no oil in the tank, and added 5L. When I pulled the car off the trailer, however, the tank was overflowing onto the floorboards. The breather tanks were overflowing into the engine bay and the actual engine had half a dipstick worth in it. Now I have all the oil I was missing, PLUS the extra 5L! After some thought, it seemed pretty clear the scavenge stage of the oil pump must have failed and it was no longer removing oil from the engine. Once the system had pumped all the oil into the engine, there was none left to pull from the tank and thus zero oil pressure. The heads would have been stuffed full, and thus we get the massive smoke show.

But here's the trick shot. The BugPack oil pump is 100% a-okay:


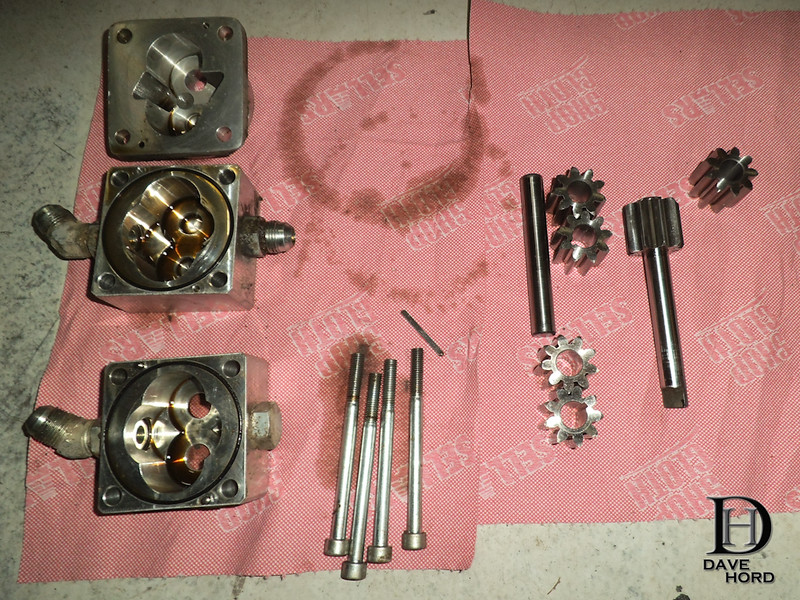
So what happened? And why did 'it' fail, and then start working again (as evidenced by the pump emptying the engine and overflowing everything else)?

So far I've managed to disassemble the entire engine and I've found no clues. The pistons and cylinders are perfect, the main bearings look like they're barely used. The rod bearings look like they've been run for about 20min, the cam bearings are basically new and the lifters and cam are also perfect. The pickup is tight, and clear. I still need to test the line from the pump to tank, but that's not a very likely failure point. It's a total mystery. At this stage I'm going to have to reassemble and simply not leave the car idling without being in the driver's seat.

On the plus side, my heads are beginning to show the 65,000+ miles they have on them. The combustion chambers cleaned up nice, but when I pulled the valves for a cleaning I found two guides with lots of play and one guide broken (with bits missing) in the exhaust port. The heads are going to visit Darren (K-Roc) for a much needed 'refresh' while I continue to clean the mud and oil off of every component from the front bumper to the rear bumper.

Track racing seems like it would be a whole lot cleaner...

-Dave
--
'71 Type 1 - Rally Car Project
'75 Type 1 - Heirloom
'95 F150 - Unfortunate daily driver...

Offline josh

  • *
  • Posts: 2248
  • Karma: -17
Re: Dave's 1971 1302 Not-So-Secret, Secret Project Build
« Reply #268 on: December 01, 2012, 09:18:00 AM »
I don't know how you do it man! It's like a full rebuild after every time out....that's gotta get a bit old!

Strange about the oil issue...I hate it when you have to chase intermittent problems that come and go as they wish :41:
55 ragtop T1
56 kombi T2

Offline owdlvr

  • Dave Hord
  • *
  • Posts: 1422
  • Karma: 10
    • Classic Car Adventures
Re: Dave's 1971 1302 Not-So-Secret, Secret Project Build
« Reply #269 on: December 04, 2012, 02:59:24 AM »
I don't know how you do it man! It's like a full rebuild after every time out....that's gotta get a bit old!

Initially I was super frustrated about it, but when you see things like how much mud was on the cylinder heads...it's probably a good idea to be pulling the motor after any muddy event. I don't think I want to be pulling the engine down to a bare case though!

Quote
Strange about the oil issue...I hate it when you have to chase intermittent problems that come and go as they wish :41:

Yeah, that part...not going to be so much fun :P

----

Engine is reassembled and ready to go in tomorrow after I get some help lifting it off the stand. I ended up getting the wrong exhaust gaskets for the muffler to pipes, so I'll probably be making a set of four tomorrow. Fun!


I re-wrapped the exhaust again, for the third time. Every time I hit gravel it tears the wrap and start little flaps of wrap hanging down from the muffler. Thus, this time I decided to do something about it.


The metal sheet is aluminum heat-shield from DCI Performance Products in Australia. Trimmed to fit, it should make a nice stone guard to keep the rocks from tearing up the heat wrap.

...and in place:


it's going to be a smoke-show for a while after start-up, the muffler has a nice coating of oil inside all of the internals. I tried to clean it out with some degreasers, but doesn't appear to have been too effective. So tomorrow I'll figure out gaskets, hopefully install the motor, and start cleaning the interior mess. Should fire the car back up on Wednesday if things go to plan.

-Dave

--
'71 Type 1 - Rally Car Project
'75 Type 1 - Heirloom
'95 F150 - Unfortunate daily driver...