Author Topic: Project Canadian Bucket  (Read 15654 times)

0 Members and 1 Guest are viewing this topic.

Offline silas

  • *
  • Posts: 6822
  • Karma: 20
    • Some cool videos...Check them out!!
Project Canadian Bucket
« on: January 03, 2004, 02:40:58 PM »
i bought this 1956 oval ragtop in poco in april of '99. i have been driving it daily up until last year, long trips to the island and down to seattle included, with no problems. this is my 5th bug, my first oval, and my first body off pan rebuild. i hope to do a majority of the work myself, but will most likely leave the paint for a proffesional. the car will be painted it's original colour, L315 jungle green, will appear stock in most every way (bumpers, trim, vent windows, etc). the front will be lowered and slightly narrowed, the rear will remain stock, detailed fuchs all around, 145's in front and 205/70's in the back, mild 1776 for cruising, and a top-secret interior is planned as well. work will be slow but steady, and i will be asking you all a ton of questions and posting updates as they happen. cheers. silas.


the og pan. new pan halves required.


Offline Geoff

  • *
  • Posts: 8394
  • Karma: 441
    • http://airspeedparts.com
Project Canadian Bucket
« Reply #1 on: January 03, 2004, 02:56:49 PM »
Nice to see ya got some pic's up. Looks like you got striped down to the bare bones, i remember those days. I thought i'd never get it finished,what a acomplishment once your done.
Keep us posted.

Russ

Project Canadian Bucket
« Reply #2 on: January 03, 2004, 06:39:29 PM »
wow,i love pics like this it shows how much work goes into something before it's done.
good luck
russ

Offline Project Decade

  • Full Member
  • Posts: 323
  • Karma: -16
Project Canadian Bucket
« Reply #3 on: January 05, 2004, 04:04:06 PM »
That's where I started 10 years ago with my car right down to the last bolt. It takes lot's of time and money let me tell you. I still have not finished the car yet, but soon it will be done and ready to go. Good luck with the car and keep the pictures coming. :D  

Offline silas

  • *
  • Posts: 6822
  • Karma: 20
    • Some cool videos...Check them out!!
Project Canadian Bucket
« Reply #4 on: January 09, 2004, 04:09:07 PM »
there is something i really dig about this picture. i think the only unrestored piece on my car will be these vin tags. i just really like the look of them. totally untouched after all these years. they're like the cars dog tags, it's true identity and place of orgin.

the blue is p/o paint job. the green is the og colour of the car, L315 jungle green, and the graffity is from some german in the factory in 1956.


Offline steveo_32

  • Gonna'own em all one day!
  • *
  • Posts: 2049
  • Karma: 3
  • Waz up
Project Canadian Bucket
« Reply #5 on: March 08, 2004, 06:04:51 PM »
I have the excact same color on my 1956 std, with the same writting behind the vin tag
Nice project good luck!~ :)  
1958 Samba 23 Window
1963 Ghia
1965 type 3 wago
1971 KG14 convert
Looking for a barn find oval!! something un-screwed with(or split)

Offline silas

  • *
  • Posts: 6822
  • Karma: 20
    • Some cool videos...Check them out!!
Project Canadian Bucket
« Reply #6 on: March 08, 2004, 07:54:37 PM »
hey steveo, got pics?

is it og or respray? how about the interior?

just curious as to the look and colour combo's.

cheers

Offline ehos

  • Full Member
  • Posts: 257
  • Karma: 0
Project Canadian Bucket
« Reply #7 on: March 08, 2004, 08:16:24 PM »
Took me 7 years for mine.  Good luck and have fun with it! :)

Remember, DO NOT Sandblast the doors.  That was the only mistake I made on mine.  Por15 is your friend :)
 

Offline steveo_32

  • Gonna'own em all one day!
  • *
  • Posts: 2049
  • Karma: 3
  • Waz up
Project Canadian Bucket
« Reply #8 on: March 18, 2004, 06:28:31 PM »
I transfered pic's from a digital camera but cannot find how to post them ................guess i should read some of these paper things that came with this computer. But mine is jungle green just like yours same # behind tag and i changed both clips F and R but it looks the same send my your email and i can transfer my picts to ya! I can also mix your paint in ppg if you need (i added a little bit on metalic to mine looks sweet)
Cheers! B)  
1958 Samba 23 Window
1963 Ghia
1965 type 3 wago
1971 KG14 convert
Looking for a barn find oval!! something un-screwed with(or split)

Offline silas

  • *
  • Posts: 6822
  • Karma: 20
    • Some cool videos...Check them out!!
Project Canadian Bucket
« Reply #9 on: March 18, 2004, 07:12:49 PM »
*update*

the shell is at the blasters, as well as a hood that i will use for patch peices , heater channels, and rear inside quarters and crossmember. walnut shells and then sand. should have it back by saturday and epoxy primed sunday. i'll post pics sunday or monday.

Offline ehos

  • Full Member
  • Posts: 257
  • Karma: 0
Project Canadian Bucket
« Reply #10 on: March 18, 2004, 07:36:49 PM »
How much to get it all blasted?

Back in the day it was 100 for my whole oval.  Just curious as to where prices have gone since then.

You didn't get the doors sandblasted did you?? :)

Offline silas

  • *
  • Posts: 6822
  • Karma: 20
    • Some cool videos...Check them out!!
Project Canadian Bucket
« Reply #11 on: March 18, 2004, 08:59:51 PM »
i havent received the bill yet. but it's gonna be alot more than $100.

no doors, not yet anyway. just shell, hood, channels and two 12\"x12\" replacement panels. i think blasting doors is allright as long as the person doing it knows what they're doing. this guy that i'm going to does know what he's doing. he hits it all w/ walnut shells to remove paint and filler, and then sandblasts to remove rust and give the metal a proper tooth so the primer will take. warping doors is caused by someone doing something they know not how to do correctly. there is a specific technique to sandblasting and when used correctly is the only way to go.

Matt

Project Canadian Bucket
« Reply #12 on: March 18, 2004, 10:14:14 PM »
Silas,
I am interested in a contact here. who are you using, and what cost do you think it will run?? I have a body I wanna blast too.

Matt

Offline silas

  • *
  • Posts: 6822
  • Karma: 20
    • Some cool videos...Check them out!!
Project Canadian Bucket
« Reply #13 on: March 18, 2004, 11:36:26 PM »
Quote
Silas,
I am interested in a contact here. who are you using, and what cost do you think it will run?? I have a body I wanna blast too.

Matt
hey matt, the car is at airstrip in richmond. 604-270-7665. talk to jerry or karen. i had been there before with a friend to drop cars off, and had met them both and they are very nice and helpfull. when i dropped my shell off i had a good chat w/ jerry. he showed me around the shop, the walnut blasting booth and the sand blasting booth and talked alot about the process they use. he said that they are the only (or one of the few) places w/ a walnut shell process. it seems like the best and logical way to do it. the sensitivity of the walnut shells are just enough to take the paint & filler off, but not to abrasive enough to warp panels.

i didnt really call or shop around, i just went w/ airstrip because of their good rep and the fact that i'd seen their work and met them. i'll post pics of the car down to bare metal and after primer probably on sunday night.

as for price, jerry said it's about $1500 for the whole car (doors, decklid, hood, shell, pan). he said around $800 for all the stuff i took in. he also said it is still way cheaper than dipping and as cheap as other places.  

Matt

Project Canadian Bucket
« Reply #14 on: March 22, 2004, 11:00:34 AM »
Silas did you get your car back already??? I'm itchin to see some pics...

Offline silas

  • *
  • Posts: 6822
  • Karma: 20
    • Some cool videos...Check them out!!
Project Canadian Bucket
« Reply #15 on: March 22, 2004, 05:03:03 PM »
well, i was supposed to pick it up saturday and primer it sunday, so on friday i called to confirm pick up, and their damn compressor had blown up. they quickly got it fixed/replaced and i picked up the car today.

it looks awesome. they did a great job. i didnt find any surprises (anymore than i knew were allready there). previous owners s#!tty bodywork and rust holes that i had known about are all more visible. i'm quite happy with the way it turned out.

so, i'm home now for a bit and then back to the garage tonight to spray epoxy primer and take pics. i will post them later tonight or tomorrow. B)


ps. i could not have asked for a nicer day to move a car that is bare metal. sun, shades and vw's.......oohhhhhyeah.

Offline jim martin

  • If something is priced to good to be true ,do yourself a favour. DONT be a IDIOT and BUY IT
  • *
  • Posts: 1406
  • Karma: 1
    • http://www.dialedinperformance.com
Project Canadian Bucket
« Reply #16 on: March 22, 2004, 08:17:26 PM »
thats great silas ,put some pictures up id love too see them !!
but get that primer on first then take those photo's , i hate rust!
unless its on a honda


the 'WOK" June 2006 Hot VW's feature car  9.830 sec at 143.44 mph.
Sponsored by : LUCAS OIL PRODUCTS   www.lucasoil.com
KROC head porting services
Dialedinp

Offline silas

  • *
  • Posts: 6822
  • Karma: 20
    • Some cool videos...Check them out!!
Project Canadian Bucket
« Reply #17 on: March 23, 2004, 04:18:40 PM »
epoxy primer went on last night. the late night ghetto garage with the door open and a 13hp 2 stage gas engine compressor whirring away didnt seem to disturb the neighbours. i have taken a ton of pics, i just need some time to upload them and post them.

hopefully later tonight after work i will get them up.  

Offline silas

  • *
  • Posts: 6822
  • Karma: 20
    • Some cool videos...Check them out!!
Project Canadian Bucket
« Reply #18 on: March 24, 2004, 12:42:33 AM »
f@#k, thesamba.com gallery is down. i'll try again in the morn.

Offline silas

  • *
  • Posts: 6822
  • Karma: 20
    • Some cool videos...Check them out!!
Project Canadian Bucket
« Reply #19 on: March 24, 2004, 02:40:12 PM »
allright, picture time.

this is how i moved the car to and from the blasters. 14' cube van from uhaul. they dont have car trailers that i could use legally to haul the shell and i was also slightly concerned about the weather, especially after the blasters when the car was bare metal. the car fit fairly well at an angle, but about 3\" of the rear apron stuck out the back so the door wouldnt fully close. i solved this problem by putting a tire on the floor of the box, closing the door on it and using a tie down to hold it closed.


i told the blasters to not worry to much about cleaning up the front because it is beyond repair and it will be cut off and replaced with a donor clip. this is why there is still og paint and p/o (previous owner) paint up there.


you can see the rear corners need some work. the blasters were thorough, however, they missed a couple small spots, nothing to be worried about tho.


some fancy ass body work by the p/o on the bottom rear passenger quarter and rear passenger bumper bracket :angry: mmmmmmm...brazing.


smooth as butta.


one last shot before i get ready to blow out the excess sand, and man i'm telling you, if you have had a car blasted, you know what i'm talking about. if you havent and want to, prepare for sand to come out of every orifice of the car. buckets of the stuff. wear proper eye, ear and respirator gear. that stuff is messy.


this guy reminds me of that scene in back to the future when marty mcfly dresses up as this crazy space alien comic book character and busts into his dad's (in the past) room and scares the crap out him w/ blazing heavy metal. the sole purpose was to scare his dad into asking his mom to the prom, or else. anywho, thanks for the help tod, would've been f@#ked without you.


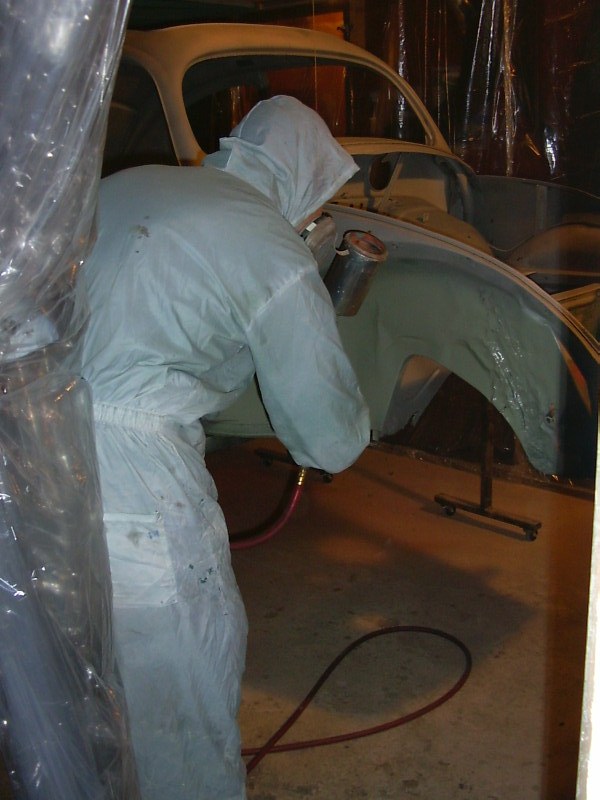
wow, my car is one colour again. the epoxy primer looks goldish/green in this pic, and it says grey on the can, but it is actually a light green.


there are a few runs because in some spots it was layed on pretty thick. it was dark so it was hard to tell in some places if it had been covered or not. better to have to much rather than not enough. it was a late night job in a residential neighbourhood just off main street, and when we were done, we were both happy that no one had called the cops on us for stinking up the joint and making so much noise. i'm not worried about the hangers, they will all be sanded out. the main thing is that the car got a good coat to protect the metal.


i'm not to sure what happened to the area in the middle of the pic. it almost looks like someone hammered the body to fit in a 5 speed. again, i'm not to worried about that. i'll either hammer and dolly the crap out of it, or leave it.


and there she is, in all her epoxy primed glory. i have taken a slew of pics of all the troubled areas aswell, but i will post those as the work progresses. the whole process worked out really well, and i'm happy w/ the blast and the prime, and now excited to have at the body.


Matt

Project Canadian Bucket
« Reply #20 on: March 24, 2004, 06:17:33 PM »
lookin good Silas!!

Offline jim martin

  • If something is priced to good to be true ,do yourself a favour. DONT be a IDIOT and BUY IT
  • *
  • Posts: 1406
  • Karma: 1
    • http://www.dialedinperformance.com
Project Canadian Bucket
« Reply #21 on: March 24, 2004, 06:20:30 PM »
looks great all cleaned and primerd up-seams like it had a five speed in there the way the tunnels all pounded up.
most of those rusted area's are a snap too repair,as you've  seen i'm all over that stuff.
#1 point lets find some good panels too start with and pick 1 battle at a time.
see if airspeed has any more old patch panels they seam too be a better fit and a higher quality.
i have cataloges from the 2 main vintage guys in the states as well as koches too .the price for those parts is very reasonable , but getting good replacement pieces is the key!!
might even try too locate someone scrapping some older cars too get the lower frame rails etc ,may work out better.
give me a call you know were i am friday ,
no you will never have a reason too say i have nothing too do!!!!
did you do the pan ??


the 'WOK" June 2006 Hot VW's feature car  9.830 sec at 143.44 mph.
Sponsored by : LUCAS OIL PRODUCTS   www.lucasoil.com
KROC head porting services
Dialedinp

Offline silas

  • *
  • Posts: 6822
  • Karma: 20
    • Some cool videos...Check them out!!
Project Canadian Bucket
« Reply #22 on: March 25, 2004, 04:08:52 PM »
thanks matt & jim.

the pan was not done. 1 stage at a time for me. the body will be handled first, then the hood, decklid, & fenders and then the pan.

i've got heater channels allready and they will be the first to go in. after that i will be picking a section and working it until i'm satisfied and moving to the next, and so on.

i will be making a list on the replacement panels that i need and calling airspeed for recommendations on quality repro panels.

if anyone sees a '59 and earlier front clip from the rear of the gas tank forward for sale, i am interested. i'm pretty sure front clips for ovals and beetles up to '59 are the same and then they change ever so slightly.

i will indeed be kept very busy w/ this project for quite some time. it is a learning process, and i'm in it for the long haul.

Offline silas

  • *
  • Posts: 6822
  • Karma: 20
    • Some cool videos...Check them out!!
Project Canadian Bucket
« Reply #23 on: June 12, 2004, 03:47:24 PM »
allright, just so you all know that i havent been asleep at the wheel, here are some updates.

first point of business is to remove the old heater channel. one side at a time now. i took plenty of measurements and pics to reference for later and to check to make sure everything is where it should be.

this is what a buddy of mine calls the \"iron fortress\". angle iron tack welded to the door pillars to insure that nothing moves.

http://www.thesamba.com/vw/forum/album_pag...hp?pic_id=76106

after i was confident that this would keep the cars geometry correct, it was cuttin time. here is a pic of the old drivers side heater channel out of the car. what a mess. pretty must non-existent at the back end and severly pooched throughout. i hung it on the wall of the garage much like a hunter hangs the head of his kill on his den wall.

http://www.thesamba.com/vw/forum/album_pag...hp?pic_id=76107

from inside the car you can see the hole where the heater channel use to be, aswell as the metal (or lack there of) that is the rear crossmember.

http://www.thesamba.com/vw/forum/album_pag...hp?pic_id=76108

now i could of just thrown the new channel in, however there was not much to weld it to. so i decided to drill out the spot welds and cut out the old drivers side crossmember aswell as the corner peice of the bottom of the rear parcel tray. (is that the right word?)

sorry for the blurriness of the pic, i think i was a little taken aback realizing just what i had done.

http://www.thesamba.com/vw/gallery/pix/160631.jpg

now after cutting and fitting and cutting and fitting and measuring and cutting and.....well, you get the idea. i managed to fit the new drivers side crossmember in aswell as cut and fit a peice to go in where the hole was left in the rear corner parcel tray (damn, that word again). the welds arent pretty but they are damn tough. most will be ground down eventually and since this is an area that will not be seen, i'm more concerned with strength and not looks. also, i am a beginner welder. i used 3m zinc rich weld through primer on the lip that attaches the rear crossmember and the bottom rail of the parcel tray. this stuff takes some getting use to. it pops and splats all over the place.

http://www.thesamba.com/vw/forum/album_pag...hp?pic_id=76110

i have mocked up the new channel and it fits great, i just need to deal with where it attaches to the front firewall. that will be included in the next little while.

sorry for the links to the pics, but i'm still posting on thesamba.com, and they wont host pics for other sites.

i'd like to thank jim martin for the weld through primer and for answering all my questions so far. aswell, his buddy/body guru tate and lanny have offered alot of answers to all my questions. i'm a rookie when it comes to  body/metal work, and these guys are a wealth of knowledge and have helped me along the way.

lots more to come. stay tuned. ;)
« Last Edit: June 13, 2004, 10:40:05 PM by silas »

Offline silas

  • *
  • Posts: 6822
  • Karma: 20
    • Some cool videos...Check them out!!
Project Canadian Bucket
« Reply #24 on: July 10, 2004, 03:47:58 PM »
allrighty.

sorry for the links to the pics. if you've been following the story so far you know that our beloved hero (me :P ) uses thesamba.com to host his pics, and that they wont show up here. if the links dont work, tell me and i'll fix them.

well. after cutting, hammering and fitting the drivers side heater channel so it was snug, i welded it in. before i did that tho, i looked up from under the car and inside the front firewall and this is what i saw.

http://www.thesamba.com/vw/forum/album_pag...hp?pic_id=79019

i applied some 3m rust inhibitor (much like rust mort or other brands) to, well, inhibit the rust and prevent it from growing further. here's what it looked like with the 3m stuff on it.

http://www.thesamba.com/vw/forum/album_pag...hp?pic_id=79021

i then sprayed a couple of light coats of tremclad rust paint for extra protection. with the 3m product it says you can topcoat it so i figured what the hey, you cant have to much anti rust protection.

next i fit the new heater channel in and lowered the body down onto the pan. all the body to pan mount holes matched up and i put 1 14mm bolt in the back, 1 14mm bolt half way along and the 2 17mm bolts in the front to make sure it was alligned and started welding.

this is now what the big hole i cut in the back is starting to look like.

http://www.thesamba.com/vw/forum/album_pag...hp?pic_id=79022

welded the new h/c to the a pillar and went to work on the front where it meets the firewall.

this is the front looked like before the new h/c went in

http://www.thesamba.com/vw/forum/album_pag...hp?pic_id=79023

and this is with the new h/c in

http://www.thesamba.com/vw/forum/album_pag...hp?pic_id=79024

and then with a repro front firewall peice, i cut and fitted the bottom 4\"s to go in. again, cut/fit/measure/rinse/repeat. most of the battle is getting the darn donor peice to slide in there. but it did, and quite nicely. again, dont look to closely at the welds. they might burn your retinas. i am improving and i am purposely doing all the inners first so i can get comfortable w/ welding vw metal.

ta-da

http://www.thesamba.com/vw/forum/album_pag...hp?pic_id=79025

and there it is. next up is the other side of the drivers front firewall and the drivers rear 1/4 where it comes down and meets the new h/c.

\"you be beethoven, aill be bach.\" :D


Offline jim martin

  • If something is priced to good to be true ,do yourself a favour. DONT be a IDIOT and BUY IT
  • *
  • Posts: 1406
  • Karma: 1
    • http://www.dialedinperformance.com
Project Canadian Bucket
« Reply #25 on: July 10, 2004, 08:32:26 PM »
looks great , you are doing a fantastic job !!! links too pictures are no problem , they pull up quick
thats the ticket just keep trimming it back slowly till you hit solid metal.
great brace work, very smart.
like you say if you are covering those areas with carpet or interior ,DON'T
waste your time cleaning up the welds , its more hassle than its worth.plus once you give a good shot of sprayable or brushable seam sealer all is hidden.


the 'WOK" June 2006 Hot VW's feature car  9.830 sec at 143.44 mph.
Sponsored by : LUCAS OIL PRODUCTS   www.lucasoil.com
KROC head porting services
Dialedinp

Offline silas

  • *
  • Posts: 6822
  • Karma: 20
    • Some cool videos...Check them out!!
Project Canadian Bucket
« Reply #26 on: July 16, 2004, 01:04:40 AM »
thanks for the encouraging words, jim.

another quick update.

i got to the garage today and was a little bummed out to see some minor surface rust around the welds and the areas around the replacement panels that i have put in. i was a little stumped and kind of pissed to see \"the brown\" (rust), when i'm trying my hardest to get rid of the stuff. so i sat, mumbled some curse words, read a mag, and tried to figure out what to do.

called jim, but the line was busy, so i called lanny and caught him cruising traffic jams in his '67. after a good chat about life and the meaning of it, i gave him a rundown of the mess i found myself in. \"no probs\", he says, in that signature lanny hussey tone, \"clean up those areas and brush on some of that epoxy primer that you have left on the shelf.\" well damn. thats just awesome. at the end of the conversation he mentioned something about having to go because some n. van punk in his moms escalade was egging him on for a race. i saw later on the news that some kid was committed to a mental hospital mumbling the words \"vw.......so......fast......skeered...me....i....lost.....\" but thats another story. :D

so what did i do? followed the doctors orders dammit.

drivers a pillar and front firewall before.

http://www.thesamba.com/vw/forum/album_pag...hp?pic_id=79943

after

http://www.thesamba.com/vw/forum/album_pag...hp?pic_id=79944

drivers rear crossmember and inner quarter and heater channel before

http://www.thesamba.com/vw/forum/album_pag...hp?pic_id=79945

after

http://www.thesamba.com/vw/forum/album_pag...hp?pic_id=79946

so my mind is at ease and i can move on. i sort of gapped on the importance of dressing the area that has been repaired after i'm through with it. i may grind down the welds and clean up these areas in the future, or i may just leave them, but for now at least they're protected.

onward and upward. ;)
« Last Edit: July 16, 2004, 10:27:31 AM by silas »

Offline jim martin

  • If something is priced to good to be true ,do yourself a favour. DONT be a IDIOT and BUY IT
  • *
  • Posts: 1406
  • Karma: 1
    • http://www.dialedinperformance.com
Project Canadian Bucket
« Reply #27 on: July 19, 2004, 11:26:47 PM »
keep it up,slow and steady wins every time.one thing i learned is if you rush something somehow it always ends up looking rushed.your doing a great job,as you now know its alot of work ,but in the end it will all be worth it because you did it !!!!
will talk too you soon,planning on motor assembley this friday,give me a call


the 'WOK" June 2006 Hot VW's feature car  9.830 sec at 143.44 mph.
Sponsored by : LUCAS OIL PRODUCTS   www.lucasoil.com
KROC head porting services
Dialedinp

Offline OUTKAST

  • *
  • Posts: 1908
  • Karma: 3
Project Canadian Bucket
« Reply #28 on: July 26, 2004, 06:48:23 PM »
It is so easy to miss stuff just found you pics today . Looking good silas , :)  :)  :)  :) Iadmire you guys doing full restos they are huge projects but the self satisfaction in the end is well worth it in the end I' m sure . Will check back
Later outkast

Offline silas

  • *
  • Posts: 6822
  • Karma: 20
    • Some cool videos...Check them out!!
Project Canadian Bucket
« Reply #29 on: February 14, 2005, 11:44:03 AM »
allright, time to dust off the cobwebs. B)

my last post was just before i started school and 1st term was crazy & i had absolutely no time to work on the car. now that i'm doing my work experience i've found extra time after work to go to the garage and get some stuff done. yaddayadda...whatev's. :lol:

so the next peice to go in was the bottom part of the b pillar where it meets the h/c on the drivers side. this area has some weird curves and corners and after trying to make a peice i was about ready to give up and search for a donor. luckily, when posting a want add on another forum, some guy named \"hulk\" came up with some great advice. ;)  \"just make it.\" so i went back at it.

after 2 days i came up with this...

tacked in place.


and the next day i checked back to make sure i liked it and welded it in.


imo, it turned out pretty well. my metal shaping tools and skills are beginner at best, but getting better, and with no repro part for sale, it was a hard peice to get done. but it's finished (until i have to do the same thing on the passengers side).

next up, passengers side rear crossmember.